
Feeds
libtool @ Savannah: libtool-2.5.3 released [stable]
Libtoolers!
The Libtool Team is pleased to announce the release of libtool 2.5.3.
GNU Libtool hides the complexity of using shared libraries behind a
consistent, portable interface. GNU Libtool ships with GNU libltdl, which
hides the complexity of loading dynamic runtime libraries (modules)
behind a consistent, portable interface.
There have been 14 commits by 2 people in the 27 days since 2.5.2.
See the NEWS below for a brief summary. An alpha and two beta releases
of GNU Libtool have been released prior to this stable release. Please
view the NEWS entries for those releases for a more complete summary of
the updates between stable releases 2.4.7 and 2.5.3.
Thanks to everyone who has contributed!
The following people contributed changes to this release:
Bruno Haible (3)
Ileana Dumitrescu (11)
Ileana
[on behalf of the libtool maintainers]
==================================================================
Here is the GNU libtool home page:
https://gnu.org/s/libtool/
For a summary of changes and contributors, see:
https://git.sv.gnu.org/gitweb/?p=libtool.git;a=shortlog;h=v2.5.3
or run this command from a git-cloned libtool directory:
git shortlog v2.5.2..v2.5.3
Here are the compressed sources:
https://ftpmirror.gnu.org/libtool/libtool-2.5.3.tar.gz (2.0MB)
https://ftpmirror.gnu.org/libtool/libtool-2.5.3.tar.xz (1.1MB)
Here are the GPG detached signatures:
https://ftpmirror.gnu.org/libtool/libtool-2.5.3.tar.gz.sig
https://ftpmirror.gnu.org/libtool/libtool-2.5.3.tar.xz.sig
Use a mirror for higher download bandwidth:
https://www.gnu.org/order/ftp.html
Here are the SHA1 and SHA256 checksums:
f48e2fcdb0b80f97e93366c41fdcd1ea90f2f253 libtool-2.5.3.tar.gz
kyK9j2vISP2j44WJndGTSVcWllKs73FtGdGdJAU6u5U= libtool-2.5.3.tar.gz
f1450b2f652d9acf3b83eee823cad966a149cca4 libtool-2.5.3.tar.xz
iYARIyzFm2s7u+Mhtgq6nbGsEVeKth7Q3wKZRYFGri4= libtool-2.5.3.tar.xz
Verify the base64 SHA256 checksum with cksum -a sha256 --check
from coreutils-9.2 or OpenBSD's cksum since 2007.
Use a .sig file to verify that the corresponding file (without the
.sig suffix) is intact. First, be sure to download both the .sig file
and the corresponding tarball. Then, run a command like this:
gpg --verify libtool-2.5.3.tar.gz.sig
The signature should match the fingerprint of the following key:
pub rsa4096 2021-09-23 [SC]
FA26 CA78 4BE1 8892 7F22 B99F 6570 EA01 146F 7354
uid Ileana Dumitrescu <ileanadumi95@protonmail.com>
uid Ileana Dumitrescu <ileanadumitrescu95@gmail.com>
If that command fails because you don't have the required public key,
or that public key has expired, try the following commands to retrieve
or refresh it, and then rerun the 'gpg --verify' command.
gpg --locate-external-key ileanadumi95@protonmail.com
gpg --recv-keys 6570EA01146F7354
wget -q -O- 'https://savannah.gnu.org/project/release-gpgkeys.php?group=libtool&download=1' | gpg --import -
As a last resort to find the key, you can try the official GNU
keyring:
wget -q https://ftp.gnu.org/gnu/gnu-keyring.gpg
gpg --keyring gnu-keyring.gpg --verify libtool-2.5.3.tar.gz.sig
This release was bootstrapped with the following tools:
Autoconf 2.72e
Automake 1.17
Gnulib v1.0-803-g30417e7f91
NEWS
- Noteworthy changes in release 2.5.3 (2024-09-25) [stable]
** New features:
- Add 'aarch64' support to the file magic test, which allows for
shared libraries to be built with Mingw for aarch64.
** Bug fixes:
- The configure options --with-pic and --without-pic have been renamed
to --enable-pic and --disable-pic, respectively. The old names
--with-pic and --without-pic are still supported, though, for
backward compatibility.
- The configure option --with-aix-soname has been renamed to
--enable-aix-soname. The old name --with-aix-soname is still
supported, though, for backward compatibility.
- Fix conflicting warnings about AC_PROG_RANLIB.
- Document situations where -export-symbols does not work.
- Update FSF office address with URL in each file's license block.
- Add checks for aclocal in standalone.at and subproject.at test files
that report failures in Linux From Scratch and Darwin builds.
Enjoy!
Drupal Association blog: Introducing the Revolutionary Drupal CMS at DrupalCon Barcelona: A New Era in Drupal with AI-Enabled Website Building
BARCELONA, Spain, 25 September 2024 — This September, the digital world witnessed a groundbreaking moment at DrupalCon Europe in Barcelona ( 23-27 September), as Dries Buytaert, the visionary founder of Drupal, unveils a preview of Drupal CMS in his landmark 40th Driesnote address. This launch isn't just an announcement; We're standing at the threshold of a new era in the Drupal story, marking the most significant evolution since its birth in 2001.
Drupal CMS leverages existing enterprise-grade security and scalability paired with the adoption of AI abilities and revolutionizing user experience with Experience Builder, all wrapped in an easy-to-use interface that any skill level can use.
“The product strategy is for Drupal CMS to be the gold standard for no-code website building,” said Dries Buytaert, Drupal Founder and Project Lead. “Our goal is to empower non-technical users like digital marketers, content creators, and site-builders to create exceptional digital experiences without requiring developers… We are not abandoning Drupal Core, developers, or enterprise users. Drupal CMS is built on Drupal Core, so we need to make sure Drupal Core does well. The way to think about Drupal CMS is a product or strategy that compliments what we already do.”
Drupal CMS: The Future Unveils in Early 2025Imagine a world where the Enterprise-class power of Drupal is not just for the technically adept but is accessible to everyone. This is the reality Drupal CMS brings to the table. Tailor-made to empower marketers, web designers, and organizations, the preconfigured options are the key to effortlessly crafting and managing websites that stand out.
Why Drupal CMS is a Game-Changer-
Smart Defaults and Pre-Built Solutions: Out-of-the-box readiness meets customizable solutions—whether for corporate sites, blogs, or marketing platforms, enriched with advanced site-building capabilities.
-
Seamless Onboarding: The intuitive install process is like having a guide, helping you cherry-pick the features your project needs.
-
AI-Powered Efficiency: With cutting-edge AI tools such as A.I. site migration and alt text creation, site building accelerates as you edit content types, set up fields, craft taxonomies, and more—with AI agents transparently handling various website actions.
-
Advanced SEO: Site builders can easily use powerful SEO features such as sitemaps, focus keywords, metatags, and more with minimal effort
-
Open-Source Power: Drupal CMS thrives on open-source collaboration, harnessing the collective innovation of a global community. Fully customizable and endless extensions prevent vendor lock-in.
Curious minds can explore a demo in the Driesnote today —experience the future of web building firsthand. And stay tuned: the official launch is set for 15 January 2025, with even more innovations on the horizon.
A Responsible Approach to AIIn line with Drupal's open web manifesto, a responsible AI policy ensures every AI feature in Drupal CMS is crafted with ethical considerations at its core—because innovation should go hand-in-hand with integrity.
Join us on this exhilarating journey as we step into the future with Drupal CMS—where imagination meets innovation, and building websites will never be the same.
For a closer look at Dries's presentation and to explore Drupal CMS, watch his full Driesnote.
About DrupalConDrupalCon is the flagship event for the global Drupal community, bringing together thousands of developers, designers, marketers, and business leaders to connect, learn, and share knowledge about Drupal. Held in various cities around the world, DrupalCon features keynotes, workshops, and networking opportunities that highlight the latest innovations in the Drupal ecosystem.
About Dries BuytaertBelgium-born Drupal founder Dries Buytaert is a pioneer in the Open Source web publishing and digital experience platform space. He is the Founder of Drupal, the Open Source software for building websites and digital experiences. Drupal is one of the largest and most active Open Source projects in the world. Dries has been working on Drupal for more than two decades and continues to lead the project today as Drupal's Project Lead.
Real Python: Python 3.13 Preview: A Modern REPL
One of Python’s strong points is its interactive capabilities. By running python you start the interactive interpreter, or REPL, which allows you to perform quick calculations or explore and experiment with your code. In Python 3.13, the interactive interpreter has been completely redesigned with new modern features.
Python’s REPL has remained largely unchanged for decades. Instead, alternative interpreters like IPython, bpython, and ptpython have addressed some of the built-in REPL’s shortcomings, providing more convenient interactive workflows for developers. As you’re about to learn, Python 3.13 brings many significant improvements to the interactive interpreter.
In this tutorial, you’ll:
- Run Python 3.13 and explore the new REPL
- Browse through the help system
- Work with multiline statements
- Paste code into your REPL session
- Navigate through your interpreter history
The upgraded REPL is just one of the new features coming in Python 3.13. You can read about all the changes in the what’s new section of Python’s changelog. Additionally, you can dig deeper into the work done on free threading and a Just-In-Time compiler.
Get Your Code: Click here to download the free sample code that shows you how to use some of the new features in Python 3.13.
A New Interactive Interpreter (REPL) in Python 3.13To try out the new REPL for yourself, you need to get your hands on a version of Python 3.13. Before the official release in October 2024, you can install a pre-release version. After October 2024, you should be able to install Python 3.13 through any of the regular channels.
A REPL, or a Read-Eval-Print Loop, is a program that allows you to work with code interactively. The REPL reads your input, evaluates it, and prints the result before looping back and doing the same thing again.
Note: To learn about the built-in REPL in Python and how it works in general, check out The Python Standard REPL: Try Out Code and Ideas Quickly.
In any version of Python, you can start this interactive shell by typing the name of your Python executable in your terminal. Typically, this will be python, but depending on your operating system and your setup, you may have to use something like py or python3 instead.
Once you start the REPL in Python 3.13, you’ll see a small but noticeable difference. The familiar Python interactive shell prompt, consisting of three right angle brackets (>>>), is now colored differently from the rest of the text:
The color difference indicates that the shell now supports color. In the new shell, color is mainly used to highlight output in tracebacks. If your terminal doesn’t display color, then the new REPL will automatically detect this and fall back to its plain, colorless display.
If you prefer to keep your interpreter free of color even when it’s supported, you can disable this new feature. One option is to set the new environment variable PYTHON_COLORS to 0:
Shell $ PYTHON_COLORS=0 python Python 3.13.0rc2 (main, Sep 13 2024, 17:09:27) [GCC 9.4.0] on linux Type "help", "copyright", "credits" or "license" for more information. >>> Copied!Setting PYTHON_COLORS=0 disables color in the REPL. If you set the environment variable to 1, you’ll get the colored prompt and output. However, since it’s the default, this is rarely necessary.
Before going any further, you’ll exit the REPL. As you may know, the old REPL, that you’ve used on Python 3.12 and earlier, has been widely commented on for the following idiosyncrasy:
Python >>> exit Use exit() or Ctrl-D (i.e. EOF) to exit Copied!The shell clearly understands your intention to end the session. Still, it makes you jump through hoops and add parentheses to your command. In Python 3.13, the REPL now understands special commands that you can write without any parentheses:
- exit or quit: Exit the interpreter
- help or F1: Access the help system
- clear: Clear the screen
Having these commands more easily available is a small thing, but it removes some friction when using the interactive interpreter. You can still use parentheses and type something like exit() if you prefer. These commands are not reserved though. That means that you could shadow them with variable assignments:
Python >>> exit = True >>> exit True >>> exit() Traceback (most recent call last): ... TypeError: 'bool' object is not callable >>> del exit >>> exit Copied!Here you create a variable named exit, effectively disabling the exit command. To end your REPL session, you can either delete the exit variable or use one of the alternative ways to exit the interpreter.
Note: Even with the new improvements, the built-in REPL is not as powerful as some of the third-party alternatives. If you’re already using any of these, there’s no immediate reason to revert back to the standard interactive interpreter.
The main advantage of the new REPL is that it’s installed together with Python. In other words, it’ll always be available for you. This is great if you find yourself in a situation where you can’t or don’t want to install a third-party library.
You can learn more about the alternative interactive interpreters in the following tutorials:
- Unlock IPython’s Magical Toolbox for Your Coding Journey
- Discover bpython: A Python REPL With IDE-Like Features
- Boost Your Coding Productivity With Ptpython
You can also read more about alternative REPLs in the guide to the standard REPL.
Read the full article at https://realpython.com/python313-repl/ »[ Improve Your Python With 🐍 Python Tricks 💌 – Get a short & sweet Python Trick delivered to your inbox every couple of days. >> Click here to learn more and see examples ]
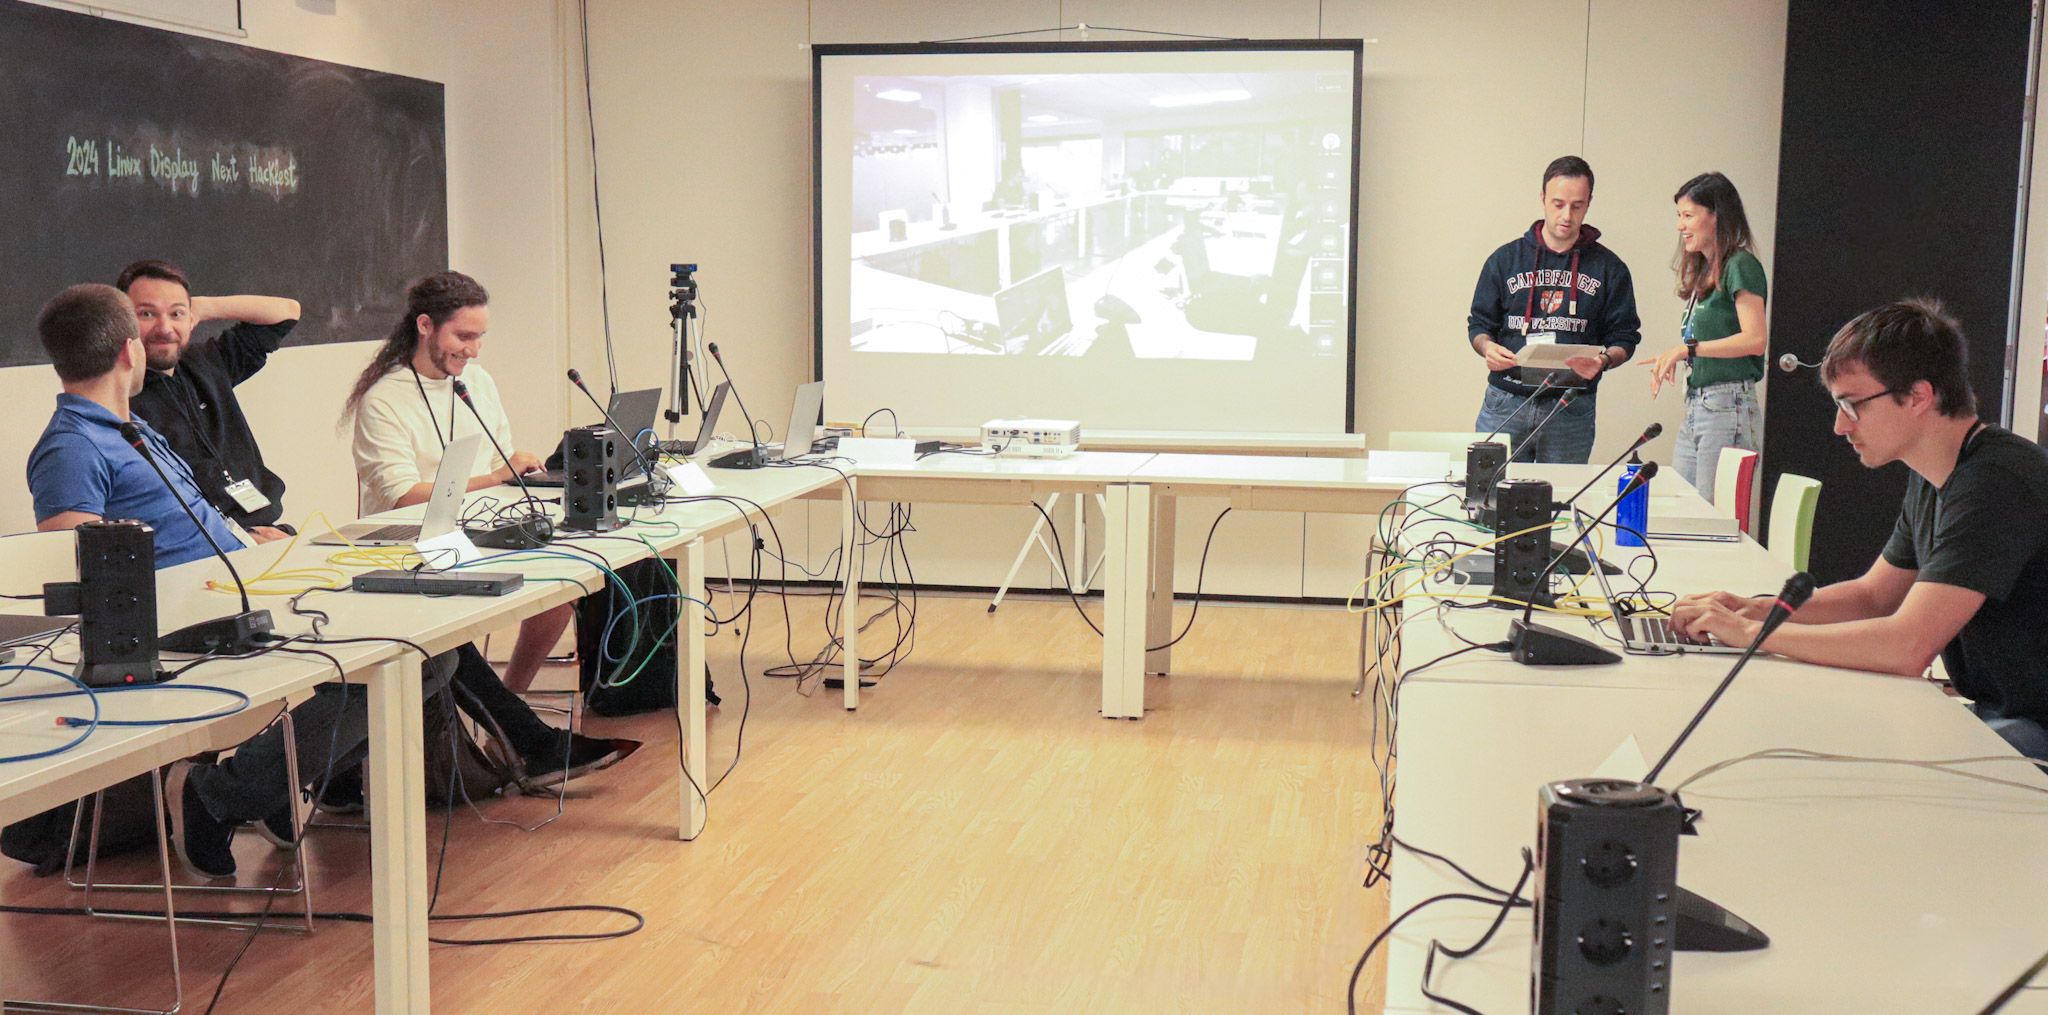
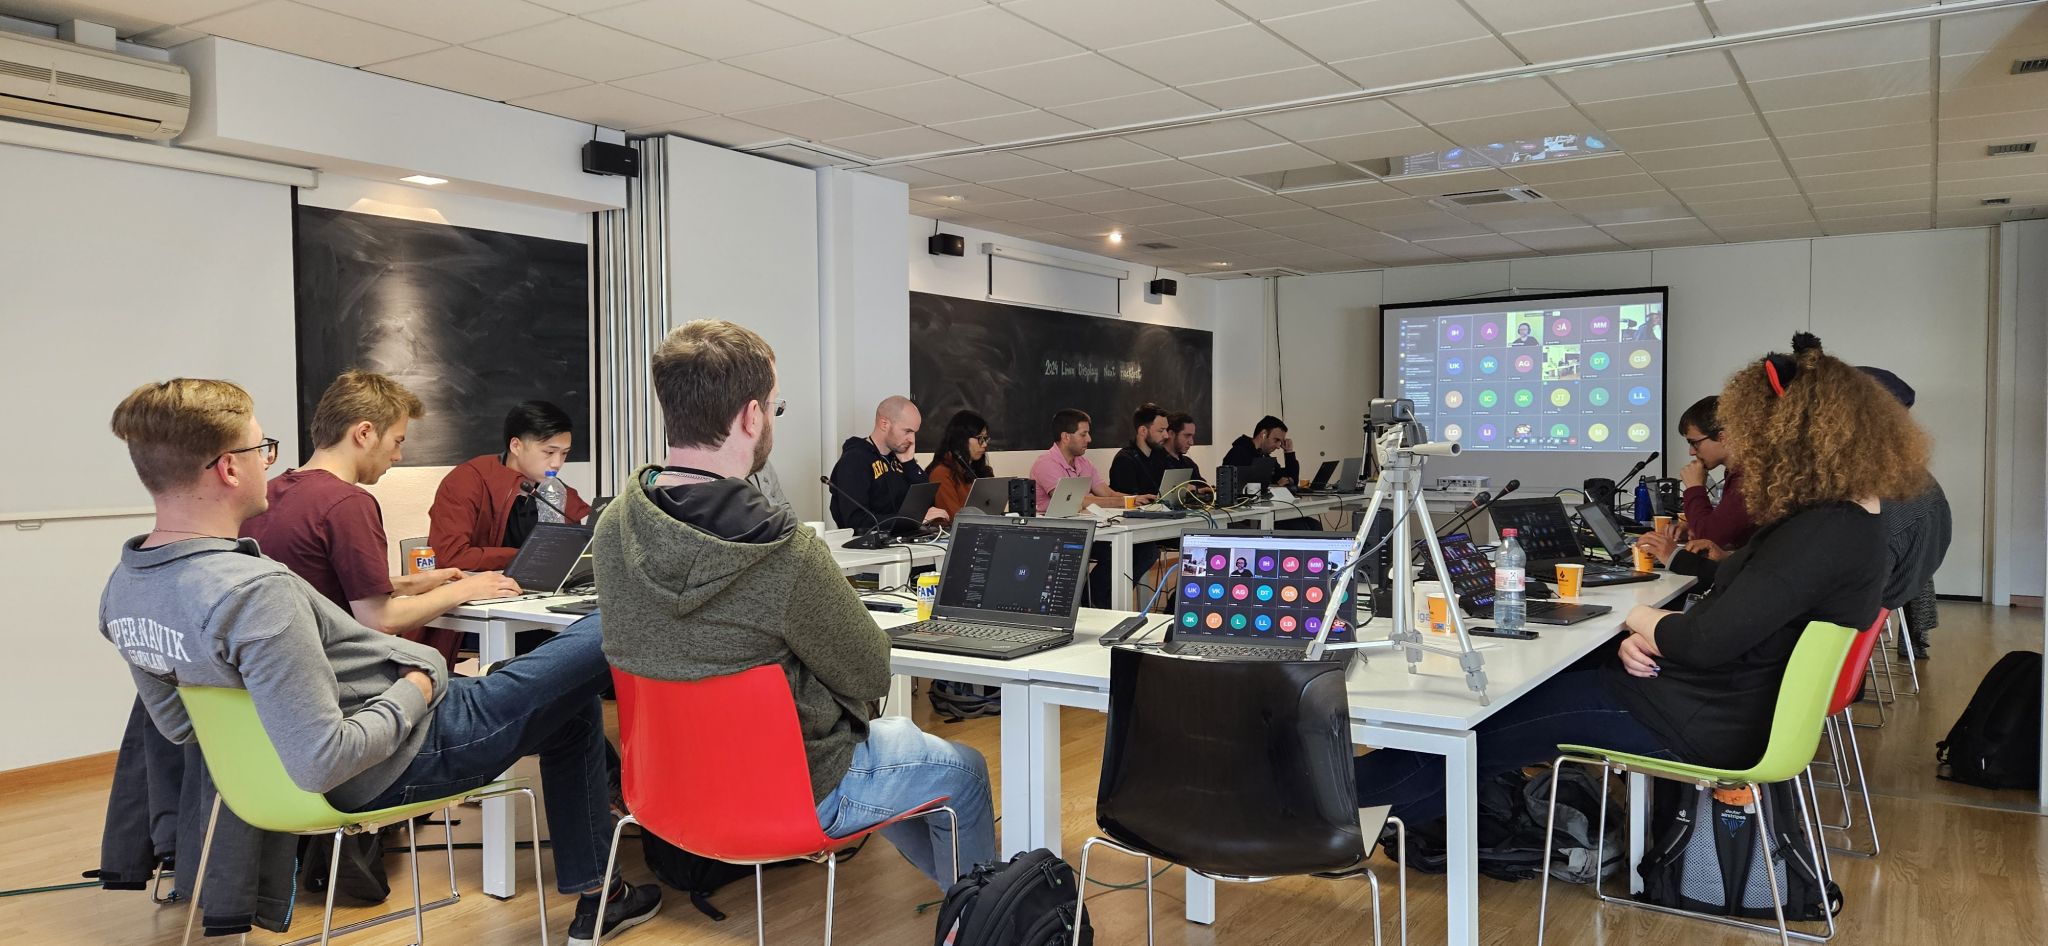
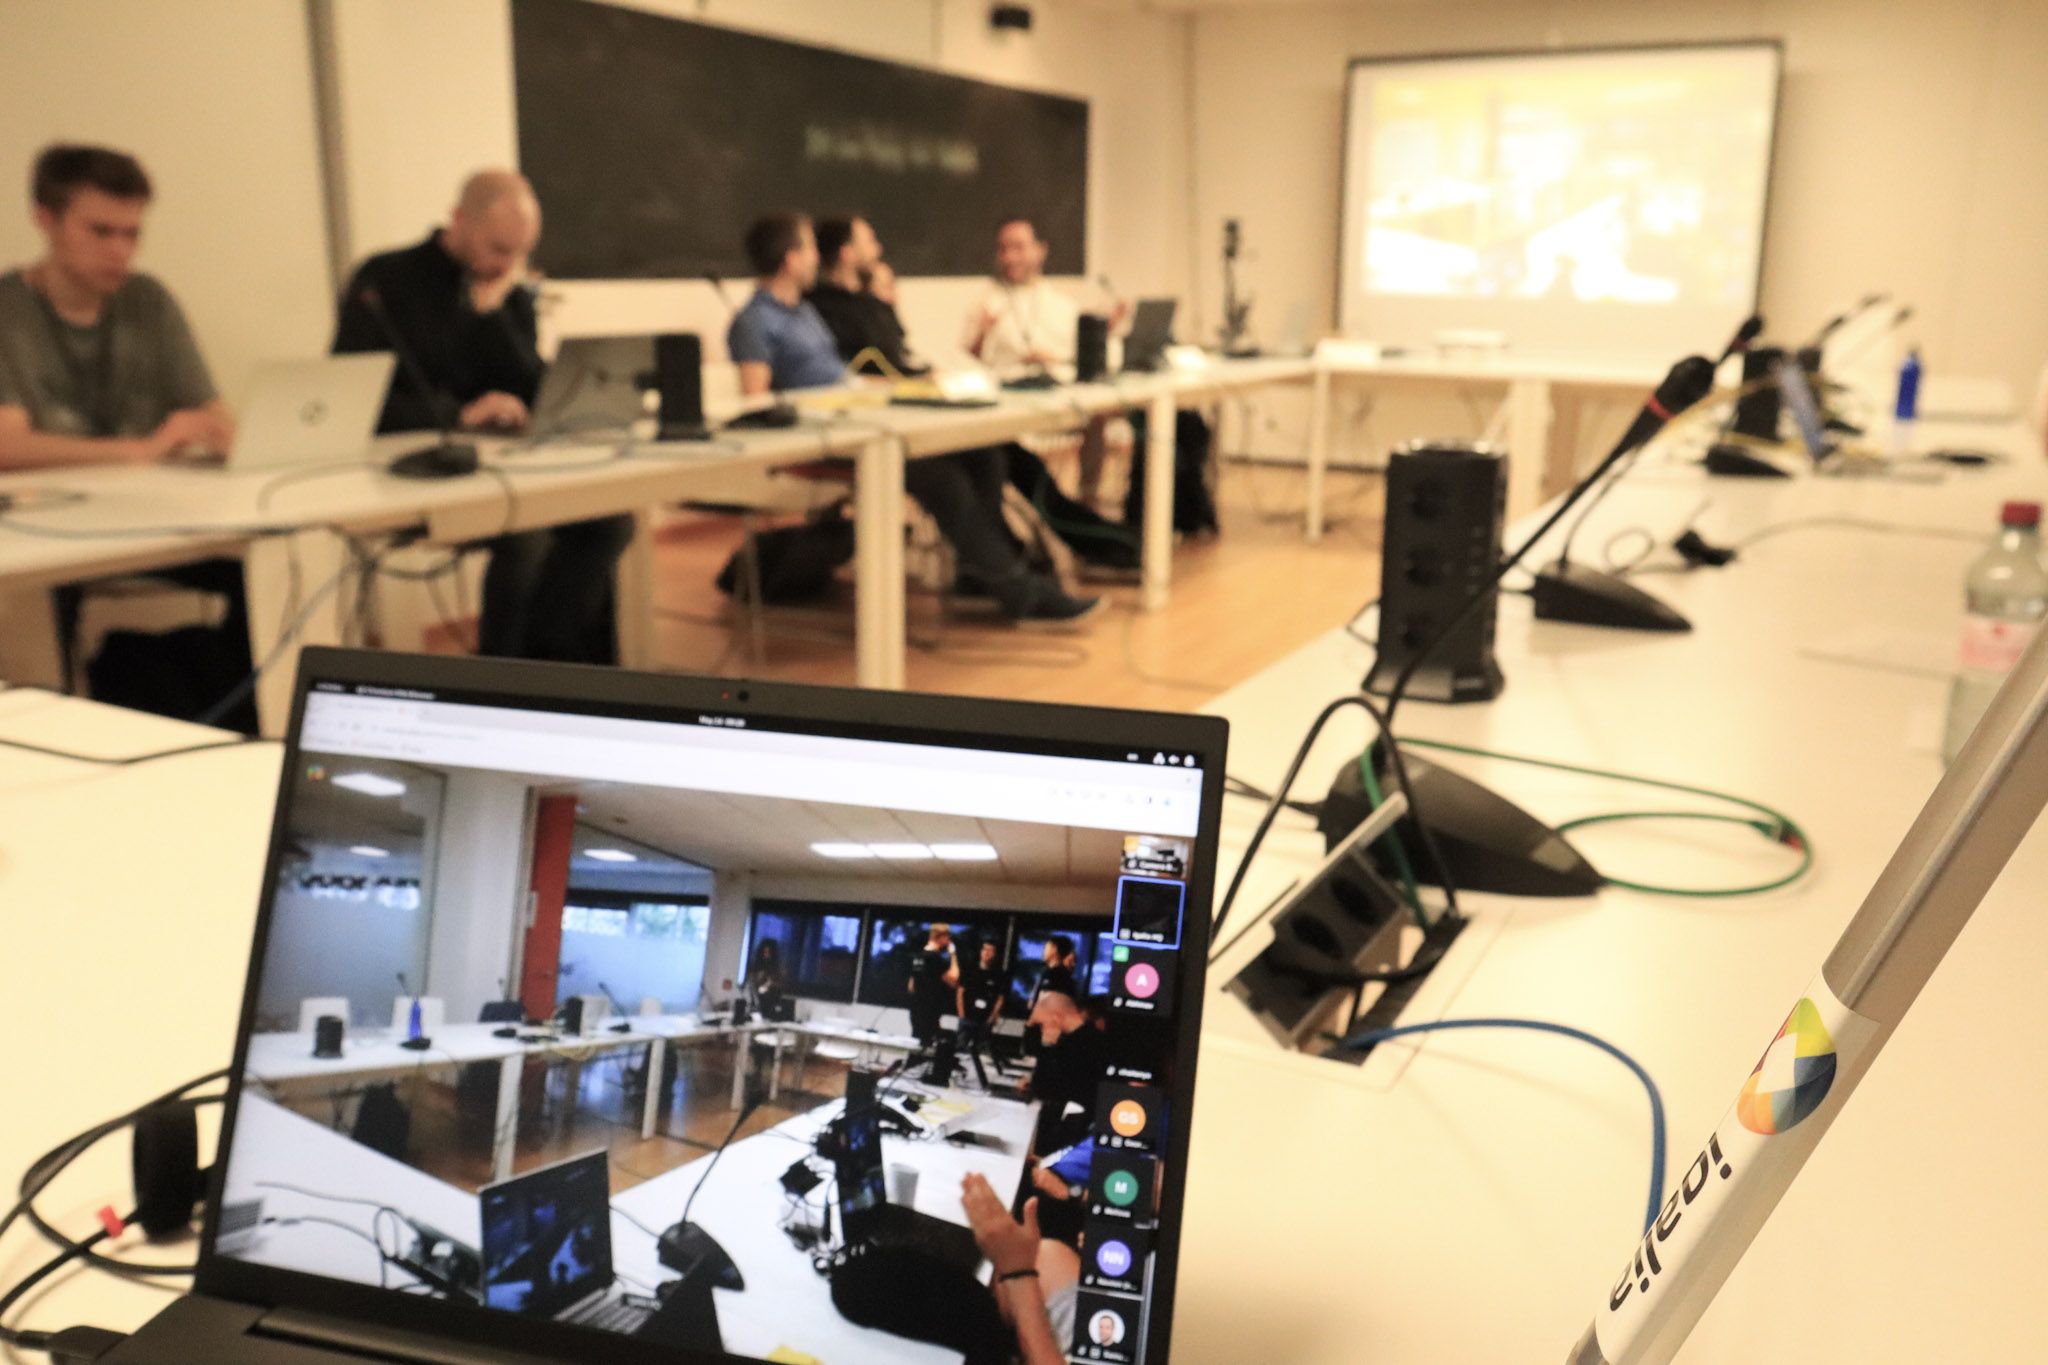
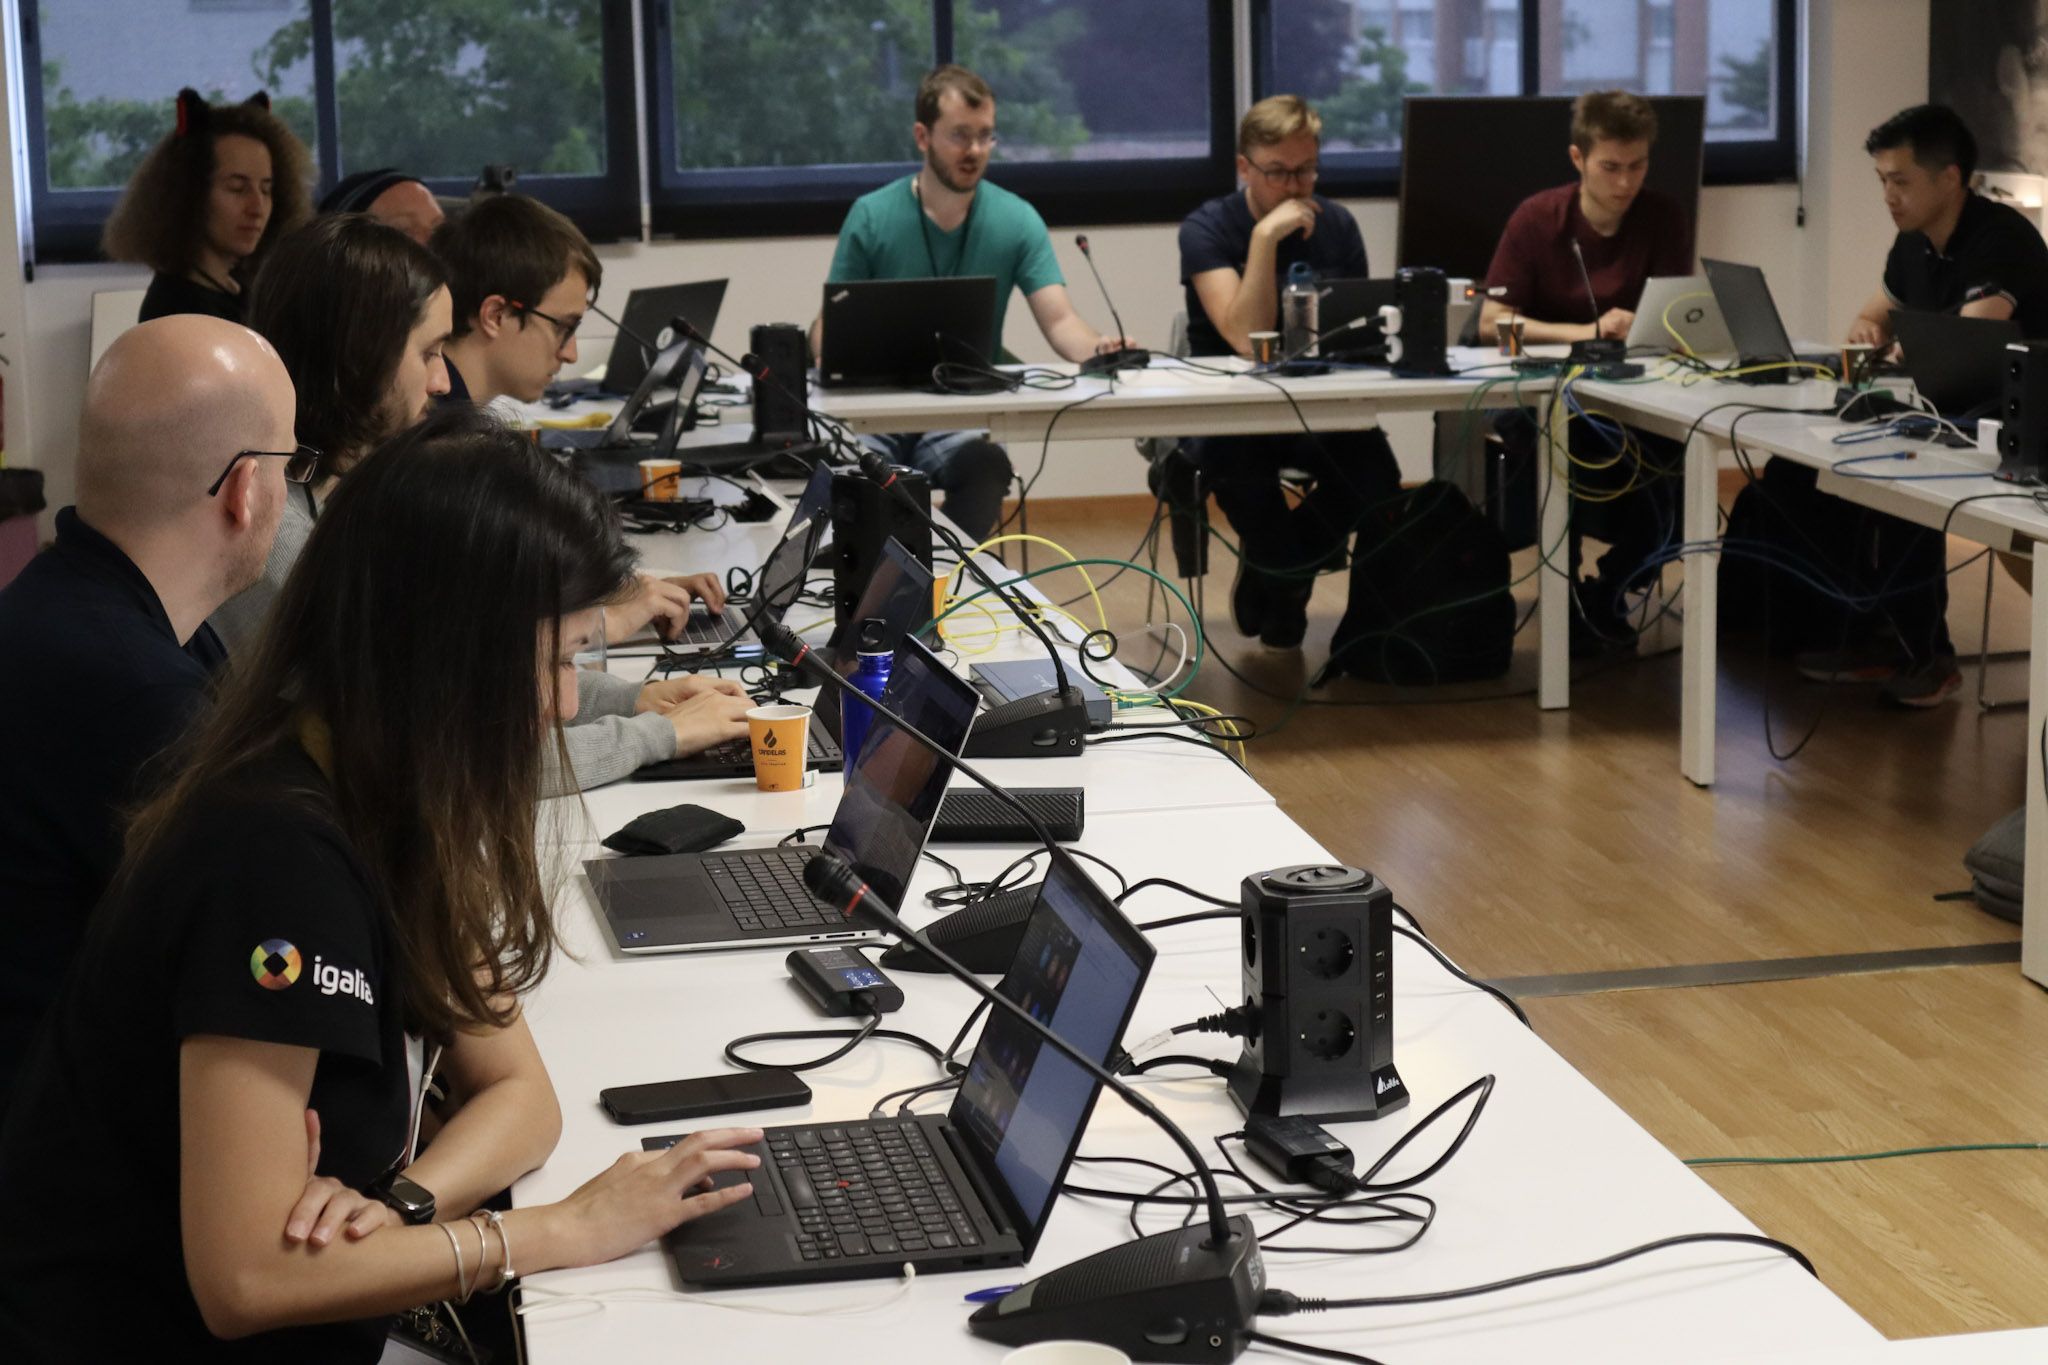
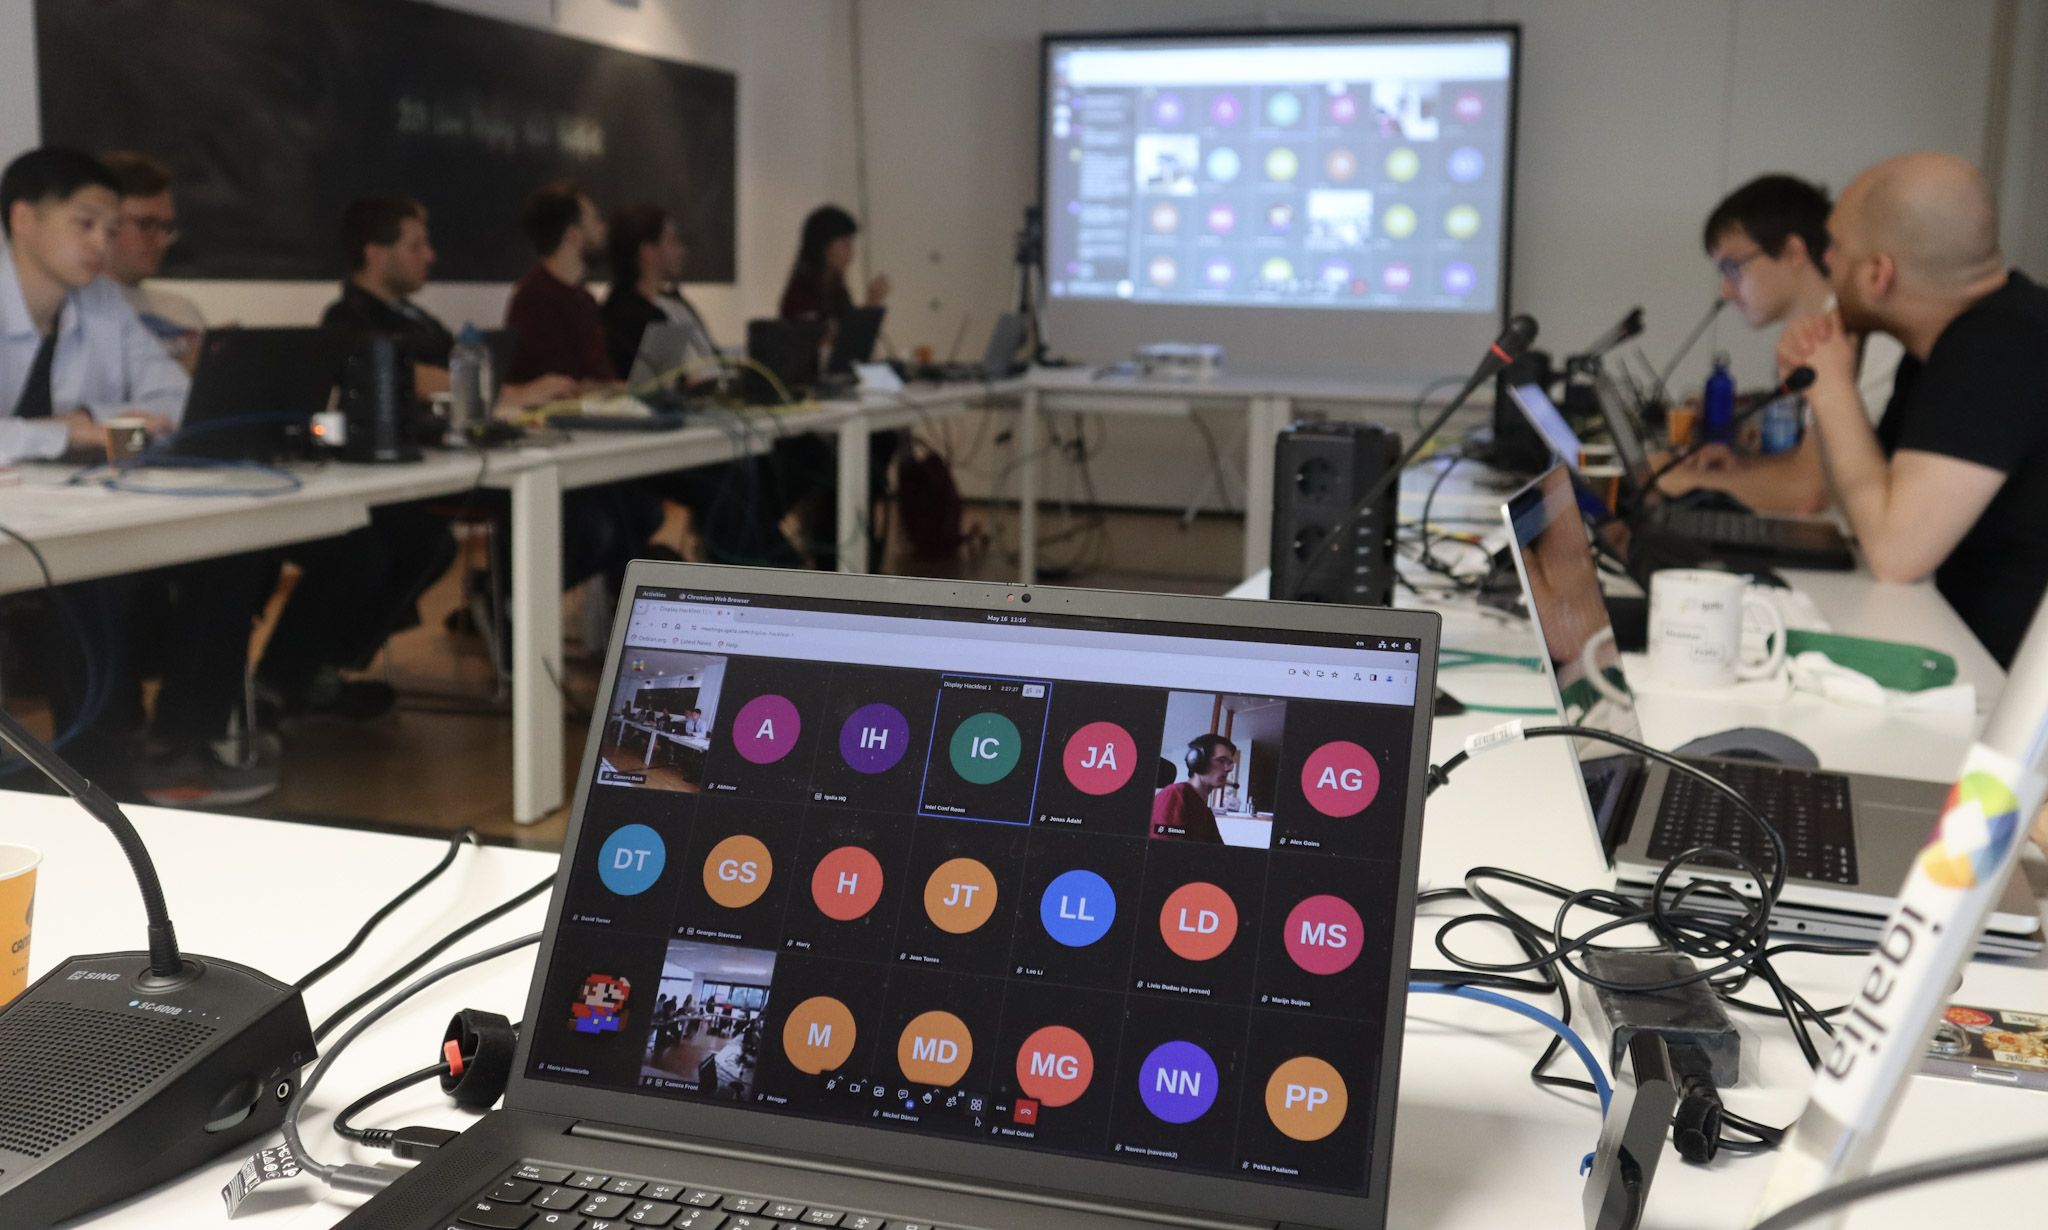
Melissa Wen: Reflections on 2024 Linux Display Next Hackfest
Hey everyone!
The 2024 Linux Display Next hackfest concluded in May, and its outcomes continue to shape the Linux Display stack. Igalia hosted this year’s event in A Coruña, Spain, bringing together leading experts in the field. Samuel Iglesias and I organized this year’s edition and this blog post summarizes the experience and its fruits.
One of the highlights of this year’s hackfest was the wide range of backgrounds represented by our 40 participants (both on-site and remotely). Developers and experts from various companies and open-source projects came together to advance the Linux Display ecosystem. You can find the list of participants here.
The event covered a broad spectrum of topics affecting the development of Linux projects, user experiences, and the future of display technologies on Linux. From cutting-edge topics to long-term discussions, you can check the event agenda here.
Organization HighlightsThe hackfest was marked by in-depth discussions and knowledge sharing among Linux contributors, making everyone inspired, informed, and connected to the community. Building on feedback from the previous year, we refined the unconference format to enhance participant preparation and engagement.
Structured Agenda and Timeboxes: Each session had a defined scope, time limit (1h20 or 2h10), and began with an introductory talk on the topic.
- Participant-Led Discussions: We pre-selected in-person participants to lead discussions, allowing them to prepare introductions, resources, and scope.
- Transparent Scheduling: The schedule was shared in advance as GitHub issues, encouraging participants to review and prepare for sessions of interest.
Engaging Sessions: The hackfest featured a variety of topics, including presentations and discussions on how participants were addressing specific subjects within their companies.
- No Breakout Rooms, No Overlaps: All participants chose to attend all sessions, eliminating the need for separate breakout rooms. We also adapted run-time schedule to keep everybody involved in the same topics.
- Real-time Updates: We provided notifications and updates through dedicated emails and the event matrix room.
Strengthening Community Connections: The hackfest offered ample opportunities for networking among attendees.
-
Social Events: Igalia sponsored coffee breaks, lunches, and a dinner at a local restaurant.
-
Museum Visit: Participants enjoyed a sponsored visit to the Museum of Estrela Galicia Beer (MEGA).
The structured agenda and breaks allowed us to cover multiple topics during the hackfest. These discussions have led to new display feature development and improvements, as evidenced by patches, merge requests, and implementations in project repositories and mailing lists.
With the KMS color management API taking shape, we discussed refinements and best approaches to cover the variety of color pipeline from different hardware-vendors. We are also investigating techniques for a performant SDR<->HDR content reproduction and reducing latency and power consumption when using the color blocks of the hardware.
Color Management/HDRColor Management and HDR continued to be the hottest topic of the hackfest. We had three sessions dedicated to discuss Color and HDR across Linux Display stack layers.
Color/HDR (Kernel-Level)Harry Wentland (AMD) led this session.
Here, kernel Developers shared the Color Management pipeline of AMD, Intel and NVidia. We counted with diagrams and explanations from HW-vendors developers that discussed differences, constraints and paths to fit them into the KMS generic color management properties such as advertising modeset needs, IN\_FORMAT, segmented LUTs, interpolation types, etc. Developers from Qualcomm and ARM also added information regarding their hardware.
Upstream work related to this session:
- KMS color management properties (new version - v5);
- IGT Tests;
- drm_info draft support of v4 DRM/KMS plane color properties;
- gamescope draft support of v4 DRM/KMS plane color properties;
- Kwin WIP implementation of DRM/KMS plane color properties.
Sebastian Wick (RedHat) led this session.
It started with Sebastian’s presentation covering Wayland color protocols and compositor implementation. Also, an explanation of APIs provided by Wayland and how they can be used to achieve better color management for applications and discussions around ICC profiles and color representation metadata. There was also an intensive Q&A about LittleCMS with Marti Maria.
Upstream work related to this session:
- Wayland color management protocol;
- Wayland color representation protocol;
- HDR support merged on Mutter;
- Color management protocol on Mutter;
- Color management protocol on GTK.
Christopher Cameron (Google) and Melissa Wen (Igalia) led this session.
In contrast to the other sessions, here we focused less on implementation and more on brainstorming and reflections of real-world SDR and HDR transformations (use and validation) and gainmaps. Christopher gave a nice presentation explaining HDR gainmap images and how we should think of HDR. This presentation and Q&A were important to put participants at the same page of how to transition between SDR and HDR and somehow “emulating” HDR.
We also discussed on the usage of a kernel background color property.
Finally, we discussed a bit about Chamelium and the future of VKMS (future work and maintainership).
Power Savings vs Color/Latency
Mario Limonciello (AMD) led this session.
Mario gave an introductory presentation about AMD ABM (adaptive backlight management) that is similar to Intel DPST. After some discussions, we agreed on exposing a kernel property for power saving policy. This work was already merged on kernel and the userspace support is under development.
Upstream work related to this session:
- Kernel series: Add support for ‘power saving policy’ property (merged)
- Mutter: issue: support for “power saving policy” property
- Kwin: MR Draft: backends/drm: add support for the “power saving policy” property
Leo Li (AMD) led this session.
Miguel Casas (Google) started this session with a presentation of Overlays in Chrome/OS Video, explaining the main goal of power saving by switching off GPU for accelerated compositing and the challenges of different colorspace/HDR for video on Linux.
Then Leo Li presented different strategies for video and gaming and we discussed the userspace need of more detailed feedback mechanisms to understand failures when offloading. Also, creating a debugFS interface came up as a tool for debugging and analysis.
Real-time scheduling and async KMS APIXaver Hugl (KDE/BlueSystems) led this session.
Compositor developers have exposed some issues with doing real-time scheduling and async page flips. One is that the Kernel limits the lifetime of realtime threads and if a modeset takes too long, the thread will be killed and thus the compositor as well. Also, simple page flips take longer than expected and drivers should optimize them.
Another issue is the lack of feedback to compositors about hardware programming time and commit deadlines (the lastest possible time to commit). This is difficult to predict from drivers, since it varies greatly with the type of properties. For example, color management updates take much longer.
In this regard, we discusssed implementing a hw_done callback to timestamp when the hardware programming of the last atomic commit is complete. Also an API to pre-program color pipeline in a kind of A/B scheme. It may not be supported by all drivers, but might be useful in different ways.
VRR/Frame Limit, Display Mux, Display Control, and more… and beerWe also had sessions to discuss a new KMS API to mitigate headaches on VRR and Frame Limit as different brightness level at different refresh rates, abrupt changes of refresh rates, low frame rate compensation (LFC) and precise timing in VRR more.
On Display Control we discussed features missing in the current KMS interface for HDR mode, atomic backlight settings, source-based tone mapping, etc. We also discussed the need of a place where compositor developers can post TODOs to be developed by KMS people.
The Content-adaptive Scaling and Sharpening session focused on sharpening and scaling filters. In the Display Mux session, we discussed proposals to expose the capability of dynamic mux switching display signal between discrete and integrated GPUs.
In the last session of the 2024 Display Next Hackfest, participants representing different compositors summarized current and future work and built a Linux Display “wish list”, which includes: improvements to VTTY and HDR switching, better dmabuf API for multi-GPU support, definition of tone mapping, blending and scaling sematics, and wayland protocols for advertising to clients which colorspaces are supported.
We closed this session with a status update on feature development by compositors, including but not limited to: plane offloading (from libcamera to output) / HDR video offloading (dma-heaps) / plane-based scrolling for web pages, color management / HDR / ICC profiles support, addressing issues such as flickering when color primaries don’t match, etc.
After three days of intensive discussions, all in-person participants went to a guided tour at the Museum of Extrela Galicia beer (MEGA), pouring and tasting the most famous local beer.
Feedback and Future Directions
Participants provided valuable feedback on the hackfest, including suggestions for future improvements.
- Schedule and Break-time Setup: Having a pre-defined agenda and schedule provided a better balance between long discussions and mental refreshments, preventing the fatigue caused by endless discussions.
- Action Points: Some participants recommended explicitly asking for action points at the end of each session and assigning people to follow-up tasks.
- Remote Participation: Remote attendees appreciated the inclusive setup and opportunities to actively participate in discussions.
- Technical Challenges: There were bandwidth and video streaming issues during some sessions due to the large number of participants.
We can’t help but thank the 40 participants, who engaged in-person or virtually on relevant discussions, for a collaborative evolution of the Linux display stack and for building an insightful agenda.
A big thank you to the leaders and presenters of the nine sessions: Christopher Cameron (Google), Harry Wentland (AMD), Leo Li (AMD), Mario Limoncello (AMD), Sebastian Wick (RedHat) and Xaver Hugl (KDE/BlueSystems) for the effort in preparing the sessions, explaining the topic and guiding discussions. My acknowledge to the others in-person participants that made such an effort to travel to A Coruña: Alex Goins (NVIDIA), David Turner (Raspberry Pi), Georges Stavracas (Igalia), Joan Torres (SUSE), Liviu Dudau (Arm), Louis Chauvet (Bootlin), Robert Mader (Collabora), Tian Mengge (GravityXR), Victor Jaquez (Igalia) and Victoria Brekenfeld (System76). It was and awesome opportunity to meet you and chat face-to-face.
Finally, thanks virtual participants who couldn’t make it in person but organized their days to actively participate in each discussion, adding different perspectives and valuable inputs even remotely: Abhinav Kumar (Qualcomm), Chaitanya Borah (Intel), Christopher Braga (Qualcomm), Dor Askayo (Red Hat), Jiri Koten (RedHat), Jonas Ådahl (Red Hat), Leandro Ribeiro (Collabora), Marti Maria (Little CMS), Marijn Suijten, Mario Kleiner, Martin Stransky (Red Hat), Michel Dänzer (Red Hat), Miguel Casas-Sanchez (Google), Mitulkumar Golani (Intel), Naveen Kumar (Intel), Niels De Graef (Red Hat), Pekka Paalanen (Collabora), Pichika Uday Kiran (AMD), Shashank Sharma (AMD), Sriharsha PV (AMD), Simon Ser, Uma Shankar (Intel) and Vikas Korjani (AMD).
We look forward to another successful Display Next hackfest, continuing to drive innovation and improvement in the Linux display ecosystem!
Mike Driscoll: JupyterLab 101 Kickstarter Stretch Goal
My Kickstarter for my latest Python book is still going on for another eight days. Now is a great time to pre-order the book as well as get my other Python books.
The project is fully funded, and I added a stretch goal.
Stretch GoalThe stretch goal is $5000 or 350 backers. If we reach either of those, I will create a video course version of the book and release it to all backers. I think being able to show JupyterLab in a video format may be an even better medium for teaching this type of topic, although the book may be better for quick browsing.
What You’ll LearnIn this book, you will learn how about the following:
- Installation and setup of JupyterLab
- The JupyterLab user interface
- Creating a Notebook
- Markdown in Notebooks
- Menus in JupyterLab
- Launching Other Applications (console, terminal, text files, etc)
- Distributing and Exporting Notebooks
- Debugging in JupyterLab
- Testing your notebooks
As a backer of this Kickstarter, you have some choices to make. You can receive one or more of the following, depending on which level you choose when backing the project:
- An early copy of JupyterLab 101 + all updates including the final version (ALL BACKERS)
- A signed paperback copy (If you choose the appropriate perk)
- Get all by Python courses hosted on Teach Me Python or another site (If you choose the appropriate perk)
- T-shirt with the book cover (If you choose the appropriate perk)
Get the book on Kickstarter today!
The post JupyterLab 101 Kickstarter Stretch Goal appeared first on Mouse Vs Python.
1xINTERNET blog: Community survey analysis and revised implementation of search in Drupal CMS (formerly Starshot)
As track leads for search in Drupal CMS (formerly Starshot), we developed a concept and aligned it with the other leaders. To refine our approach, we conducted a survey to gather feedback and identify potential improvements. This article presents the survey results and the planned implementation.
The Dot is closed. Long live KDE Planet!
As KDE grows, so does the interest in each of its projects. Gathering all KDE news in one place no longer works. The volume of updates coming from the KDE community as a whole has become too large to cover in its entirety on the Dot. With this in mind, we are archiving the Dot, but keeping its content accessible for historical reasons.
The news coming out of the community was curated and edited for the Dot. The current rate of news items being published today would've not only made that impractical, but would have also led to things being unjustly left out, giving only a partial view of what was going on.
But we are not leaving you without your source of KDE news! We have figured out something better: we have worked with KDE webmasters to set up a blogging system for contributors. You can now access Announcements, Akademy, the Association news, and the news from your favorite projects directly, unfiltered, unedited, straight from the source.
Or... If you want to keep up with what is going on in ALL KDE projects and news on a daily (often hourly) basis, use the Planet! Access it on the web or add an RSS feed to your reader. You can also follow KDE news as it happens in our Discuss forums and talk about it live with the rest of the community. You can even follow @planet.kde.org@rss-parrot.net on Mastodon to stay up to date.
If you just want the highlights, check out our social media:
Talk Python to Me: #478: When and how to start coding with kids
Metadrop: Improving headers in a Drupal site using Dries' HTTP Header Analyzer
In a previous article I wrote about the importance of the HTTP headers and web security avoiding the technical stuff. In this article I want to get into all the dirty technical details.
Some time ago we came across the HTTP Header Analyzer by Dries Buytaert. This tool, as the name suggests, analyses the headers of the HTTP response from a website. There are other header analysers out there, but this one, published by the creator of Drupal, also takes into account Drupal-specific headers. The tool displays a report of all headers found, along with an explanation of the purpose of the header and notes on the values of the header, sometimes including recommendations for better values. It also displays information about missing headers that should be present.
With all this information, the tool gives a score based on the missing headers, warnings and notices detected during the analysis. On the first runs on our website, I have to admit that the score was not bad, but not good: 6/10. Now I am happy to say that we get a score of 10/10 on the home page. Unfortunately, not all pages can get the highest score, as I explain below.
…The Drop Times: DrupalCon Barcelona 2024 Day 1: Awards, Driesnote, and Community
Specbee: Why You Can’t Ignore Google Crawlability, Indexability & Mobile-First Indexing in SEO
Krita 5.2.5 Released!
Krita 5.2.5 is here, bringing over 50 bugfixes since 5.2.3 (5.2.4 was a Windows-specific hotfix). Major fixes have been done to audio playback, transform mask calculation and more!
In addition to the core team, special thanks to Maciej Jesionowski, Ralek Kolemios, Freya Lupen, Michael Genda, Rasyuqa A. H., Simon Ra and Sam James for a variety of fixes!
Changes since 5.2.3:- Correctly adjust audio playback when animation framerate is changed.
- Fix no layer being activated on opening a document (Bug 490375)
- [mlt] Fix incorrect usage of get_frame API (Bug 489146)
- Fix forbidden cursor blinking when switching tools with shortcuts (Bug 490255)
- Fix conflicts between mouse and touch actions requested concurrently (Bug 489537)
- Only check for the presence of bt2020PQColorSpace on Windows (Bug 490301)
- Run macdeployqt after searching for missing libs (Bug 490181)
- Fix crash when deleting composition
- Fix scaling down image with 1px grid spacing (Bug 490898)
- Fix layer activation issue when opening multiple documents (Bug 490843)
- Make clip-board pasting code a bit more robust (Bug 490636)
- Fix a number of issues with frame generation (Bug 486417)
- A number of changes related to qt6 port changes.
- Fix black canvas appearing when "Limit animation frame size" is active (Bug 486417)
- WebP: fix colorspace export issue when dithering is enabled (Bug 491231)
- WebP: preserve color profile on export if color model is RGB(A)
- Fix layer selection when a layer was removed while view was inactive
- Fix On-Canvas Brush Editor's decimal sliders (Bug 447800, Bug 457744)
- Make sure file layers are updated when image size or resolution changes (Bug 467257, Bug 470110)
- Fix Advanced Export of the image with filter masks or layer styles (Bug 476980)
- Avoid memory leak in the advanced export function
- Fix mipmaps not being regenerated after transformation was finished or cancelled (Bug 480973)
- [Gentoo] Don't use xsimd::default_arch in the pixel scaler code
- KisZug: Fix ODR violation for map_*
- Fix a crash in Filter Brush when changing the filter type (Bug 478419)
- PSD: Don't test reference layer for homogenous check (Bug 492236)
- Fix an assert that should have been a safe assert (Bug 491665)
- Set minimum freetype version to 2.11 (Bug 489377)
- Set Krita Default on restoring defaults (Bug 488478)
- Fix loading translated news (Bug 489477)
- Make sure that older files with simple transform masks load fine & Fix infinite loop with combination of clone + transform-mask-on-source (Bug 492320)
- Fix more cycling updates in clone/transform-masks combinations (Bug 443766)
- Fix incorrect threaded image access in multiple clone layers (Bug 449964)
- TIFF: Ignore resolution if set to 0 (Bug 473090)
- Specific Color Selector: Update labels fox HSX (Bug 475551)
- Specific Color Selector: Fix RGB sliders changing length (Bug 453649)
- Specific Color Selector: Fix float slider step 1 -> 0.01
- Specific Color Selector: Fix holding down spinbox arrows (Bug 453366)
- Fix clone layers resetting the animation cache (Bug 484353)
- Fix an assert when trying to activate an image snapshot (Bug 492114)
- Fix redo actions to appear when undoing juggler-compressed actions (Bug 491186)
- Update cache when cloning perspective assistants (Bug 493185)
- Fix a warning on undoing flattening a group (Bug 474122)
- Relink clones to the new layer when flattening (Bug 476514)
- Fix onion skins rendering on layers with a transform masks (Bug 457136)
- Fix perspective value for hovering pixel
- Fix Move and Transform tool to work with Pass-Through groups (Bug 457957)
- JPEG XL: Export: implement streaming encoding and progress reporting
- Deselect selection when pasting from the clipboard (Bug 459162)
If you're using the portable zip files, just open the zip file in Explorer and drag the folder somewhere convenient, then double-click on the Krita icon in the folder. This will not impact an installed version of Krita, though it will share your settings and custom resources with your regular installed version of Krita. For reporting crashes, also get the debug symbols folder.
Note: We are no longer making 32-bit Windows builds.
- 64 bits Windows Installer: krita-5.2.5-setup.exe
- Portable 64 bits Windows: krita-5.2.5.zip
- Debug symbols. (Unpack in the Krita installation folder)
- 64 bits Linux: krita-5.2.5-x86_64.appimage
The separate gmic-qt AppImage is no longer needed.
(If, for some reason, Firefox thinks it needs to load this as text: right-click on the link to download.)
MacOSNote: We're not supporting MacOS 10.13 anymore, 10.14 is the minimum supported version.
- MacOS disk image: krita-5.2.5.dmg
We consider Krita on ChromeOS as ready for production. Krita on Android is still beta. Krita is not available for Android phones, only for tablets, because the user interface requires a large screen.
Source code md5sumFor all downloads, visit https://download.kde.org/stable/krita/5.2.5/ and click on "Details" to get the hashes.
KeyThe Linux AppImage and the source .tar.gz and .tar.xz tarballs are signed. You can retrieve the public key here. The signatures are here (filenames ending in .sig).
PyCoder’s Weekly: Issue #648 (Sept. 24, 2024)
#648 – SEPTEMBER 24, 2024
View in Browser »
Get a sneak peek at the upcoming features in Python 3.13 aimed at enhancing performance. In this tutorial, you’ll make a custom Python build with Docker to enable free threading and an experimental JIT compiler. Along the way, you’ll learn how these features affect the language’s ecosystem.
REAL PYTHON
Python code too slow? You can quickly create a Rust extension to speed it up. This post shows you how to re-implement some Python code as Rust, connect the Rust to Python, and optimize the Rust for even further performance improvements.
ITAMAR TURNER-TRAURING
Snyk is thrilled to announce DevSecCon 2024, Developing AI Trust Oct 8-9, a FREE virtual summit designed for DevOps, developer and security pros of all levels. Hear from industry pros John Hammond & Daniel Miessler for some practical tips on devsecops approach to secure development. Save our spot →
SNYK.IO sponsor
This post covers Python’s doctest which allows you to write tests within your code’s docstrings. This does two things: it gives you tests, but it also documents how your code can be used.
JUHA-MATTI SANTALA
A well-designed coding environment enhances your focus and productivity and makes coding sessions more enjoyable. In this Code Conversation, your instructor Philipp Ascany will guide you step-by-step through the process of finding, installing, and adjusting color themes in VS Code.
REAL PYTHON course
What are strategies for being a productive developer with ADHD? How can you help your team members with ADHD to succeed and complete projects? This week on the show, we speak with Chris Ferdinandi about his website and podcast “ADHD For the Win!”
REAL PYTHON podcast
Intel makes it easy to develop AI applications on open frameworks and libraries. Seamlessly integrate into an open ecosystem and build AI solutions with more flexibility and choice. Explore the possibilities available with Intel’s OpenVINO toolkit →
INTEL CORPORATION sponsor
Simon has been on the Python Software Foundation Board for two years now and has recently returned from a board retreat. This post talks about what he has learned along the way, including just what does the PSF do, PyPI, PyCons, and more.
SIMON WILLISON
Goodhart’s law states: “When a measure becomes a target, it ceases to be a good measure.” Whether that’s test coverage, cyclomatic complexity, or code performance, all metrics are proxies and proxies can be gamed.
HILLEL WAYNE
This post covers how Mark did a deep dive on a large dataset covering building footprints in Asia. He uses a variety of tools including duckdb and the multiprocessing module in Python.
MARK LITWINTSCHIK
“Django comes with a form library, and yet we wrote a total replacement library… Django forms were fundamentally not usable for what we wanted to do.”
KODARE.NET
This article shows how you can create a case-insensitive string class using some basic meta programming with the dunder method __new__.
RODRIGO GIRÃO SERRÃO
Discover seven ways you can use Jupyter notebooks in PyCharm to explore and work with your data more quickly and effectively.
HELEN SCOTT
Talk Python interviews Charlie Marsh, the maintainer of ruff, and they talk about uv and other projects at Astral.
KENNEDY & MARSH podcast
Python 3.8 will stop getting security updates in November 2024. You really should upgrade!
ITAMAR TURNER-TRAURING
GITHUB.COM/FPGMAAS • Shared by Florian Maas
Django Content Settings: Advanced Admin Editable SettingsDJANGO-CONTENT-SETTINGS.READTHEDOCS.IO • Shared by oduvan
Events Weekly Real Python Office Hours Q&A (Virtual) September 25, 2024
REALPYTHON.COM
September 25 to September 27, 2024
PYDATA.ORG
September 26 to September 27, 2024
PITERPY.COM
September 26 to September 27, 2024
DURIANPY.ORG
September 27 to September 30, 2024
PYCON.JP
September 28 to September 30, 2024
PYCON.ORG
October 3 to October 5, 2024
PYCON.ORG
October 4 to October 6, 2024
PYCON.ORG
Happy Pythoning!
This was PyCoder’s Weekly Issue #648.
View in Browser »
[ Subscribe to 🐍 PyCoder’s Weekly 💌 – Get the best Python news, articles, and tutorials delivered to your inbox once a week >> Click here to learn more ]
Pages
Recent Publications
- Managing Hidden Dependencies in OO Software: a Study Based on Open Source Projects
- Open Source Communities as Liminal Ecosystems
- Investigating developers' email discussions during decision-making in Python language evolution
- Developers, Quality Control and Download Volume in Open Source Software (OSS) Projects
FLOSS Project Planets
- Python Morsels: Python's range() function
- Tag1 Consulting: Performance Testing Leads To Major Improvements for Drupal CMS — and all of Drupal
- Daniel Roy Greenfeld: TIL: Using inspect and timeit together
- Freelock Blog: 🕵️♂️ Privacy for website owners, and introducing 💧 Drupal CMS
- Kdenlive 24.12.1 released