
FLOSS Project Planets
Wim Leers: XB week 18: DriesNote deadline
With DrupalCon Barcelona 2024 only two weeks later, the focus this week is on tying up loose ends. That already started last week, but of the milestone 0.1.0 priorities that product lead Lauri identified, 15 are still left after last week: we need to fix 1.5/day to get to zero.
Major loose endsI titled last week’s update drag and drop party because there were so many improvements on that front. But one critical piece was still missing: it was painful to drag components into locations that are difficult to visualize: top and bottom of slots, even more so for adjacent slots. Bálint “balintbrews” Kléri brought one additional improvement:
Your browser does not support playing videos. You can download it instead.
Drag a component and drop it into truly any location.Issue #3471169, video by Bálint.
Beautiful isn’t it?! I couldn’t say it better than Jesse “jessebaker” Baker in his review: This is such a marked improvement and honestly it’s already better than I dared hope it would be, especially this early. Excellent work.
Ben “bnjmnm” Mullins finished the highest-impact loose end: he ensured all single-value field types work correctly.
This week, Ben finally had the chance to introduce sorely needed end-to-end (E2E) test coverage, which ensures that a whole range of field widgets work as expected not only in the original field widget sense (focus on server side), but also the live update sense (focus on client side): the Redux integration must be aware of when the values the user is typing is valid. More work remains to be done there, but the introduction of the prop-types.cy.js E2E Cypress test marks a significant milestone! 1 Next steps will be tracked in the corresponding meta/plan issue.
Lots of usability bugs squashedJesse coordinated the squashing of many usability bugs — not really broken things, but things that should happen to not have a clunky UX:
- Omkar “omkar-pd” Deshpande and Jesse: #3470933: Close the insert panel when clicking outside the panel — why force the users to do extra clicking when we can close something when user actions indicate a UI piece is not currently necessary?
- Amine “boulaffasae” Boulaffass and Bálint: #3472634: Component List doesn’t scroll — when installing additional Single Directory Components (SDCs), the list can grow beyond the viewport height and this fix allows accessing those :D
- Gaurav “gauravvvv”, Shyam “shyam_bhatt” Bhatt and Bálint: #3472488: The preview container height will overflow outside the canvas — a fixed canvas size prevented building tall pages!
- Utkarsh “utkarsh_33” and fazilitehreem expanded upon the right-click support they added last week: #3472053: Show context menu on right clicking components in the Layers panel — because what is possible on the canvas/in the preview, should also be possible in the “layers” panel
Missed a prior week? See all posts tagged Experience Builder.
Goal: make it possible to follow high-level progress by reading ~5 minutes/week. I hope this empowers more people to contribute when their unique skills can best be put to use!
For more detail, join the #experience-builder Slack channel. Check out the pinned items at the top!
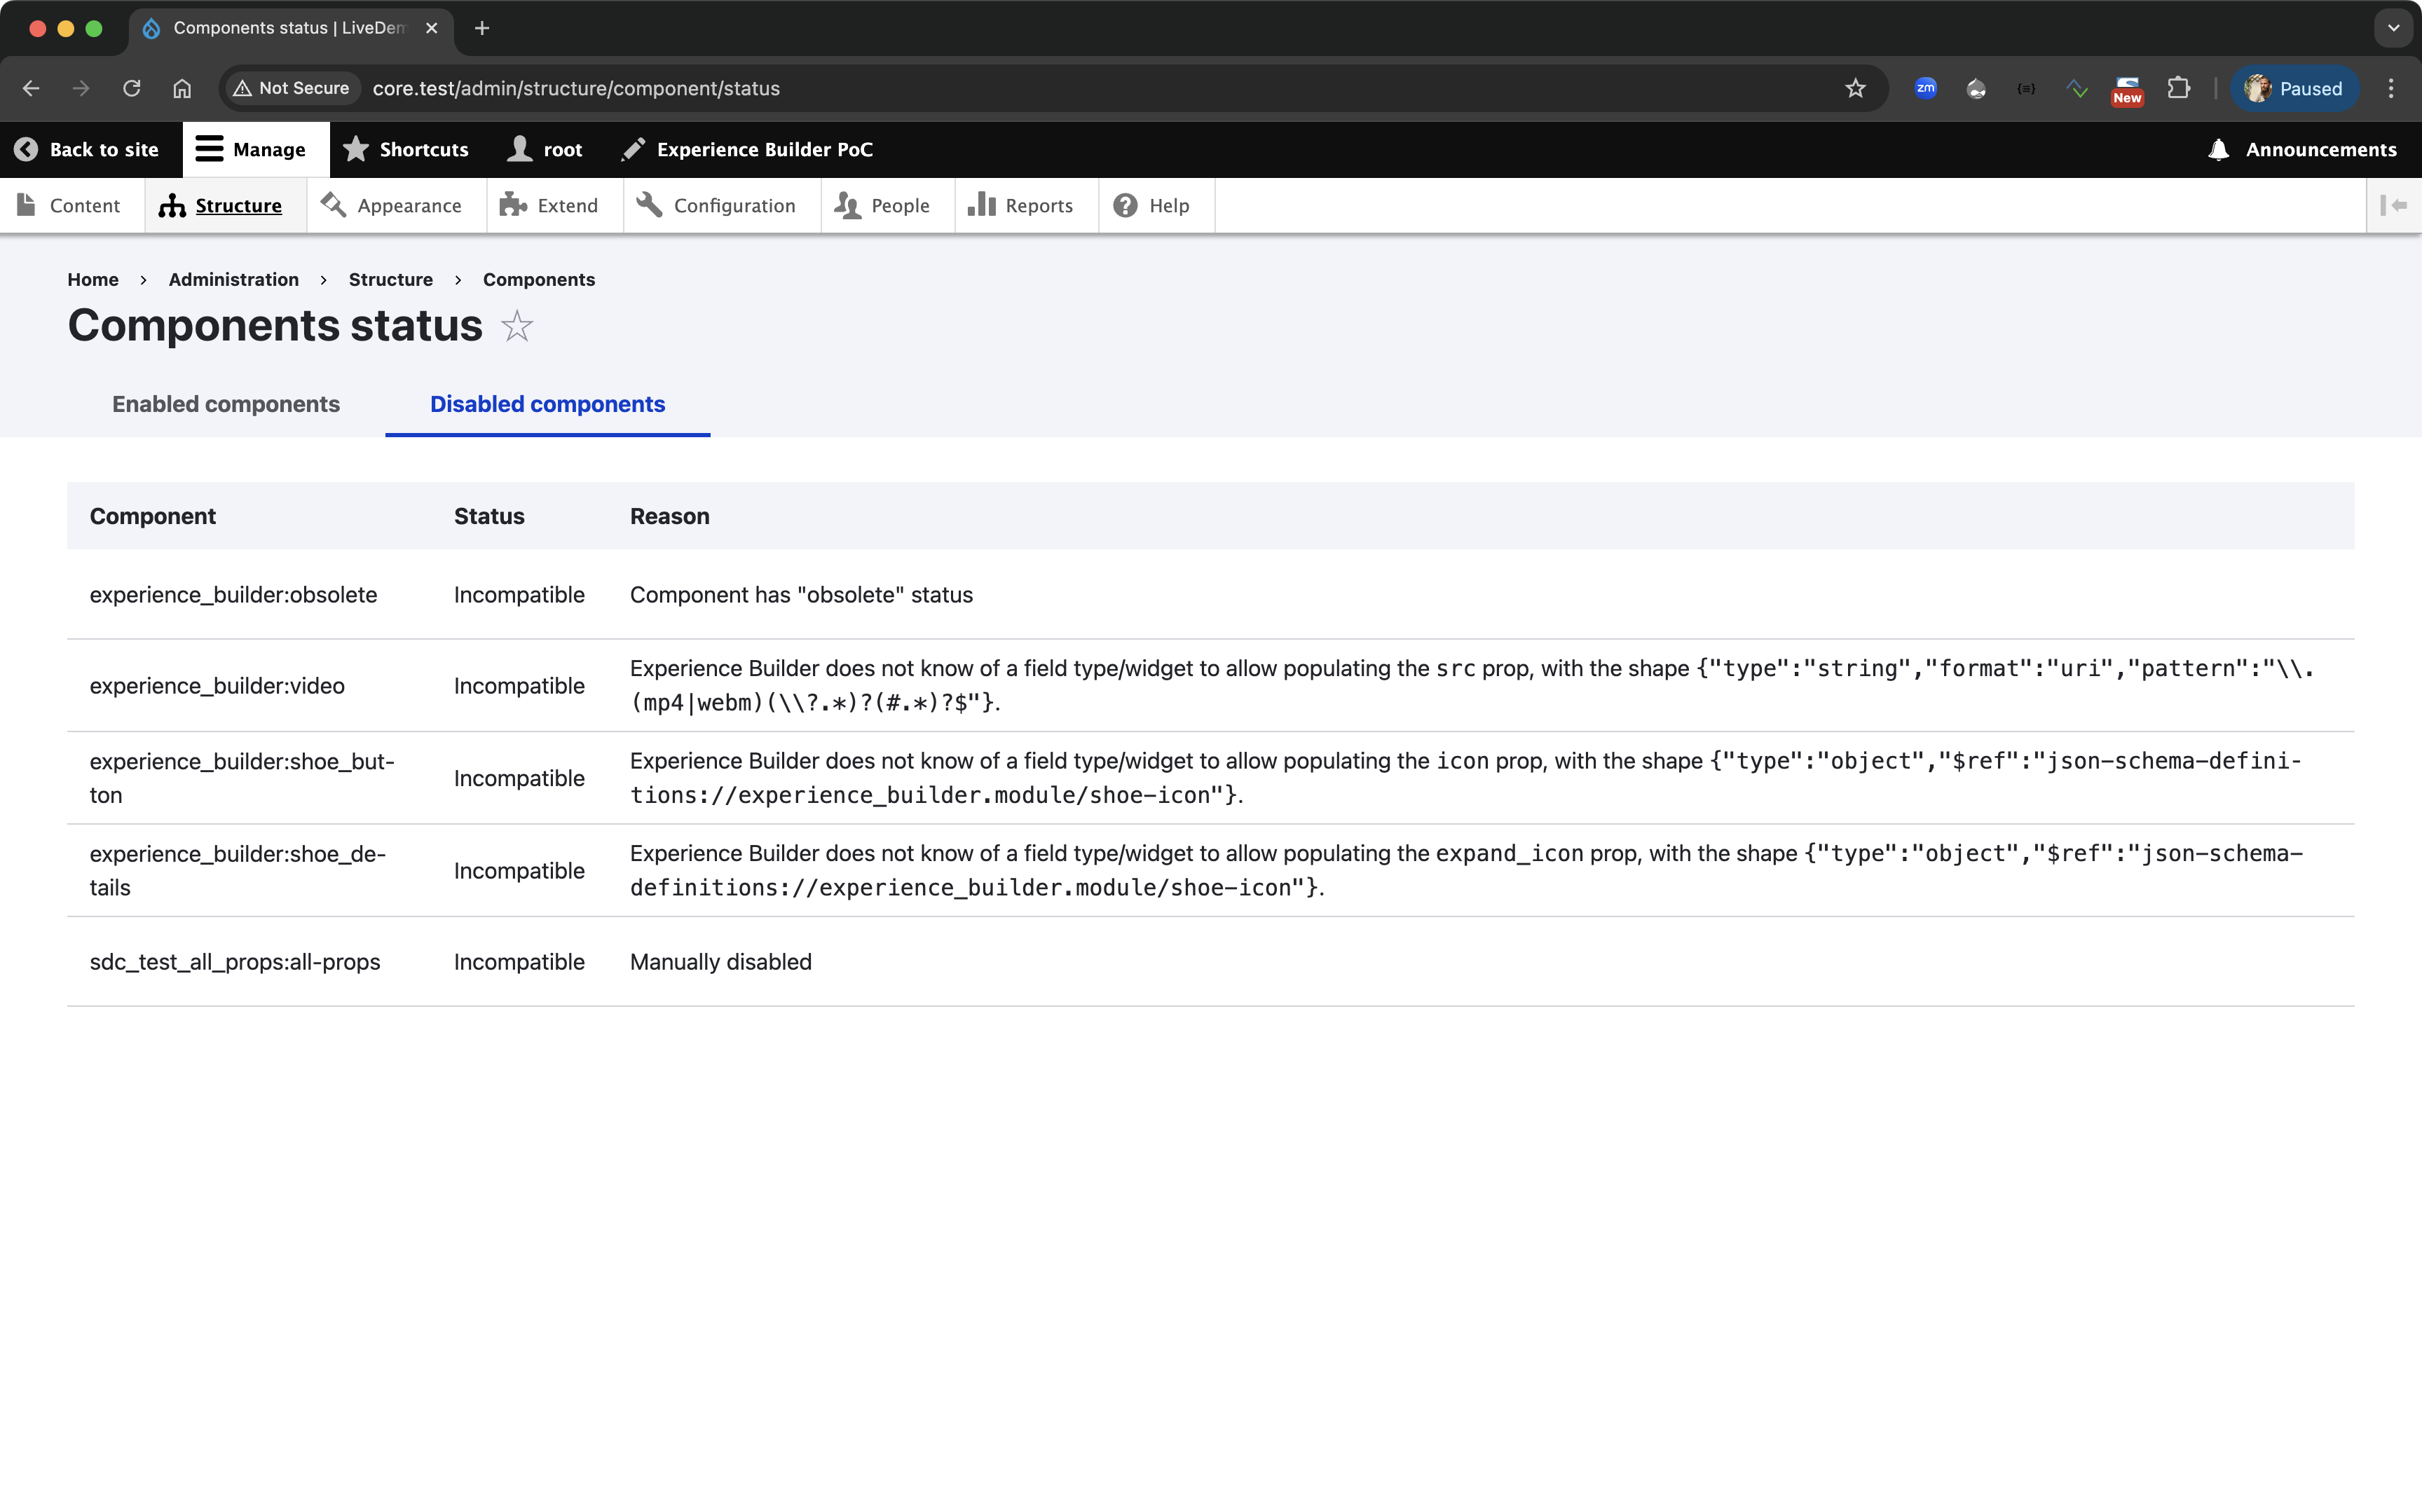
Back-end improvements- Feliksas “f.mazeikis” Mazeikis landed the most important server-side change of the week: surfacing the reason for an SDC not being available in XB. This is obviously critical information for SDC developers. More needs to happen in this space, but this in particular is a huge productivity boost for the people working on the Starshot Demo Design System, because that too will be featured in the Driesnote at DrupalCon Barcelona :)
Issue #3469684, image by me.
- Ted “tedbow” Bowman and Dave “longwave” Long made the most critical response a CacheableJsonResponse instead of a JsonResponse, which means it can now be served by Drupal’s Dynamic Page Cache while guaranteeing up-to-date information. Similar to the “component list scroll” bug fix above, this was only perceptible with many SDCs installed (and Xdebug enabled), but it still is an important leap forward. 2
- Deepak “deepakkm” Mishra, Ted and I added support for propless SDCs — a silly oversight :D
- Finally, I clarified the “shape matching bits” by improving the docs, code organization (it dates back to the earliest XB days!), making its location and experimental nature more explicit in the CODEOWNERS file, and introducing a Shape matching issue queue component. 3
Unfortunately, during the week, Lauri prioritized several more issues, so we ended this week with … 12 — only 3 fewer than we started with :/ That means we’ll need to land >2/day in the next week to get to zero. Fortunately, most of those twelve are already pretty far along.
Who of you have ever been able to chill towards a deadline, and how did you do that? :D
Week 18 was September 9–15, 2024.
-
It is not comprehensive yet, but then again, nor does Drupal core have field types that can populate all of the possible prop shapes that Single Directory Components’ JSON schema are able to express. Next steps here are growing the test coverage to reach full confidence for the prop shapes that we do have field types + widgets for. ↩︎
-
And as Ben pointed out: this is very cacheable by design, so it’s not a case of premature optimization. ↩︎
-
I think it’d be good to have each area in the CODEOWNERS file correspond to an issue queue component. Thoughts? Let me know! ↩︎
DrupalEasy: DrupalEasy Podcast S17E3 - Ryan Price - Modernizing a Legacy Integration
We talk with Ryan Price from ICF about a recent project he worked on involving updating a legacy Drupal 7 install with modern Drupal 10 techniques.
URLs mentionedPacific Northwest Drupal Summit - October 11-13, 2024.
Professional module development - 15 weeks, 90 hours, live, online course.
Drupal Career Online - 12 weeks, 77 hours, live online, beginner-focused course.
We're using the machine-driven Amazon Transcribe service to provide an audio transcript of this episode.
SubscribeSubscribe to our podcast on iTunes, iHeart, Amazon, YouTube, or Spotify.
If you'd like to leave us a voicemail, call 321-396-2340. Please keep in mind that we might play your voicemail during one of our future podcasts. Feel free to call in with suggestions, rants, questions, or corrections. If you'd rather just send us an email, please use our contact page.
CreditsPodcast edited by Amelia Anello.
Erik Marsja: Using Pandas to Read JSON from URL
The post Using Pandas to Read JSON from URL appeared first on Erik Marsja.
When working with data in Python, using Pandas to read JSON from URL is an excellent tool that lets you directly load JSON data from a web source into a Pandas dataframe. This tutorial will teach you the steps to accomplish this task, building upon our previous discussions on reading JSON with Python more generally.
Table of Contents How to use Pandas to Read JSON from URLFirst, let us look at a simple example of using Pandas to read JSON from a URL.
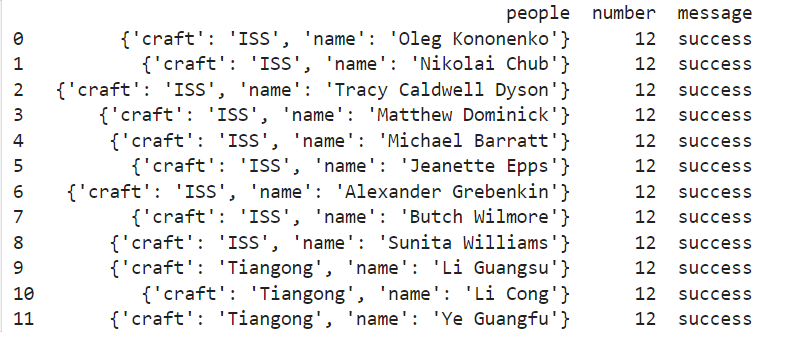
import pandas as pd # URL containing JSON data url = "http://api.open-notify.org/astros.json" # Read JSON data from URL into a DataFrame df = pd.read_json(url) # Display the dataframe print(df)In the code chunk above, we start by importing the Pandas library. The URL variable contains the web address where the JSON data is hosted. The pd.read_json(url) function is then used to read the JSON data from the URL and load it into a Pandas DataFrame, which is a two-dimensional labeled data structure with columns of potentially different types. Finally, print(df) displays the DataFrame, allowing us to see the imported data in tabular format.
Now that we have seen a basic example, let us learn more about the parameters of the pd.read_json() method to understand how we can customize the reading process.
The pd.read_json() method has several parameters that allow you to fine-tune how the JSON data is read and converted into a dataframe. Here is an overview of the most important parameters:
- path_or_buf: The string containing the URL or the path to the JSON file. This is the source of the JSON data that will be read.
- orient: Defines the expected JSON string format. Default is ‘columns’. This parameter specifies the orientation of the JSON data. Other options include ‘split’, ‘records’, ‘index’, and ‘values’.
- typ: Specifies the type of object to be returned. Default is ‘frame’. This parameter can be set to ‘series’ if you want to return a Series instead of a DataFrame.
- dtype: Determines whether to infer types of objects. Default is ‘None’. This parameter can be used to specify the data type for each column.
- convert_axes: Whether to convert the axes to another type. Default is ‘True’. This parameter allows you to convert the axes to a specified data type.
- convert_dates: List of columns to convert to dates. Default is ‘True’. This parameter can be used to specify which columns should be parsed as dates.
- keep_default_dates: Whether to include default date parsers. Default is ‘True’. This parameter determines whether to use the default date parsers provided by Pandas.
- precise_float: Whether to use a high precision floating point converter. Default is ‘False’. This parameter can be set to ‘True’ if you need high precision for float values.
- date_unit: Unit for encoding datetime. Default is ‘None’. This parameter can be used to specify the time unit for encoding datetime objects.
- encoding: Specifies the encoding to be used. Default is ‘utf-8’. This parameter determines the encoding for reading the JSON data.
- lines: Whether to read the JSON file as a JSON object per line. Default is ‘False’. This parameter can be set to ‘True’ if the JSON data is in a line-delimited format.
With these parameters allows you to better control how JSON data is read and processed, enabling you to tailor the DataFrame to your needs.
SummaryTo summarize, we have learned how to use Pandas to read JSON data from a URL. We explored a practical example and detailed the parameters of the pd.read_json() method, enhancing our ability to customize the data reading process. Handling nested JSON data can be more challenging, but that will be covered in a future post.
I would appreciate it if you could share this post and leave your comments below. Your feedback is invaluable!
Here are some other reading data-related tutorials:
- How to Convert JSON to Excel in Python with Pandas
- How to use Pandas read_html to Scrape Data from HTML Tables
The post Using Pandas to Read JSON from URL appeared first on Erik Marsja.
Gunnar Wolf: 50 years of queries
The relational model is probably the one innovation that brought computers to the mainstream for business users. This article by Donald Chamberlin, creator of one of the first query languages (that evolved into the ubiquitous SQL), presents its history as a commemoration of the 50th anniversary of his publication of said query language.
The article begins by giving background on information processing before the advent of today’s database management systems: with systems storing and processing information based on sequential-only magnetic tapes in the 1950s, adopting a record-based, fixed-format filing system was far from natural. The late 1960s and early 1970s saw many fundamental advances, among which one of the best known is E. F. Codd’s relational model. The first five pages (out of 12) present the evolution of the data management community up to the 1974 SIGFIDET conference. This conference was so important in the eyes of the author that, in his words, it is the event that “starts the clock” on 50 years of relational databases.
The second part of the article tells about the growth of the structured English query language (SEQUEL)– eventually renamed SQL–including the importance of its standardization and its presence in commercial products as the dominant database language since the late 1970s. Chamberlin presents short histories of the various implementations, many of which remain dominant names today, that is, Oracle, Informix, and DB2. Entering the 1990s, open-source communities introduced MySQL, PostgreSQL, and SQLite.
The final part of the article presents controversies and criticisms related to SQL and the relational database model as a whole. Chamberlin presents the main points of controversy throughout the years: 1) the SQL language lacks orthogonality; 2) SQL tables, unlike formal relations, might contain null values; and 3) SQL tables, unlike formal relations, may contain duplicate rows. He explains the issues and tradeoffs that guided the language design as it unfolded. Finally, a section presents several points that explain how SQL and the relational model have remained, for 50 years, a “winning concept,” as well as some thoughts regarding the NoSQL movement that gained traction in the 2010s.
This article is written with clear language and structure, making it easy and pleasant to read. It does not drive a technical point, but instead is a recap on half a century of developments in one of the fields most important to the commercial development of computing, written by one of the greatest authorities on the topic.
This week in Plasma: polishing like mad
The core Plasma team has entered full-on bug-fixing mode until Plasma 6.2.1, and what a week of bug-fixes it was! We’re nailing regressions reported in the beta release as they appear, as well as older bugs we didn’t manage to get to yet. I’m incredibly impressed with the team and their tremendous work this week!
In addition, a few features and UI changes postponed from Plasma 6.2 have started to land in 6.3.
Notable New FeaturesPlasma’s Widget Explorer sidebar now gives you the opportunity to remove all instances of a widget, which can help when you have a stuck widget hidden somewhere (Niccolò Venerandi, Plasma 6.3.0. Link):
Notable UI ImprovementsWith multiple screens showing wallpaper slideshows, the transition times for each screen’s slideshow are now synced so they happen at the same moment (Sebastian Meyer, Plasma 6.3.0. Link)
Loosened the criteria for mouse button re-binding, so for example you can now swap the “Back” and “Middle Click” buttons (Paul Dann, Plasma 6.3.0. Link)
The Emoji Selector window now remembers its window position (on X11) and size (me: Nate Graham, Plasma 6.3.0. Link)
For notifications that you can pause, the “Pause” button now becomes a “Resume” button after you press it, instead of being checkable (me: Nate Graham, Plasma 6.3.0. Link)
In Plasma’s Networks widget, networks you’re not connected to no longer have Configure buttons, because clicking on them didn’t actually do anything useful anyway (me: Nate Graham, Plasma 6.3.0. Link)
The checkboxes on System Settings’ Bluetooth page have been replaced with switches, because they’re for instant-apply settings (Christoph Wolk, Plasma 6.3.0. Link)
Notable Bug FixesFixed a bug that could cause System Settings to crash when leaving its Wallpaper page (Méven Car, Plasma 6.2.0. Link)
Fixed a bug that could cause Plasma to crash under certain circumstances when applying certain global themes (Nicolas Fella, Plasma 6.2.0. Link)
Fixed a case where plasma-browser-integration-host (the process that communicates with web browsers that have Plasma Browser Integration installed) could crash when windows were closed (Méven Car, Plasma 6.2.0. Link)
Closing a Plasma widget while a tooltip for one of its UI elements is open no longer causes the tooltip to remain visible and awkwardly jump to the panel itself; now the tooltip also disappears as you would expect. This also fixes a related crash (Niccolò Venerandi, Plasma 6.2.0. Link 1 and link 2)
Fixed a bug that could cause the logout process to get stuck on a black screen on X11 (David Edmundson, Plasma 6.2.0. Link)
Moving a window to another virtual desktop using a method that does not switch to that desktop no longer leaves no window focused on the current desktop (David Edmundson, Plasma 6.2.0. Link)
Fixed a bug that caused real-fake-session-restore to not work properly on Wayland (David Edmundson, Plasma 6.2.0. Link)
The footer on Discover’s updates page no longer sometimes gets visually broken (Harald Sitter, Plasma 6.2.0. Link)
When configuring Plasma’s Digital Clock widget to show seconds and using 24-hour time, the time display no longer gets cut off on narrow vertical panels (Akseli Lahtinen, Plasma 6.2.0. Link)
Fixed an issue that could cause Plasma’s edit mode to misbehave in strange ways when there are widgets on the desktop and auto-hide panels (Marco Martin, Plasma 6.2.0. Link)
Plasma’s “Minimize All Windows” widget no longer sometimes fails to restore them on Wayland; now this always works (Christoph Wolk, Plasma 6.2.0. Link)
System Settings once again remembers its window size, position (on X11), and maximization state as expected (Akseli Lahtinen, Plasma 6.2.0. Link)
On X11, you can now open the color scheme editor on System Settings’ Colors page more than once (Albert Astals Cid, Plasma 6.2.0. Link)
Fixed the “two clicks to rename” feature on the Plasma desktop when using systemwide double-click mode so that it works properly (Christoph Wolk, Plasma 6.2.0. Link)
Fixed a bug that caused it to be impossible to change power profiles in the Plasma widget under certain circumstances. There may be other such bugs too BTW; this only fixed one of them (Jakob Petsovits, Plasma 6.2.0. Link)
KWin’s global “Move Mouse to Focus” shortcut now does something more sensible on Wayland by moving the pointer to the focused window instead of the top-left corner of the screen (Xaver Hugl, Plasma 6.2.0. Link)
The Audio Volume widget can once again display its complex view (rather than a dumb giant icon) when placed in an extremely thick panel (Christoph Wolk, Plasma 6.2.0. Link)
Made it possible to translate four labels on System Settings’ Touchpad page which were previously untranslatable and hence always shown in English (Victor Ryzhykh, Plasma 6.2.0. Link)
Plasma’s feature to sync your keyboard’s LED color with the system’s accent color (where supported) can now be permanently disabled if you don’t use it or like it (Natalie Clarius, Plasma 6.2.0. Link)
When using an auto-hide Plasma panel, it can no longer be accidentally opened invisibly while in KWin’s Overview effect, which would also cause it to briefly get stuck open after leaving Overview (Xaver Hugl, Plasma 6.2.0. Link)
Plasma’s Power and Battery widget no longer sometimes mis-labels batteries on systems with removable batteries or multiple batteries (Oliver Beard, Plasma 6.2.0. Link)
Fixed a bug that caused some Plasma widgets’ pop-ups to not have their top corners rounded as intended (Niccolò Venerandi, Plasma 6.2.0. Link)
Throughout QtQuick-based KDE software, pressing a keyboard’s “Show Menu” key now opens the menu under the focused item if there is one, rather than always opening it under the cursor (Evgeny Chesnokov, Frameworks 6.7. Link)
Throughout KDE software, the “Upload to Imgur” sharing plugin now only lets you try to upload file types that Imgur actually supports (Nicolas Fella, Frameworks 6.7. Link)
The informational tooltips seen all over the place in System Settings that you can access by clicking on a little button with the info symbol on it no longer flickers between visible and invisible if it opens right under the cursor (Ismael Asensio, Frameworks 6.7. Link)
Global shortcuts for activating Kickoff no longer break if you restart Plasma with plasmashell --replace (David Edmundson, Frameworks 6.7. Link). Also, friendly reminder that if you’re using Plasma’s systemd startup integration — which you probably are since it’s on by default for distros that ship systemd — the correct way to restart Plasma is systemctl restart --user plasma-plasmashell.service.
Other bug information of note:
- 1 Very high priority Plasma bug (same as last week). Current list of bugs
- 36 15-minute Plasma bugs (up from 33 last week). Current list of bugs
- 181 (!) KDE bugs of all kinds fixed over the last week. Full list of bugs
In Discover, moved the processing of app ratings to another thread so it can’t block the UI thread and make the app feel slow and laggy when the network is slow (Aleix Pol Gonzalez, Plasma 6.2.0. Link)
Launching an app that lacks a .desktop file (e.g. an app packaged as an AppImage) no longer causes a brief screen freeze whose length is proportional to the size of the app’s executable (Vlad Zahorodnii, Plasma 6.2.0. Link)
Optimized how KDE software in general finds mountpoints, which can result in a significant speed-up for various apps’ file-based use cases — up to 80% for one of them! (Kai Uwe Broulik, Frameworks 6.7. Link)
How You Can HelpPlease test the Plasma 6.2 beta release! We’ve focused a lot on stability for this release and want to make sure we haven’t missed anything big before the final release in about a month. Your bug reports do not go into a black hole; we triage every one! So enthusiastic testing and bug reporting is encouraged. I’ve noticed fewer bug reports for this beta than previous ones, and I don’t believe for an instant that it’s because the release is already perfect! Go out there and file those bug reports!
Otherwise, visit https://community.kde.org/Get_Involved to discover additional ways to be part of a project that really matters. Each contributor makes a huge difference in KDE; you are not a number or a cog in a machine! You don’t have to already be a programmer, either. I wasn’t when I got started. Try it, you’ll like it! We don’t bite! Or consider donating instead! That helps too.
Upcoming tablet input changes in Plasma Wayland
This blog post provides the heads-up about planned tablet input changes that are brewing for Plasma 6.3. KWin provides support for the tablet input protocol, but things are different on the client side. Some apps support it, some do not. If an application supports the tablet input protocol, great, it will receive tablet input events as is. On the other hand, if the application does not support the tablet input protocol, then KWin will fake tablet input as pointer input. In Plasma 6.3, KWin will stop doing that and I think that we should briefly talk what led us to such a decision and what impact it will have.
Originally, when the tablet input protocol support had landed in KWin, there were still pretty few applications and toolkits that supported it. Emulating tablet input was a fairly reasonable decision, otherwise you would have likely not been able to use tablet in the Plasma Wayland session at all. As time went by, more and more clients gained native support for the tablet protocol. Unfortunately, in meanwhile, we had also started noticing various issues with tablet emulation.
So, what’s the reasonable thing to do about it? Fix the bugs of course. And we did. But there is still a set of issues that cannot be addressed without bringing more complexity in already too complex code that we are struggling to keep afloat. Enough is enough.
Q: What’s new in 6.3?A: Starting since 6.3, tablet input emulation will be deprecated and disabled by default. Note that you can enable it back by setting the KWIN_WAYLAND_EMULATE_TABLET=1 environment variable.
Q: When will tablet input emulation be dropped?A: There is no concrete milestone at the moment.
Q: What does it mean to you? (as a user)A: Hopefully, nothing. The major toolkits such as GTK, Qt, and SDL already provide support for the tablet protocol, so does Xwayland. So, you should be able to use tablet without any issues in X11 applications or Wayland native applications that use the aforementioned toolkits. Chromium/Electron still does not provide native support for tablet input on Wayland, but it’s also worth noting that most of those applications run through Xwayland by default unless the user sets some command-line arguments.
If your favorite application does not work with tablets, please tell it to the developers of that application so they know that there’s demand for such an operation mode.
Q: What should I do? (as a toolkit developer)A: Please add support for tablets! If your toolkit already supports the tablet input protocol, wonderful, no work to do. \o/
Q: Is KWin alone by stopping emulating tablet input?A: No, it is not. Mutter (the Wayland compositor in GNOME Shell) doesn’t emulate tablet input either.
Closing wordsDeprecating tablet emulation is disappointing but the options that we have are not great either. It’s either bring in more complexity in order to fix the existing issues (plus even more code to ensure that the pointer focus is managed correctly when using both pointer and tablet) into an already too complex codebase or just do nothing special about applications that don’t opt in into tablet input. Hopefully, the remaining applications and toolkits that still miss tablet support add it in the near future. If you have more thoughts about it, please reach out to us at our matrix room.
Sahil Dhiman: Educational and Research Institutions With Own ASN in India
Another one of the ASN list. This turned out longer than I expected (which is good). If you want to briefly understand what is an ASN, my Personal ASNs From India post carries an introduction to it.
Now, here’re the Educational and Research Institutions with their own ASN in India, which I could find:
- AS2697 Education and Research Network
- AS9885 NKN Internet Gateway
- AS23770 Tata Institute of Fundamental Research (used as National Centre for Biological Sciences network)
- AS38021 Network of Indian Institute of Foreign Trade
- AS38620 National Knowledge Network
- AS38872 Indian School of Business
- AS45340 B.M.S College of Engineering
- AS55296 National Institute of Public Finance and Policy
- AS55479 Indian Institute of Technology, Kanpur
- AS55566 Inter University Centre for Astronomy and Astrophysics
- AS55824 NKN Core Network
- AS56056 AMITY-IN
- AS55847 NKN Edge Network
- AS58703 Amrita Vishwa Vidyapeetham
- AS58758 Tata Institute of Fundamental Research (used as Homi Bhabha Centre for Science Education (HBCSE) network)
- AS59163 GLA University
- AS59193 Indian Institute of Technology, Hyderabad
- AS131226 Indian Institute of Technology, Roorkee
- AS131473 SRM University
- AS132423 Indian Institute of Technology, Bombay
- AS132524 Tata Institute of Fundamental Research (used as main campus network)
- AS132749 Indraprastha Institute of Information Technology, Delhi
- AS132780 Indian Institute of Technology, Delhi
- AS132984 Uka Tarsadia University
- AS132785 Shiv Nadar Institution of Eminence Deemed to be University
- AS132995 South Asian University
- AS133002 Indian Institute of Tropical Meteorology
- AS133233 S.N. Bose National Centre for Basic Sciences
- AS133273 Tata Institute of Social Sciences
- AS133308 Indira Gandhi Centre For Atomic Research
- AS133313 Saha Institute of Nuclear Physics
- AS133552 B.M.S. College of Engineering
- AS133723 Institute for Plasma Research
- AS134003 Centre For Cellular And Molecular Platforms
- AS134023 Aligarh Muslim University
- AS134322 Tata Institute of Fundamental Research (used as International Centre for Theoretical Sciences (ICTS) network)
- AS134901 Indian Institute of Science Education And Research
- AS134934 Institute For Stem Cell Biology And Regenerative Medicine
- AS135730 Datta Meghe Institute Of Medical Sciences
- AS135734 Birla Institute of Technology And Science
- AS135835 Sardar Vallabhbhai Patel National Police Academy
- AS136005 Raman Research Institute
- AS136304 Institute of Physics, Bhubaneswar
- AS136470 B.M.S. College of Engineering
- AS136702 Physical Research Laboratory
- AS137136 Indian Agricultural Statistics Research Institute
- AS137282 Kalinga Institute of Industrial Technology
- AS137617 Indian Institute of Management, Ahmedabad
- AS137956 Indian Institute of Technology, Ropar
- AS138155 Jawaharlal Nehru University
- AS138231 Indian Institute of Information Technology, Allahabad
- AS140033 Indian Institute of Technology, Bhilai
- AS140118 Indian Institute of Technology Banaras Hindu University
- AS140192 Indian Institute of Information Technology and Management, Kerala
- AS140200 Panjab University
- AS141270 Indian Institute Of Technology, Indore
- AS141340 Indian Institute Of Technology, Madras
- AS141477 Indira Gandhi National Open University
- AS141478 Director National Institute Of Technology, Calicut
- AS141288 National Institute of Science Education And Research Bhubaneswar
- AS141507 National Institute of Mental Health And Neurosciences
- AS142493 Sri Ramachandra Institute Of Higher Education And Research
- AS147239 Lal Bahadur Shastri National Academy of Administration (LBSNAA)
- AS147258 Dayalbagh Educational Institute
- AS149607 National Forensic Sciences University
- AS151086 Amrita Vishwa Vidyapeetham
- AS152533 National Institute of Technology, Karnataka
Special Mentions
Some observations:
- Only 14 (out of 67) networks have/announce IPv6 prefixes.
- Two networks have IX presence; AS132785 Shiv Nadar at Extreme IX Delhi and AS56056 Amity at DE-CIX Delhi.
- TIFR as an organization has 4 ASNs (AS23770, AS58758, AS132524 and AS134322), BMS College of Engineering has 3 (AS45340, AS133552 and AS136470) and Amrita Vishwa Vidyapeetham has 2 (AS58703 and AS151086).
- AS2697, AS9885, AS38620, AS55824 and AS55847 ie Education and Research Network (ERNET) and National Knowledge Network (NKN) form the Indian NREN.
- 43 network have NKN as their upstream, while BSNL comes second as upstream for 21.
Let me know if I’m missing someone.
The Drop Times: Heading to Barcelona? Stop by LagoonCon Barcelona 2024!
Gary Benson: Too many git branches?
Do you have too many git branches on the go at once? Here is the command to list them in order of last modification:
git for-each-ref --sort=-committerdate refs/headsmandclu: Barcelona Update: Starshot Events Recipe Track
With DrupalCon Barcelona fast approaching I thought it was time to share some more updates on the progress of the events recipe for Drupal CMS a.k.a. the Starshot initiative.
mandclu Sep 20, 2024 - 9:27am TagsReal Python: The Real Python Podcast – Episode #221: Thriving as a Developer With ADHD
What are strategies for being a productive developer with ADHD? How can you help your team members with ADHD to succeed and complete projects? This week on the show, we speak with Chris Ferdinandi about his website and podcast "ADHD For the Win!"
[ Improve Your Python With 🐍 Python Tricks 💌 – Get a short & sweet Python Trick delivered to your inbox every couple of days. >> Click here to learn more and see examples ]
PyCharm: What’s New in PyCharm 2024.2.2!
PyCharm 2024.2.2 is here with many key updates, including Python support improvements, new Django features, and enhancements to the Data View tool window!
Visit our What’s New page for more details on all these features and to explore many others. You can download the latest version from our download page or update your current version through our free Toolbox App.
Download PyCharm 2024.2.2 PyCharm 2024.2.2 highlights Django enhancements PRO New code completion suggestionsWhen working with models, PyCharm now offers field completion suggestions in a variety of cases, such as Model.save(update_fields[…]), Model.refresh_from_db(fields=[…]), Model.clean_fields(exclude=[…]), and so on.
Quick-fix to create a method for an unresolved ViewSetIf a ViewSet has an unresolved reference, PyCharm suggests a quick-fix to introduce the missing method. Use Alt + Enter to call it.
What’s new! Data View PROYou can now look at n-dimensional NumPy arrays in the Data View tool window. Define the array you would like to inspect, along with a specific dimension or slice, in a special field at the bottom of the tool window, and PyCharm will display a table with the results.
Python support improvements Support for default types for type parameters (PEP 696)Improve typing with PyCharm’s support for the Python 3.13 ability to define the default types for type parameters. The IDE now incorporates default types for type parameters both for old-style and new-style generic classes, functions, and type aliases, and it takes them into account in type inference.
Pattern matching: Foldable match statementsTo improve the readability of code with large pattern-matching statements, you can now use folding for entire match statements or for separate cases inside them.
Download PyCharm 2024.2.2Visit our What’s New page to learn about other useful features included in this release, or read the release notes for the full breakdown, including more details on the features mentioned here.
If you encounter any problems, please report them in our issue tracker so we can address them promptly.
Connect with us on X (formerly Twitter) to share your thoughts on PyCharm 2024.2.2!
The Drop Times: 'Local Association Stand' at DrupalCon Barcelona 2024
Promet Source: Get to Know Provus®EDU: Our Higher Ed Drupal Distro
Qt Gradle Plugin 1.0 Released
Qt Gradle Plugin 1.0 (QtGP) build tool has been released. You can include it in your Android builds from Maven Central.
Web Review, Week 2024-38
Let’s go for my web review for the week 2024-38.
Is Tor still safe to use?Tags: tech, tor, privacy
The quick answer is yes. The longer answer is that more effort is still required to ensure the network has enough diversity of nodes to stay healthy.
https://blog.torproject.org/tor-is-still-safe/
Tags: tech, ai, machine-learning, gpt, business, economics, criticism
This is a very harsh and bleak view on the current generative AI craze. Clearly it survives on some sort of weird faith that things will magically improve. Some decision makers clearly run fully on said faith and lost all kind of realistic view of the situation. They are just very disconnected from the user’s needs.
There’s even a funny quote in there: “Generative AI must seem kind of magical when your entire life is either being in a meeting or reading an email”.
When this bubble bursts, it’s hard to predict what the fallout will be on the tech industry… for sure it won’t be pretty. It also begs the question: what is this industry going to do next? There’s clearly no plan after generative AI.
https://www.wheresyoured.at/subprimeai/
Tags: tech, ai, machine-learning, gpt, politics, ecology
Need to illustrate how much the current AI arm race is an ecological and social problem? Here is a very pathological case. This is what you get when you let the tycoons behind this completely unchecked.
https://www.npr.org/2024/09/11/nx-s1-5088134/elon-musk-ai-xai-supercomputer-memphis-pollution
Tags: tech, oracle, surveillance
People are gasping in horror with Larry Ellison’s latest claims… but really they should realize he’s not dreaming big. All of that is already here in one form or another. Maybe it was time to protest years ago?
https://www.404media.co/larry-ellisons-ai-powered-surveillance-dystopia-is-already-here/
Tags: tech, security, war, battery
Or why we should all be concerned and condemn the latest pager and walkie-talkie attacks. They clearly opened a Pandora’s box, it’d be surprising not to see more of those from various organizations. The funds and efforts required make it affordable enough.
https://www.bunniestudios.com/blog/2024/turning-everyday-gadgets-into-bombs-is-a-bad-idea/
Tags: tech, javascript, trademark, law, oracle
This is a good initiative. It makes no sense for Oracle to still cling onto JavaScript has a trademark.
Tags: tech, c++
Interesting proposal for a superset of C++ bringing a safe subset. Could it be a way to improve C++ use for the coming decade?
Tags: tech, asynchronous, multithreading, io
Or why going through an event loop might be more work initially but will make some things easier longer term. Nice way to frame how threads are bringing some opaque state.
https://utcc.utoronto.ca/~cks/space/blog/tech/ThreadsAsyncIOAndCancellation
Tags: tech, linux, kernel, realtime
Definitely good news if you have to maintain a real-time Linux system for industrial use. No more patches to carry over.
Tags: tech, kernel, rust
An interesting endeavor to create you own OS using another language than one of the usual ones.
Tags: tech, databases, sqlite, backup
Wish to use SQLite in production? You better have a good backup strategy. This article explains the main available options.
https://oldmoe.blog/2024/04/30/backup-strategies-for-sqlite-in-production/
Tags: tech, shell, scripting
Shell scripts deserve to be well designed like this indeed.
https://nochlin.com/blog/6-techniques-i-use-to-create-a-great-user-experience-for-shell-scripts
Tags: tech, shader, vulkan, directx
This is good news. DirectX being the other big graphics API if it adopts SPIR-V as interchange format it’ll open the way to more shader reuses.
https://devblogs.microsoft.com/directx/directx-adopting-spir-v/
Tags: tech, web, frontend, webgpu, 2d, graphics
Looks like an interesting tool to have in the box for 2D effects on the web.
Tags: tech, gui, html, web, frontend, complexity
A good list to design HTML forms. The bar is indeed high and there’s value in simplicity.
https://daverupert.com/2024/09/good-forms/
Tags: tech, web, frontend, css
This is indeed an interesting new CSS selector. Opens the door to doing more in a declarative way and with less Javascript.
https://www.joshwcomeau.com/css/has/
Tags: tech, management, metrics
We should definitely be more wary of metrics indeed. They help for a while, but at some point you’ll necessarily get unfortunately burnt by them. The only fallback is “good judgement”… do what you can with this.
https://buttondown.com/hillelwayne/archive/goodharts-law-in-software-engineering/
Tags: tech, team, management
Nice tricks to help the team jell. I should try this more.
https://brittonbroderick.com/2024/08/18/building-aggressively-helpful-teams/
Bye for now!
Akademy 2024 (in Würzburg!)
This year Akademy was in Würzburg (shock! horror!). I think its not too far fetched to say that we pulled it successfully.
How it came to beDuring last years Akademy in Thessaloniki the idea came up given the high density of KDE people in the area to hold Akademy in Würzburg. On top we had the perfect venue in mind: two lecture halls for talks, BoF rooms and a ample common area for people to hack and socialize. I had such thoughts in the back of my mind for a while but did not share or go through with them.
However what Akademy does is it makes you talk to people and Tobias convinced it me that we should do it and more people even agreed that Akademy in Würzburg would be a good idea! (Of course some of these encouragers this does not mean work organizing Akademy like it would mean for us…) So on the second-to-last day of Akademy I sat down and wrote an email to my former university professor to enquire about the possibility of doing Akademy in the building that we envisioned.
And just like that, after some informal talks during Akademy and a meeting at the University and sending in a proposal after the Call for Hosts later you end up having weekly meetings to talk about and plan the next installment of Akademy.
How it did goThere were some problems but I think all in all this year Akademy went very well. I heard so much praise and positive feedback it felt a bit surreal at first (as did Sunday evening when all the talks were done). The most stressful situation for me happened on Sunday afternoon when I retrieved my charging phone from the team room to discover that the social event could not go ahead as planned and trying to manage that with the rest of the team. I think the resulting evening was very nice and chill and you could feel my relieve. I heard there was even an afterparty afterwards at the bar where we had held the welcome event.
Of course during the event there are always minor issues that need dealing with and looking out for those, dealing with them and trying to make sure everything is running smoothly (and the stress coming these things) meant that I couldn’t (and was not in the right state of mind) to focus much on the talks. When the BoF days started this was bit better but only on Thursday after the day trip I felt in a ‘conference mood’ and was able to focus fully on the BoFs that I was attending and sit down and hack a bit. If you want to learn more about the actual conference many people have blogged about it on the planet or read the report on the Akademy website.
In the end I think it’s fair to say that Akademy was a success. Made possible by KDE e.V. (go donate!), the sponsors, all the people of the Akademy team local and non-local, all the Volunteers on short and on long notice an last but not least all the awesome attendees - there would be no Akademy without any people. Thank you to you all! I am excited to learn about where next years Akademy will be (you can do it as well - it’s not hard and you get an awesome award on top) and looking forward to attending it as ‘normal Attendee’ and meeting everyone again there (if not earlier).
Talk Python to Me: #477: Awesome Text Tricks with NLP and spaCy
eiriksm.dev: - I think I said “wait that’s all?” out loud!
From time to time I get some really good and motivating feedback on the product I have built, violinist.io. And I want to start this post, which will also have a huge feature announcement, by mentioning a couple of them:
It was wonderfully painless (...) I don’t think I’ve ever experienced a faster setup of a CI tool — I think I said “wait that’s all?” out loud!
overall did the trick of what I was looking for and was very very fast
In other words, easy to set up, and fast results.
Well, today I want to share another product update that will make it theoretically even faster to set up and get results. But first allow me to provide a bit of background on why this new feature came to be.
One recurring question we get is regarding two avenues of a similar aspect:
- Does our code have to make its way to violinist.io infrastructure for us to be able to use the service?
- Can violinist.io access our Self Hosted GitLab which is locked down with a required VPN connection
They might differ a bit in wording or actual focus, but they usually boil down to one of these. And from time to time we find a compromise to both of these questions together, and the person contacting us turn into happy customers. But from time to time these questions also become the actual blocker for them to start using violinist.io. But now, at least, we have an alternative that covers both of these use cases: Self hosting violinist.io runners!
And here is why I am mentioning the feedback regarding quick onboarding in the context of this product announcement. You can literally start an update check with one docker command:
docker run \ --pull=always \ -e "LICENCE_KEY=my_key" \ -e "PROJECT_URL=https://github.com/user/repo" \ -e "USER_TOKEN=ghp_jYgGb_1npvkiHTdnM" \ ghcr.io/violinist-dev/update-check-runner:8.3-multi-composer-2This will run the same update job as if it were running on violinist.io, only using your own computer!
Of course, this in itself is not super useful. Avoiding running commands on your computer is the whole point of using an automatic update service like violinist.io, but now you can do cool stuff like:
- Run the same update jobs as violinist.io without any code entering any third party infrastructure
- Run jobs your CI infrastructure of choice. GitHub Actions, CircleCI, Bitbucket pipelines, Self Hosted GitLab, your totally locked down VPN protected GitLab instance that has a totally locked down Jenkins server. And so on
- Decide your own intervals for running them, probably inside said CI infrastructure. Daily jobs? Weekly jobs? Hourly jobs? Not a problem.
- Compose CI workflows that can do all your repositories in a matrix, all on the same schedule, if useful?
- Expose a webhook to trigger jobs, and run them when new items appear in the Drupal Security Announcements RSS feed
- And a million other things probably? You decide!
If this sounds useful to you, or your organization, please don’t hesitate to reach out for a free trial. In fact, in the name of smooth onboarding, here is an absolutely free trial for you already without reaching out (as long as you are reading and using this within 2 months of this blog post): A totally free license key, valid for all repositories for 2 months from today (valid until 2024-11-19T19:20:19+01:00):
hc1NTsMwFATgHqXyCZ6f_-2V_RyvkLgAmzRYYLVqqiaqQKhSz9CrIA6T2xAWbGE50nwz9-Vr-Xz0Ajy7tPHQjm2anx7aUI9Dpdc67H8D8-g_Ji-sZ5u_m5v6dmrndxaa50YgSJDchZXq_-lzP_cs9J7_fPEV1HZu-2m7O4wv29M4zSzsPA_X63LLWKJb1w1SykKlRJgFoXRFR25AaZ6M48KgJKFJAdlM0kEU2bpkEYwCRBdBpqisQuIl6yyh01QKqNIZqUvXRcgchS0KxWohko3JKecgfQMNow all you need is a repository and a PAT (Personal Access Token), and you are off on your new automatic update adventure. For a bit more documentation than this sparse promotional blog post, please visit the container repository.
Lastly, there are so much more I want to share and address about this. For example the aspect of open source in all of this, the differences between this and violinist.io (the SaaS), the licencing and pricing aspect. But those are all blog posts on their own. For now, I hope you will try it out if it’s useful, and that you want to connect should you have any questions or concerns. Here in the comments, or by reaching out.
Let’s close up this blog post with an animated gif of "runners".
Wingware: Wing Python IDE Version 10.0.6 - September 20, 2024
Wing 10.0.6 adds support for Python 3.13 and fixes some issues with AI development, code refactoring, and unit testing with pytest.
See the change log for details.
Download Wing 10 Now: Wing Pro | Wing Personal | Wing 101 | Compare Products
What's New in Wing 10
AI Assisted Development
Wing Pro 10 takes advantage of recent advances in the capabilities of generative AI to provide powerful AI assisted development, including AI code suggestion, AI driven code refactoring, description-driven development, and AI chat. You can ask Wing to use AI to (1) implement missing code at the current input position, (2) refactor, enhance, or extend existing code by describing the changes that you want to make, (3) write new code from a description of its functionality and design, or (4) chat in order to work through understanding and making changes to code.
Examples of requests you can make include:
"Add a docstring to this method" "Create unit tests for class SearchEngine" "Add a phone number field to the Person class" "Clean up this code" "Convert this into a Python generator" "Create an RPC server that exposes all the public methods in class BuildingManager" "Change this method to wait asynchronously for data and return the result with a callback" "Rewrite this threaded code to instead run asynchronously"Yes, really!
Your role changes to one of directing an intelligent assistant capable of completing a wide range of programming tasks in relatively short periods of time. Instead of typing out code by hand every step of the way, you are essentially directing someone else to work through the details of manageable steps in the software development process.
Support for Python 3.12, 3.13, and ARM64 LinuxWing 10 adds support for Python 3.12 and 3.13, including (1) faster debugging with PEP 669 low impact monitoring API, (2) PEP 695 parameterized classes, functions and methods, (3) PEP 695 type statements, and (4) PEP 701 style f-strings.
Wing 10 also adds support for running Wing on ARM64 Linux systems.
Poetry Package ManagementWing Pro 10 adds support for Poetry package management in the New Project dialog and the Packages tool in the Tools menu. Poetry is an easy-to-use cross-platform dependency and package manager for Python, similar to pipenv.
Ruff Code Warnings & ReformattingWing Pro 10 adds support for Ruff as an external code checker in the Code Warnings tool, accessed from the Tools menu. Ruff can also be used as a code reformatter in the Source > Reformatting menu group. Ruff is an incredibly fast Python code checker that can replace or supplement flake8, pylint, pep8, and mypy.
Try Wing 10 Now!
Wing 10 is a ground-breaking new release in Wingware's Python IDE product line. Find out how Wing 10 can turbocharge your Python development by trying it today.
Downloads: Wing Pro | Wing Personal | Wing 101 | Compare Products
See Upgrading for details on upgrading from Wing 9 and earlier, and Migrating from Older Versions for a list of compatibility notes.
Pages
Recent Publications
- Managing Hidden Dependencies in OO Software: a Study Based on Open Source Projects
- Open Source Communities as Liminal Ecosystems
- Investigating developers' email discussions during decision-making in Python language evolution
- Developers, Quality Control and Download Volume in Open Source Software (OSS) Projects
FLOSS Project Planets
- Web Wash: Drupal 11.1: Farewell Body Field and Hello New Hook System
- Drupal Starshot blog: Announcing the selected partner for the new Design System for Experience Builder and Drupal CMS
- Daniel Roy Greenfeld: TIL: types.SimpleNamespace is a Bunch class
- LostCarPark Drupal Blog: Drupal Advent Calendar 2024 Addendum - The Drop Times and 24 Days of Automation
- FSF Events: Free Software Directory meeting on IRC: Friday, December 27, starting at 12:00 EST (17:00 UTC)