
Planet Python
Real Python: Using the len() Function in Python
The len() function in Python is a powerful and efficient tool used to determine the number of items in objects, such as sequences or collections. You can use len() with various data types, including strings, lists, dictionaries, and third-party types like NumPy arrays and pandas DataFrames. Understanding how len() works with different data types helps you write more efficient and concise Python code.
Using len() in Python is straightforward for built-in types, but you can extend it to your custom classes by implementing the .__len__() method. This allows you to customize what length means for your objects. For example, with pandas DataFrames, len() returns the number of rows. Mastering len() not only enhances your grasp of Python’s data structures but also empowers you to craft more robust and adaptable programs.
By the end of this tutorial, you’ll understand that:
- The len() function in Python returns the number of items in an object, such as strings, lists, or dictionaries.
- To get the length of a string in Python, you use len() with the string as an argument, like len("example").
- To find the length of a list in Python, you pass the list to len(), like len([1, 2, 3]).
- The len() function operates in constant time, O(1), as it accesses a length attribute in most cases.
In this tutorial, you’ll learn when to use the len() Python function and how to use it effectively. You’ll discover which built-in data types are valid arguments for len() and which ones you can’t use. You’ll also learn how to use len() with third-party types like ndarray in NumPy and DataFrame in pandas, and with your own classes.
Free Bonus: Click here to get a Python Cheat Sheet and learn the basics of Python 3, like working with data types, dictionaries, lists, and Python functions.
Getting Started With Python’s len()The function len() is one of Python’s built-in functions. It returns the length of an object. For example, it can return the number of items in a list. You can use the function with many different data types. However, not all data types are valid arguments for len().
You can start by looking at the help for this function:
Python >>> help(len) Help on built-in function len in module builtins: len(obj, /) Return the number of items in a container. Copied!The function takes an object as an argument and returns the length of that object. The documentation for len() goes a bit further:
Return the length (the number of items) of an object. The argument may be a sequence (such as a string, bytes, tuple, list, or range) or a collection (such as a dictionary, set, or frozen set). (Source)
When you use built-in data types and many third-party types with len(), the function doesn’t need to iterate through the data structure. The length of a container object is stored as an attribute of the object. The value of this attribute is modified each time items are added to or removed from the data structure, and len() returns the value of the length attribute. This ensures that len() works efficiently.
In the following sections, you’ll learn about how to use len() with sequences and collections. You’ll also learn about some data types that you cannot use as arguments for the len() Python function.
Using len() With Built-in SequencesA sequence is a container with ordered items. Lists, tuples, and strings are three of the basic built-in sequences in Python. You can find the length of a sequence by calling len():
Python >>> greeting = "Good Day!" >>> len(greeting) 9 >>> office_days = ["Tuesday", "Thursday", "Friday"] >>> len(office_days) 3 >>> london_coordinates = (51.50722, -0.1275) >>> len(london_coordinates) 2 Copied!When finding the length of the string greeting, the list office_days, and the tuple london_coordinates, you use len() in the same manner. All three data types are valid arguments for len().
The function len() always returns an integer as it’s counting the number of items in the object that you pass to it. The function returns 0 if the argument is an empty sequence:
Python >>> len("") 0 >>> len([]) 0 >>> len(()) 0 Copied!In the examples above, you find the length of an empty string, an empty list, and an empty tuple. The function returns 0 in each case.
A range object is also a sequence that you can create using range(). A range object doesn’t store all the values but generates them when they’re needed. However, you can still find the length of a range object using len():
Python >>> len(range(1, 20, 2)) 10 Copied!This range of numbers includes the integers from 1 to 19 with increments of 2. The length of a range object can be determined from the start, stop, and step values.
In this section, you’ve used the len() Python function with strings, lists, tuples, and range objects. However, you can also use the function with any other built-in sequence.
Read the full article at https://realpython.com/len-python-function/ »[ Improve Your Python With 🐍 Python Tricks 💌 – Get a short & sweet Python Trick delivered to your inbox every couple of days. >> Click here to learn more and see examples ]
Real Python: The Real Python Podcast – Episode #228: Maintaining the Foundations of Python & Cautionary Tales
How do you build a sustainable open-source project and community? What lessons can be learned from Python's history and the current mess that the WordPress community is going through? This week on the show, we speak with Paul Everitt from JetBrains about navigating open-source funding and the start of the Python Software Foundation.
[ Improve Your Python With 🐍 Python Tricks 💌 – Get a short & sweet Python Trick delivered to your inbox every couple of days. >> Click here to learn more and see examples ]
Talk Python to Me: #485: Secure coding for Python with SheHacksPurple
Matt Layman: Heroku To DigitalOcean - Building SaaS #206
Python Morsels: Inspecting objects in Python
I rely on 4 functions for inspecting Python objects: type, help, dir, and vars.
Table of contents
- Inspecting an object's structure and data
- How to see an object's class
- Looking up documentation with help
- Getting the methods and attributes for an object
- Inspecting direct attributes of an object
- Base classes, module paths, and more
- Inspect Python objects with type, help, dir, and vars
The scenario is, we're either in the Python REPL or we've used the built-in breakpoint function to drop into the Python debugger within our code. So we're within some sort of interactive Python environment.
For example, we might be running this file, which we've put a breakpoint call in to drop into a Python debugger:
from argparse import ArgumentParser from collections import Counter from pathlib import Path import re def count_letters(text): return Counter( char for char in text.casefold() if char.isalpha() ) def main(): parser = ArgumentParser() parser.add_argument("file", type=Path) args = parser.parse_args() letter_counts = count_letters(args.file.read_text()) breakpoint() for letter, count in letter_counts.most_common(): print(count, letter.upper()) if __name__ == "__main__": main()And we've used the PDB interact command to start a Python REPL:
~ $ python3 letter_counter.py frankenstein.txt > /home/trey/letter_counter.py(18)main() -> breakpoint() (Pdb) interact *pdb interact start* >>>We have a letter_counts variable that refers to some sort of object. We want to know what this object is all about.
What questions could we ask of this object?
Well, to start with, we could simply refer to the object, and then hit Enter:
>>> letter_counts Counter({'e': 46043, 't': 30365, 'a': 26743, 'o': 25225, 'i': 24613, 'n': 24367, 's': 21155, 'r': 20818, 'h': 19725, 'd': 16863, 'l': 12739, 'm': 10604, 'u': 10407, 'c': 9243, 'f': 8731, 'y': 7914, 'w': 7638, 'p': 6121, 'g': 5974, 'b': 5026, 'v': 3833, 'k': 1755, 'x': 677, 'j': 504, 'q': 324, 'z': 243})We've typed the name of a variable that points to an object, and now we see the programmer-readable representation for that object.
How to see an object's classOften, the string representation tells …
Read the full article: https://www.pythonmorsels.com/inspecting-python-objects/Django Weblog: Django’s technical governance challenges, and opportunities
As of October 29th, two of four members of the Django Software Foundation Steering Council have resigned from their role, with their intentions being to trigger an election of the Steering Council earlier than otherwise scheduled, per our established governance processes.
To our departing members, Simon and Adam, thank you for your contributions to Django and its governance ❤️. The framework and our community owes a lot to your dedication, and we’re confident our community will join us in celebrating your past contributions – and look forward to learning about your future endeavors in the Django ecosystem. And thanks to the remaining members, James and Andrew, for their service over the years.
Our governance challengesGovernance in open source is hard, and community-driven open source even more so. We’re proud that Django’s original two Benevolent Dictators For Life (BDFLs) both retired from the role and turned things over to community governance ten years ago now. The BDFL model can provide excellent technical governance, but also has its flaws. So the mantle of technical governance then went on to the Core Developers and the Technical Board (renamed to Steering Council) was introduced.
However, time has revealed flaws in the Steering Council’s governance model and operations. The Steering Council was able to provide decision-making – tiebreaking when the developer community couldn’t lead to consensus – but didn’t provide more forward-looking leadership or vision. Disagreements over how – or if – the Steering Council should approach this part of leadership led us to the current situation, with no functioning technical governance as of a few weeks ago. Even before those recent events, those flaws were also a common source of frustration for our contributors, and a source of concern for Django users who (rightly or not) might have expectations of Django’s direction – such as the publication of a “roadmap” for Django development.
The Django Software Foundation Board of Directors is and was aware of those issues, and recently made attempts to have the Steering Council rectify them, in coordination with other established community members. The DSF Board has tried to be hands-off when it comes to technical leadership, but in retrospect we should have been getting involved sooner, or more decisively. The lack of technical leadership is an existential threat to Django – a slow moving one, but a threat nonetheless. It’s our responsibility to address this threat.
Where we’re headingWe now need new Steering Council members. But we also need governance reform. There’s a lot about the Steering Council that is good and might only need minimal changes. However, the overall question of the Steering Council’s remit, and how it approaches technical leadership for the Django community, needs to be resolved.
We’re going to hold early elections of the Steering Council, as soon as we’ve completed the ongoing 2025 DSF Board elections. Those elections will follow existing processes, and we will want a Steering Council who strives to meet the group’s intended goals:
- To safeguard big decisions that affect Django projects at a fundamental level.
- To help shepherd the project’s future direction.
We expect the new Steering Council will take on those known challenges, resolve those questions of technical leadership, and update Django’s technical governance. They will have the full support of the Board of Directors to address this threat to Django’s future. And the Board will also be more decisive in intervening, should similar issues keep arising.
How you can helpWe need contributors willing to take on those challenges and help our community come out ahead. It’s a big role, impactful but demanding. And there are strict, often annoying eligibility rules for the Steering Council.
To help you help us, we’ve set up a form: Django 6.x Steering Council elections - Expression of interest.
If you’re interested in stepping up to shepherd Django’s technical direction, fill in our expression of interest form. We’ll let you know whether or not you meet those eligibility rules, take the guesswork out of the way. You get to focus on your motivation for taking on this kind of high-purpose, high-reward governance role.
Django 6.x Steering Council elections - Expression of interest
How everyone can helpThose elections will be crucial for the future of Django, and will be decided thanks to the vote of our Django Software Foundation Individual Members. If you know people who contribute to the DSF’s mission but aren’t Individual Members already -- use our form to nominate them as Individual Members, so they’re eligible to vote. If you’re that person, do nominate yourself. We consider all contributions towards our mission: advancing and promoting Django, protecting the framework’s long-term viability, and advancing the state of the art in web development.
Any questions? Reach out via email to foundation@djangoproject.com.
PyCharm: Inline AI Prompting, Coding Assistance for the dataclass_transform Decorator (PEP 681), and More in PyCharm 2024.3!
Code smarter, optimize performance, and stay focused on what matters most with the latest updates in PyCharm 2024.3. From enhanced support for AI Assistant and Jupyter notebooks to new features like no-code data filtering, there’s so much to explore.
Learn about all the updates on our What’s New page, download the latest version from our website, or update your current version through our free Toolbox App.
Download PyCharm 2024.3 Key features of PyCharm 2024.3 AI Assistant Inline AI promptingGet help with code, generate documentation, or write tests by prompting AI directly in PyCharm’s editor. Just type your request on a new line and hit Enter.
Edits made by AI are marked in purple in the gutter, so changes are easy to spot. Need a fresh suggestion? Press Tab, Ctrl+/ ( ⌘/ on macOS), or manually edit the purple input text yourself. This feature is available for Python, JavaScript, TypeScript, JSON, YAML, and Jupyter notebooks.
For a personalized AI chat experience, you can now also choose from Google Gemini, OpenAI, or your own local models. Moreover, enhanced context management now lets you control what AI Assistant takes into consideration. The brand-new UI auto-includes open files and selected code and comes with options to add or remove files and attach project-wide instructions to guide responses across your codebase.
Ability to convert for loops into list comprehensionsRefactor your code faster with AI Assistant, which can now help you change massive for loops into list comprehensions. This feature works for all for loops, including nested and while loops.
Local multiline AI code completion PyCharm ProfessionalPyCharm Professional now provides local multiline AI code completion suggestions based on the proprietary JetBrains ML model used for Full Line Code Completion. Note that we don’t use your data to train the model.
Local multiline code completion typically generates 2–4 lines of code in scenarios where it can predict the next sequence of logical steps, such as within loops, when handling conditions, or when completing common code patterns and boilerplate sections.
Coding assistance for the dataclass_transform decorator (PEP 681)PyCharm now supports intelligent coding assistance for custom data classes created with libraries using the dataclass_transform decorator. Enjoy the same support as for standard data classes, including attribute code completion and type inference for constructor signatures.
Download PyCharm 2024.3 Jupyter Notebook PyCharm Professional Auto-installation for multiple packagesPyCharm 2024.3 makes it easier to install packages that are imported in your code. A new quick-fix is available for bulk auto-installations, allowing you to download and install several packages in one click.
Ability to open Jupyter table outputs in the Data View windowView Jupyter table outputs in the Data View tool window to access powerful features like heatmaps, formatting, slicing, and AI functions for enhanced dataframe analysis. Just click on the Open in Data View icon to get started.
No-code data filteringEffortlessly filter data in the Data View tool window or within dataframes without writing any code. Just click the Filter icon in the upper-right corner, choose your filter options and see results in the same window. This functionality works with all supported Python frameworks, including pandas, Polars, NumPy, PyTorch, TensorFlow, and Hugging Face Datasets.
Debug port specification PyCharm ProfessionalPyCharm now allows you to specify a single debugger port for all communications, simplifying debugging in restricted environments like Docker or WSL. After you set the port in the debugger settings, the debugger runs as a server and all communication between it and the IDE flows through the specified port.
Download PyCharm 2024.3Visit our What’s New page or check out the full release notes for more features and additional details about the features mentioned here. Please report any bugs on our issue tracker so we can address them promptly.
Connect with us on X (formerly Twitter) to share your thoughts on PyCharm 2024.3. We look forward to hearing from you!
Real Python: Quiz: Namespaces and Scope in Python
In this quiz, you’ll test your understanding of Python Namespaces and Scope.
You’ll revisit how Python organizes symbolic names and objects in namespaces, when Python creates a new namespace, how namespaces are implemented, and how variable scope determines symbolic name visibility.
[ Improve Your Python With 🐍 Python Tricks 💌 – Get a short & sweet Python Trick delivered to your inbox every couple of days. >> Click here to learn more and see examples ]
PyPy: Guest Post: Final Encoding in RPython Interpreters
This post started as a quick note summarizing a recent experiment I carried out upon a small RPython interpreter by rewriting it in an uncommon style. It is written for folks who have already written some RPython and want to take a deeper look at interpreter architecture.
Some experiments are about finding solutions to problems. This experiment is about taking a solution which is already well-understood and applying it in the context of RPython to find a new approach. As we will see, there is no real change in functionality or the number of clauses in the interpreter; it's more like a comparison between endo- and exoskeletons, a different arrangement of equivalent bones and plates.
OverviewAn RPython interpreter for a programming language generally does three or four things, in order:
- Read and parse input programs
- Encode concrete syntax as abstract syntax
- Optionally, optimize or reduce the abstract syntax
- Evaluate the abstract syntax: read input data, compute, print output data, etc.
Today we'll look at abstract syntax. Most programming languages admit a concrete parse tree which is readily abstracted to provide an abstract syntax tree (AST). The AST is usually encoded with the initial style of encoding. An initial encoding can be transformed into any other encoding for the same AST, looks like a hierarchy of classes, and is implemented as a static structure on the heap.
In contrast, there is also a final encoding. A final encoding can be transformed into by any other encoding, looks like an interface for the actions of the interpreter, and is implemented as an unwinding structure on the stack. From the RPython perspective, Python builtin modules like os or sys are final encodings for features of the operating system; the underlying implementation is different when translated or untranslated, but the interface used to access those features does not change.
In RPython, an initial encoding is built from a hierarchy of classes. Each class represents a type of tree nodes, corresponding to a parser production in the concrete parse tree. Each class instance therefore represents an individual tree node. The fields of a class, particularly those filled during .__init__(), store pre-computed properties of each node; methods can be used to compute node properties on demand. This seems like an obvious and simple approach; what other approaches could there be? We need an example.
Final Encoding of BrainfuckWe will consider Brainfuck, a simple Turing-complete programming language. An example Brainfuck program might be:
[-]This program is built from a loop and a decrement, and sets a cell to zero. In an initial encoding which follows the algebraic semantics of Brainfuck, the program could be expressed by applying class constructors to build a structure on the heap:
Loop(Plus(-1))A final encoding is similar, except that class constructors are replaced by methods, the structure is built on the stack, and we are parameterized over the choice of class:
lambda cls: cls.loop(cls.plus(-1))In ordinary Python, transforming between these would be trivial, and mostly is a matter of passing around the appropriate class. Indeed, initial and final encodings are equivalent; we'll return to that fact later. However, in RPython, all of the types must line up, and classes must be determined before translation. We'll need to monomorphize our final encodings, using some RPython tricks later on. Before that, let's see what an actual Brainfuck interface looks like, so that we can cover all of the difficulties with final encoding.
Before we embark, please keep in mind that local code doesn't know what cls is. There's no type-safe way to inspect an arbitrary semantic domain. In the initial-encoded version, we can ask isinstance(bf, Loop) to see whether an AST node is a loop, but there simply isn't an equivalent for final-encoded ASTs. So, there is an implicit challenge to think about: how do we evaluate a program in an arbitrary semantic domain? For bonus points, how do we optimize a program without inspecting the types of its AST nodes?
What follows is a dissection of this module at the given revision. Readers may find it satisfying to read the entire interpreter top to bottom first; it is less than 300 lines.
Core FunctionalityFinal encoding is given as methods on an interface. These five methods correspond precisely to the summands of the algebra of Brainfuck.
class BF(object): # Other methods elided def plus(self, i): pass def right(self, i): pass def input(self): pass def output(self): pass def loop(self, bfs): passNote that the .loop() method takes another program as an argument. Initial-encoded ASTs have other initial-encoded ASTs as fields on class instances; final-encoded ASTs have other final-encoded ASTs as parameters to interface methods. RPython infers all of the types, so the reader has to know that i is usually an integer while bfs is a sequence of Brainfuck operations.
We're using a class to implement this functionality. Later, we'll treat it as a mixin, rather than a superclass, to avoid typing problems.
MonoidIn order to optimize input programs, we'll need to represent the underlying monoid of Brainfuck programs. To do this, we add the signature for a monoid:
class BF(object): # Other methods elided def unit(self): pass def join(self, l, r): passThis is technically a unital magma, since RPython doesn't support algebraic laws, but we will enforce the algebraic laws later on during optimization. We also want to make use of the folklore that free monoids are lists, allowing callers to pass a list of actions which we'll reduce with recursion:
class BF(object): # Other methods elided def joinList(self, bfs): if not bfs: return self.unit() elif len(bfs) == 1: return bfs[0] elif len(bfs) == 2: return self.join(bfs[0], bfs[1]) else: i = len(bfs) >> 1 return self.join(self.joinList(bfs[:i]), self.joinList(bfs[i:])).joinList() is a little bulky to implement, but Wirth's principle applies: the interpreter is shorter with it than without it.
IdiomsFinally, our interface includes a few high-level idioms, like the zero program shown earlier, which are defined in terms of low-level behaviors. In an initial encoding, these could be defined as module-level functions; here, we define them on the mixin class BF.
class BF(object): # Other methods elided def zero(self): return self.loop(self.plus(-1)) def move(self, i): return self.scalemove(i, 1) def move2(self, i, j): return self.scalemove2(i, 1, j, 1) def scalemove(self, i, s): return self.loop(self.joinList([ self.plus(-1), self.right(i), self.plus(s), self.right(-i)])) def scalemove2(self, i, s, j, t): return self.loop(self.joinList([ self.plus(-1), self.right(i), self.plus(s), self.right(j - i), self.plus(t), self.right(-j)])) Interface-oriented Architecture Applying InterfacesNow, we hack at RPython's object model until everything translates. First, consider the task of pretty-printing. For Brainfuck, we'll simply regurgitate the input program as a Python string:
class AsStr(object): import_from_mixin(BF) def unit(self): return "" def join(self, l, r): return l + r def plus(self, i): return '+' * i if i > 0 else '-' * -i def right(self, i): return '>' * i if i > 0 else '<' * -i def loop(self, bfs): return '[' + bfs + ']' def input(self): return ',' def output(self): return '.'Via rlib.objectmodel.import_from_mixin, no stressing with covariance of return types is required. Instead, we shift from a Java-esque view of classes and objects, to an OCaml-ish view of prebuilt classes and constructors. AsStr is monomorphic, and any caller of it will have to create their own covariance somehow. For example, here are the first few lines of the parsing function:
@specialize.argtype(1) def parse(s, domain): ops = [domain.unit()] # Parser elided to preserve the reader's attentionBy invoking rlib.objectmodel.specialize.argtype, we make copies of the parsing function, up to one per call site, based on our choice of semantic domain. Oleg calls these "symantics" but I prefer "domain" in code. Also, note how the parsing stack starts with the unit of the monoid, which corresponds to the empty input string; the parser will repeatedly use the monoidal join to build up a parsed expression without inspecting it. Here's a small taste of that:
while i < len(s): char = s[i] if char == '+': ops[-1] = domain.join(ops[-1], domain.plus(1)) elif char == '-': ops[-1] = domain.join(ops[-1], domain.plus(-1)) # and so onThe reader may feel justifiably mystified; what breaks if we don't add these magic annotations? Well, the translator will throw UnionError because the low-level types don't match. RPython only wants to make one copy of functions like parse() in its low-level representation, and each copy of parse() will be compiled to monomorphic machine code. In this interpreter, in order to support parsing to an optimized string and also parsing to an evaluator, we need two copies of parse(). It is okay to not fully understand this at first.
Composing InterfacesEarlier, we noted that an interpreter can optionally optimize input programs after parsing. To support this, we'll precompose a peephole optimizer onto an arbitrary domain. We could also postcompose with a parser instead, but that sounds more difficult. Here are the relevant parts:
def makePeephole(cls): domain = cls() def stripDomain(bfs): return domain.joinList([t[0] for t in bfs]) class Peephole(object): import_from_mixin(BF) def unit(self): return [] def join(self, l, r): return l + r # Actual definition elided... for now... return Peephole, stripDomainDon't worry about the actual optimization yet. What's important here is the pattern of initialization of semantic domains. makePeephole is an SML-style functor on semantic domains: given a final encoding of Brainfuck, it produces another final encoding of Brainfuck which incorporates optimizations. The helper stripDomain is a finalizer which performs the extraction from the optimizer's domain to the underlying cls that was passed in at translation time. For example, let's optimize pretty-printing:
AsStr, finishStr = makePeephole(AsStr)Now, it only takes one line to parse and print an optimized AST without ever building it on the heap. To be pedantic, fragments of the output string will be heap-allocated, but the AST's node structure will only ever be stack-allocated. Further, to be shallow, the parser is written to prevent malicious input from causing a stack overflow, and this forces it to maintain a heap-allocated RPython list of intermediate operations inside loops.
print finishStr(parse(text, AsStr())) PerformanceBut is it fast? Yes. It's faster than the prior version, which was initial-encoded, and also faster than Andrew Brown's classic version (part 1, part 2). Since Brown's interpreter does not perform much optimization, we will focus on how final encoding can outperform initial encoding.
JITFirst, why is it faster than the same interpreter with initial encoding? Well, it still has initial encoding from the JIT's perspective! There is an Op class with a hierarchy of subclasses implementing individual behaviors. A sincere tagless-final student, or those who remember Stop Writing Classes (2012, Pycon US), will recognize that the following classes could be plain functions, and should think of the classes as a concession to RPython's lack of support for lambdas with closures rather than an initial encoding. We aren't ever going to directly typecheck any Op, but the JIT will generate typechecking guards anyway, so we effectively get a fully-promoted AST inlined into each JIT trace. First, some simple behaviors:
class Op(object): _immutable_ = True class _Input(Op): _immutable_ = True def runOn(self, tape, position): tape[position] = ord(os.read(0, 1)[0]) return position Input = _Input() class _Output(Op): _immutable_ = True def runOn(self, tape, position): os.write(1, chr(tape[position])) return position Output = _Output() class Add(Op): _immutable_ = True _immutable_fields_ = "imm", def __init__(self, imm): self.imm = imm def runOn(self, tape, position): tape[position] += self.imm return positionThe JIT does technically have less information than before; it no longer knows that a sequence of immutable operations is immutable enough to be worth unrolling, but a bit of rlib.jit.unroll_safe fixes that:
class Seq(Op): _immutable_ = True _immutable_fields_ = "ops[*]", def __init__(self, ops): self.ops = ops @unroll_safe def runOn(self, tape, position): for op in self.ops: position = op.runOn(tape, position) return positionFinally, the JIT entry point is at the head of each loop, just like with prior interpreters. Since Brainfuck doesn't support mid-loop jumps, there's no penalty for only allowing merge points at the head of the loop.
class Loop(Op): _immutable_ = True _immutable_fields_ = "op", def __init__(self, op): self.op = op def runOn(self, tape, position): op = self.op while tape[position]: jitdriver.jit_merge_point(op=op, position=position, tape=tape) position = op.runOn(tape, position) return positionThat's the end of the implicit challenge. There's no secret to it; just evaluate the AST. Here's part of the semantic domain for evaluation, as well as the "functor" to optimize it. In AsOps.join() are the only isinstance() calls in the entire interpreter! This is acceptable because Seq is effectively a type wrapper for an RPython list, so that a list of operations is also an operation; its list is initial-encoded and available for inspection.
class AsOps(object): import_from_mixin(BF) def unit(self): return Shift(0) def join(self, l, r): if isinstance(l, Seq) and isinstance(r, Seq): return Seq(l.ops + r.ops) elif isinstance(l, Seq): return Seq(l.ops + [r]) elif isinstance(r, Seq): return Seq([l] + r.ops) return Seq([l, r]) # Other methods elided! AsOps, finishOps = makePeephole(AsOps)And finally here is the actual top-level code to evaluate the input program. As before, once everything is composed, the actual invocation only takes one line.
tape = bytearray("\x00" * cells) finishOps(parse(text, AsOps())).runOn(tape, 0) Peephole OptimizationOur peephole optimizer is an abstract interpreter with one instruction of lookahead/rewrite buffer. It implements the aforementioned algebraic laws of the Brainfuck monoid. It also implements idiom recognition for loops. First, the abstract interpreter. The abstract domain has six elements:
class AbstractDomain(object): pass meh, aLoop, aZero, theIdentity, anAdd, aRight = [AbstractDomain() for _ in range(6)]We'll also tag everything with an integer, so that anAdd or aRight can be exact annotations. This is the actual Peephole.join() method:
def join(self, l, r): if not l: return r rv = l[:] bfHead, adHead, immHead = rv.pop() for bf, ad, imm in r: if ad is theIdentity: continue elif adHead is aLoop and ad is aLoop: continue elif adHead is theIdentity: bfHead, adHead, immHead = bf, ad, imm elif adHead is anAdd and ad is aZero: bfHead, adHead, immHead = bf, ad, imm elif adHead is anAdd and ad is anAdd: immHead += imm if immHead: bfHead = domain.plus(immHead) elif rv: bfHead, adHead, immHead = rv.pop() else: bfHead = domain.unit() adHead = theIdentity elif adHead is aRight and ad is aRight: immHead += imm if immHead: bfHead = domain.right(immHead) elif rv: bfHead, adHead, immHead = rv.pop() else: bfHead = domain.unit() adHead = theIdentity else: rv.append((bfHead, adHead, immHead)) bfHead, adHead, immHead = bf, ad, imm rv.append((bfHead, adHead, immHead)) return rvIf this were to get much longer, then implementing a DSL would be worth it, but this is a short-enough method to inline. The abstract interpretation is assumed by induction for the left-hand side of the join, save for the final instruction, which is loaded into a rewrite register. Each instruction on the right-hand side is inspected exactly once. The logic for anAdd followed by anAdd is exactly the same as for aRight followed by aRight because they both have underlying Abelian groups given by the integers. The rewrite register is carefully pushed onto and popped off from the left-hand side in order to cancel out theIdentity, which itself is merely a unifier for anAdd or aRight of 0.
Note that we generate a lot of garbage. For example, parsing a string of n '+' characters will cause the peephole optimizer to allocate n instances of the underlying domain.plus() action, from domain.plus(1) up to domain.plus(n). An older initial-encoded version of this interpreter used hash consing to avoid ever building an op more than once, even loops. It appears more efficient to generate lots of immutable garbage than to repeatedly hash inputs and search mutable hash tables, at least for optimizing Brainfuck incrementally during parsing.
Finally, let's look at idiom recognition. RPython lists are initial-coded, so we can dispatch based on the length of the list, and then inspect the abstract domains of each action.
def isConstAdd(bf, i): return bf[1] is anAdd and bf[2] == i def oppositeShifts(bf1, bf2): return bf1[1] is bf2[1] is aRight and bf1[2] == -bf2[2] def oppositeShifts2(bf1, bf2, bf3): return (bf1[1] is bf2[1] is bf3[1] is aRight and bf1[2] + bf2[2] + bf3[2] == 0) def loop(self, bfs): if len(bfs) == 1: bf, ad, imm = bfs[0] if ad is anAdd and imm in (1, -1): return [(domain.zero(), aZero, 0)] elif len(bfs) == 4: if (isConstAdd(bfs[0], -1) and bfs[2][1] is anAdd and oppositeShifts(bfs[1], bfs[3])): return [(domain.scalemove(bfs[1][2], bfs[2][2]), aLoop, 0)] if (isConstAdd(bfs[3], -1) and bfs[1][1] is anAdd and oppositeShifts(bfs[0], bfs[2])): return [(domain.scalemove(bfs[0][2], bfs[1][2]), aLoop, 0)] elif len(bfs) == 6: if (isConstAdd(bfs[0], -1) and bfs[2][1] is bfs[4][1] is anAdd and oppositeShifts2(bfs[1], bfs[3], bfs[5])): return [(domain.scalemove2(bfs[1][2], bfs[2][2], bfs[1][2] + bfs[3][2], bfs[4][2]), aLoop, 0)] if (isConstAdd(bfs[5], -1) and bfs[1][1] is bfs[3][1] is anAdd and oppositeShifts2(bfs[0], bfs[2], bfs[4])): return [(domain.scalemove2(bfs[0][2], bfs[1][2], bfs[0][2] + bfs[2][2], bfs[3][2]), aLoop, 0)] return [(domain.loop(stripDomain(bfs)), aLoop, 0)]This ends the bonus question. How do we optimize an unknown semantic domain? We must maintain an abstract context which describes elements of the domain. In initial encoding, we ask an AST about itself. In final encoding, we already know everything relevant about the AST.
The careful reader will see that I didn't really answer that opening question in the JIT section. Because the JIT still ranges over the same operations as before, it can't really be slower; but why is it now faster? Because the optimizer is now slightly better in a few edge cases. It performs the same optimizations as before, but the rigor of abstract interpretation causes it to emit slightly better operations to the JIT backend.
Concretely, improving the optimizer can shorten pretty-printed programs. The Busy Beaver Gauge measures the length of programs which search for solutions to mathematical problems. After implementing and debugging the final-encoded interpreter, I found that two of my entries on the Busy Beaver Gauge for Brainfuck had become shorter by about 2%. (Most other entries are already hand-optimized according to the standard algebra and have no optimization opportunities.)
DiscussionGiven that initial and final encodings are equivalent, and noting that RPython's toolchain is written to prefer initial encodings, what did we actually gain? Did we gain anything?
One obvious downside to final encoding in RPython is interpreter size. The example interpreter shown here is a rewrite of an initial-encoded interpreter which can be seen here for comparison. Final encoding adds about 20% more code in this case.
Final encoding is not necessarily more code than initial encoding, though. All AST encodings in interpreters are subject to the Expression Problem, which states that there is generally a quadratic amount of code required to implement multiple behaviors for an AST with multiple types of nodes; specifically, n behaviors for m types of nodes require n × m methods. Initial encodings improve the cost of adding new types of nodes; final encodings improve the cost of adding new behaviors. Final encoding may tend to win in large codebases for mature languages, where the language does not change often but new behaviors are added frequently and maintained for long periods.
Optimizations in final encoding require a bit of planning. The abstract-interpretation approach is solid but relies upon the monoid and its algebraic laws. In the worst case, an entire class hierarchy could be required to encode the abstraction.
It is remarkable to find a 2% improvement in residual program size merely by reimplementing an optimizer as an abstract interpreter respecting the algebraic laws. This could be the most important lesson for compiler engineers, if it happens to generalize.
Final encoding was popularized via the tagless-final movement in OCaml and Scala, including famously in a series of tutorials by Kiselyov et al. A "tag", in this jargon, is a runtime identifier for an object's type or class; a tagless encoding effectively doesn't allow isinstance() at all. In the above presentation, tags could be hacked in, but were not materially relevant to most steps. Tags were required for the final evaluation step, though, and the tagless-final insight is that certain type systems can express type-safe evaluation without those tags. We won't go further in this direction because tags also communicate valuable information to the JIT.
Summarizing Table Initial Encoding Final Encoding hierarchy of classes signature of interfaces class constructors method calls built on the heap built on the stack traversals allocate stack traversals allocate heap tags are available with isinstance() tags are only available through hacks cost of adding a new AST node: one class cost of adding a new AST node: one method on every other class cost of adding a new behavior: one method on every other class cost of adding a new behavior: one class CreditsThanks to folks in #pypy on Libera Chat: arigato for the idea, larstiq for pushing me to write it up, and cfbolz and mattip for reviewing and finding mistakes. The original IRC discussion leading to this blog post is available here.
This interpreter is part of the rpypkgs suite, a Nix flake for RPython interpreters. Readers with Nix installed can run this interpreter directly from the flake:
$ nix-prefetch-url https://github.com/MG-K/pypy-tutorial-ko/raw/refs/heads/master/mandel.b $ nix run github:rpypkgs/rpypkgs#bf -- /nix/store/ngnphbap9ncvz41d0fkvdh61n7j2bg21-mandel.bPython Bytes: #409 We've moved to Hetzner write-up
Stefan Scherfke: Publishing to PyPI with a Trusted Publisher from GitLab CI/CD
PyPA’s Trusted Publishers let you upload Python packages directly from your CI pipeline to PyPI. And you don’t need any long-lived secrets like API tokens. This makes uploading Python packages not only easier than ever and more secure, too.
In this article, we’ll look at what Trusted Publishers are and how they’re more secure than using API tokens or a username/password combo. We’ll also learn how to set up our GitLab CI/CD pipeline to:
- continuously test the release processes with the TestPyPI on every push to main,
- automatically perform PyPI releases on every Git tag, and
- additionally secure the process with GitLab (deployment) environments.
The official documentation explains most of this, but it doesn’t go into much depth regarding GitLab pipelines and leaves a few details unexplained.
Why should I want to use this?API tokens aren’t inherently insecure, but they do have a few drawbacks:
- If they are passed as environment variables, there’s a chance they’ll leak (think of a debug env | sort command in your pipeline).
- If you don’t watch out, bad co-maintainers can steal the token and do mischief with it.
- You have to manually renew the token from time to time, which can be annoying in the long run.
Trusted Publishers can avoid these problems or, at the very least, reduce their risk:
- You don’t have to manually renew any long-lived tokens.
- All tokens are short-lived. Even if they leak, they can’t be misused for long.
After we’ve learned how Trusted Publishers and protected GitLab environments work, we will take another look at security considerations.
How do Trusted Publishers work?The basic idea of Trusted Publishers is quite simple:
- In PyPI’s project settings, you add a Trusted Publisher and configure it with the GitLab URL of your project.
- PyPI will then only accept package uploads if the uploader can prove that the upload comes from a CI pipeline of that project.
The technical process behind this is based on the OpenID Connect (OIDC) standard.
Essentially, the process works like this:
- In your CI pipeline, you request an ID token for PyPI.
- GitLab injects the short-lived token into your pipeline as a (masked) environment variable. It is cryptographically signed by GitLab and contains, among other things, your project’s path with namespace.
- You use this token to authenticate with PyPI and request another token for the actual package upload.
- This API token can now be used just like “normal” project-scoped API tokens.
The Trusted Publishers documentation explains this in more detail.
One problem remains, though: An ID token can be requested in any pipeline job and in any branch. Malicious contributors could sneak in a pipeline job and make a corrupted release.
This is where environments come in.
EnvironmentsGitLab environments represent your deployed code in your infrastructure. Think of your code running in a container in your production or testing Kubernetes cluster; or your Python package living on PyPI. :-)
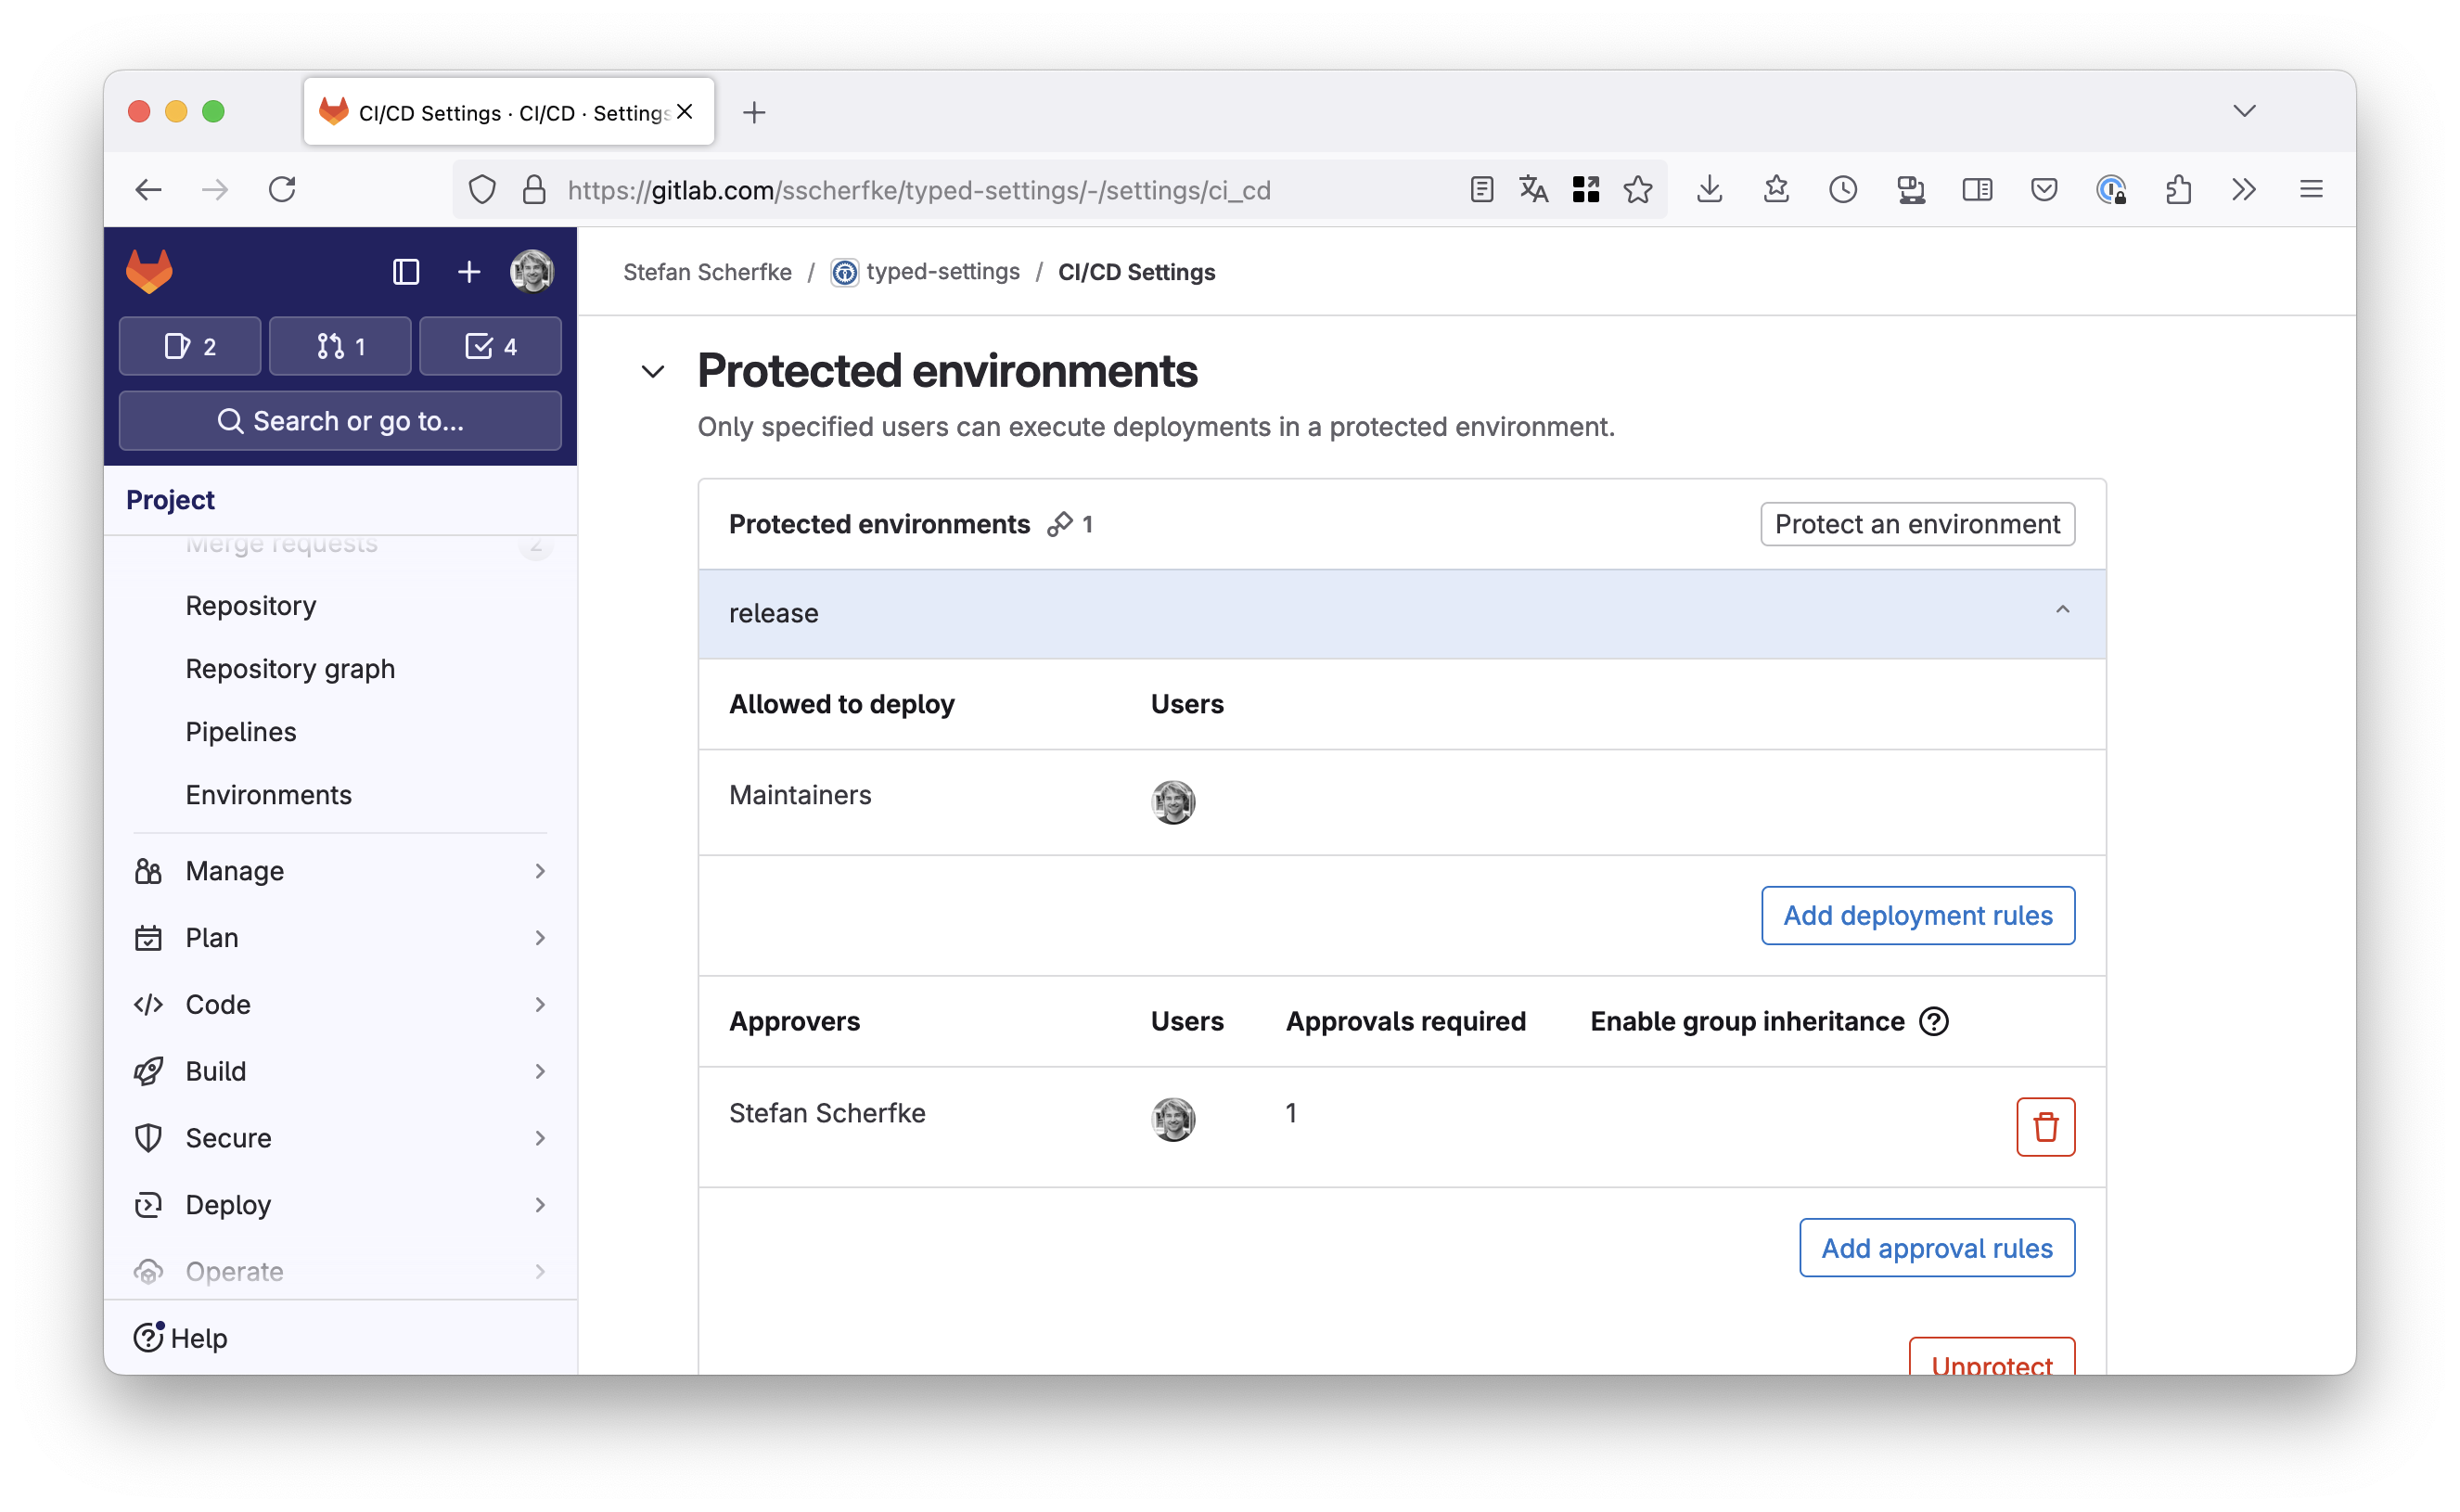
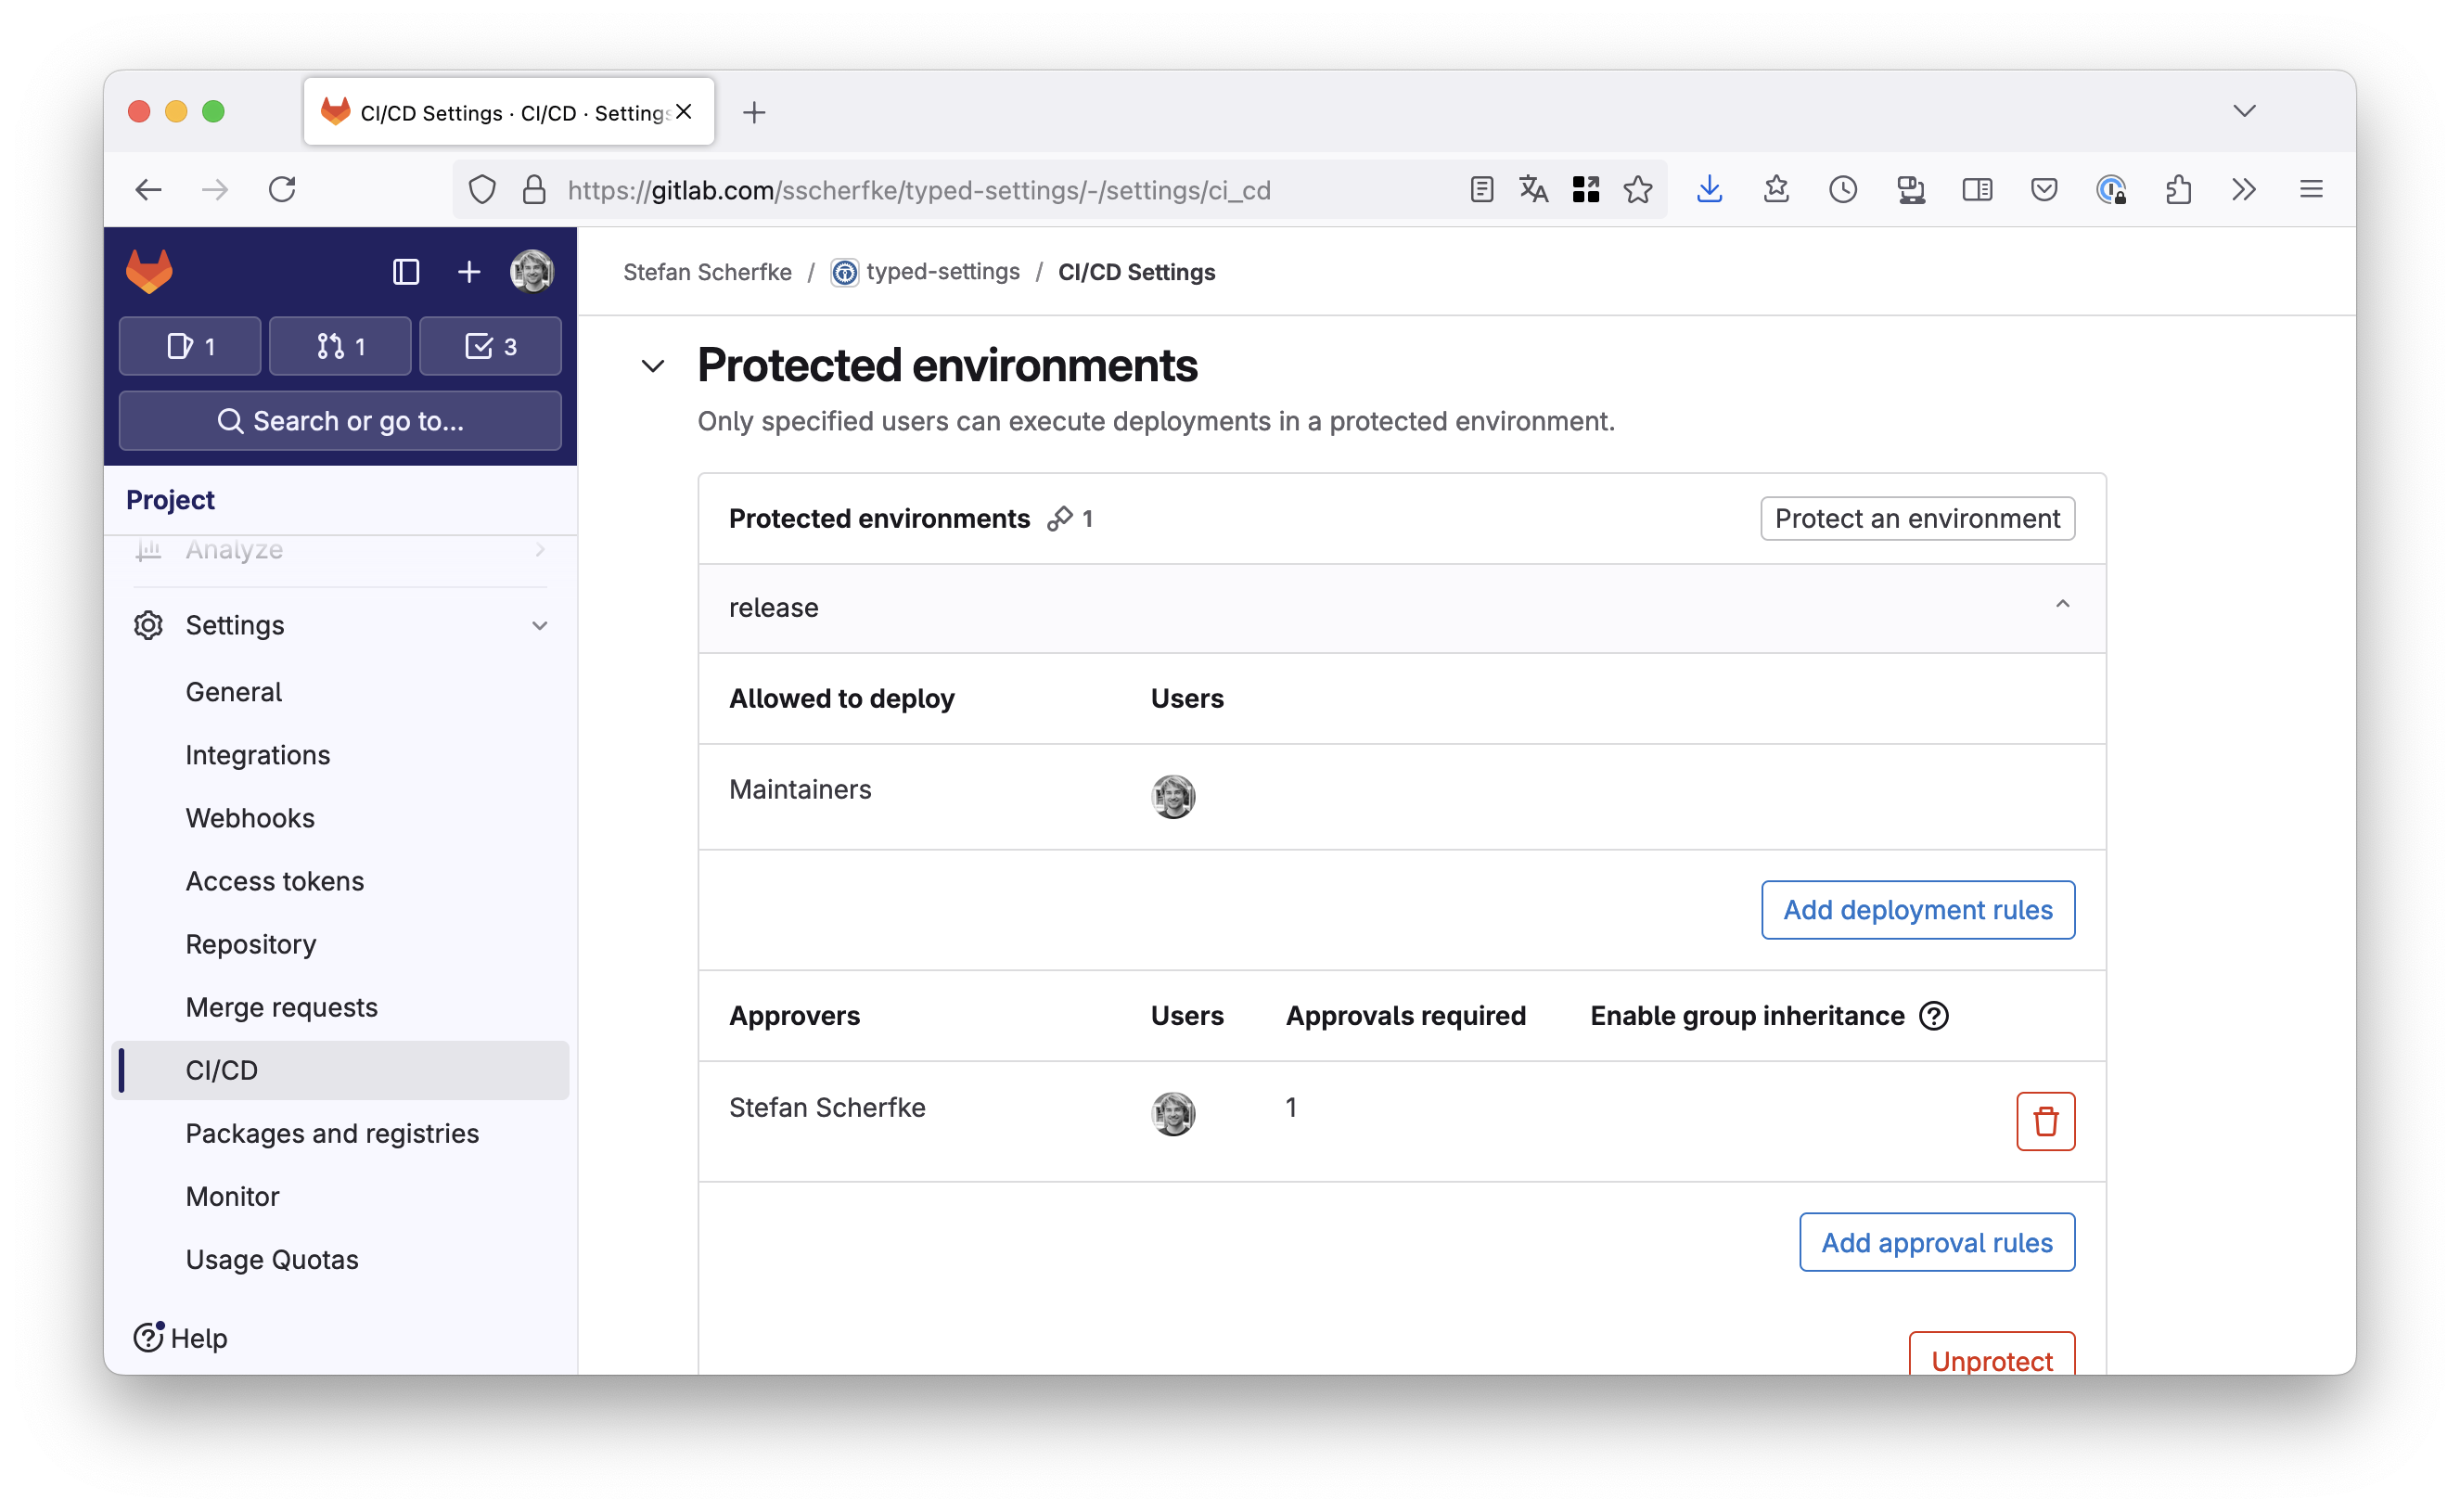
The most important feature of environments in this context is access control: You can protect environments, restricting deployments to them. For protected environments, you can define users or roles that are allowed to perform deployments and that must approve deployments. For example, you could restrict deployments (uploads to PyPI) to all maintainers of your project, but only after you yourself have approved each release.
Note
Protected environments are a premium feature.
Non-profit open source projects/organizations can apply for a free ultimate subscription.
It seems that very old projects also have this feature enabled. Otherwise I can’t explain why I have it for Typed Settings but not for my other projects…
To use an environment in your CI/CD pipeline, you need to add it to a job in the .gitlab-ci.yml.
If we also store the name of the environment in the PyPI deployment settings, only uploads from that environment will be allowed, i.e. only uploads that have been authorized by selected people.
Only maintainers can deploy to the release environment and only after Stefan approved it. Only maintainers can deploy to the release environment and only after Stefan approved it. Security Considerations
The last two sections have already hinted at this: GitLab environments are only truly secure if you can protect them.
Let’s take a step back and consider what threats we’re trying to protect against, so that we’ll then be able to choose the right approach:
- Random people doing a merge request for your project.
- Contributors with the developer role committing directly into your project.
- Co-maintainers with more permissions then a developer.
- A Jia Tan which you trust even more than the other maintainers.
What can we do about it?
- Code in other people’s forks doesn’t have access to your project’s CI variables nor can it request OIDC ID tokens in your project’s name. But you need to carefully review each MR!
- Contributors with only developer permissions can still request ID tokens. If you cannot use protected environments, using an API token stored in a protected CI/CD variable is a more secure approach. You should also protect your main branch and all tags (using the * pattern), so that devleopers only have access to feature branches. You’ll find it under Settings → Repository → Protected branches/tags.
- Protected CI/CD variables do not protect you from malicious maintainers, though. Even if you only allow yourself to create tags, other maintainers still have access to protected variables. Protected environments with only a selected set of approvers is the most secure approach.
- If a very trusted co-maintainer becomes malicious, there’s very little you can do. Carefully review all commits and read the audit logs (Secure → Audit Events).
So that means for you:
- If you are the only maintainer of a small open source project, just use a Trusted Publisher with (unprotected) environments.
- If you belong to a larger project with multiple maintainers, consider applying for GitLab for Open Source and use a Trusted Publisher with a protected environment.
- If there are multiple contributors and you don’t have access to protected environments, use an API token stored in a protected CI/CD variable and try only grant developer permissions to contributors.
See also
Please also read about the security model and considerations in the PyPa docs.
Putting it all togetherConfiguring your GitLab project to use a trusted publisher involves three main steps:
- Update your project’s publishing settings on PyPI and TestPyPI.
- Update the CI/CD settings for your GitLab project.
- Update your project’s pyproject.toml and .gitlab-ci.yml.
Tell PyPI to trust your GitLab CI pipelines.
- Log in to PyPI and go to your account’s Publishing settings. Here, you can manage and add trusted publishers for your project.
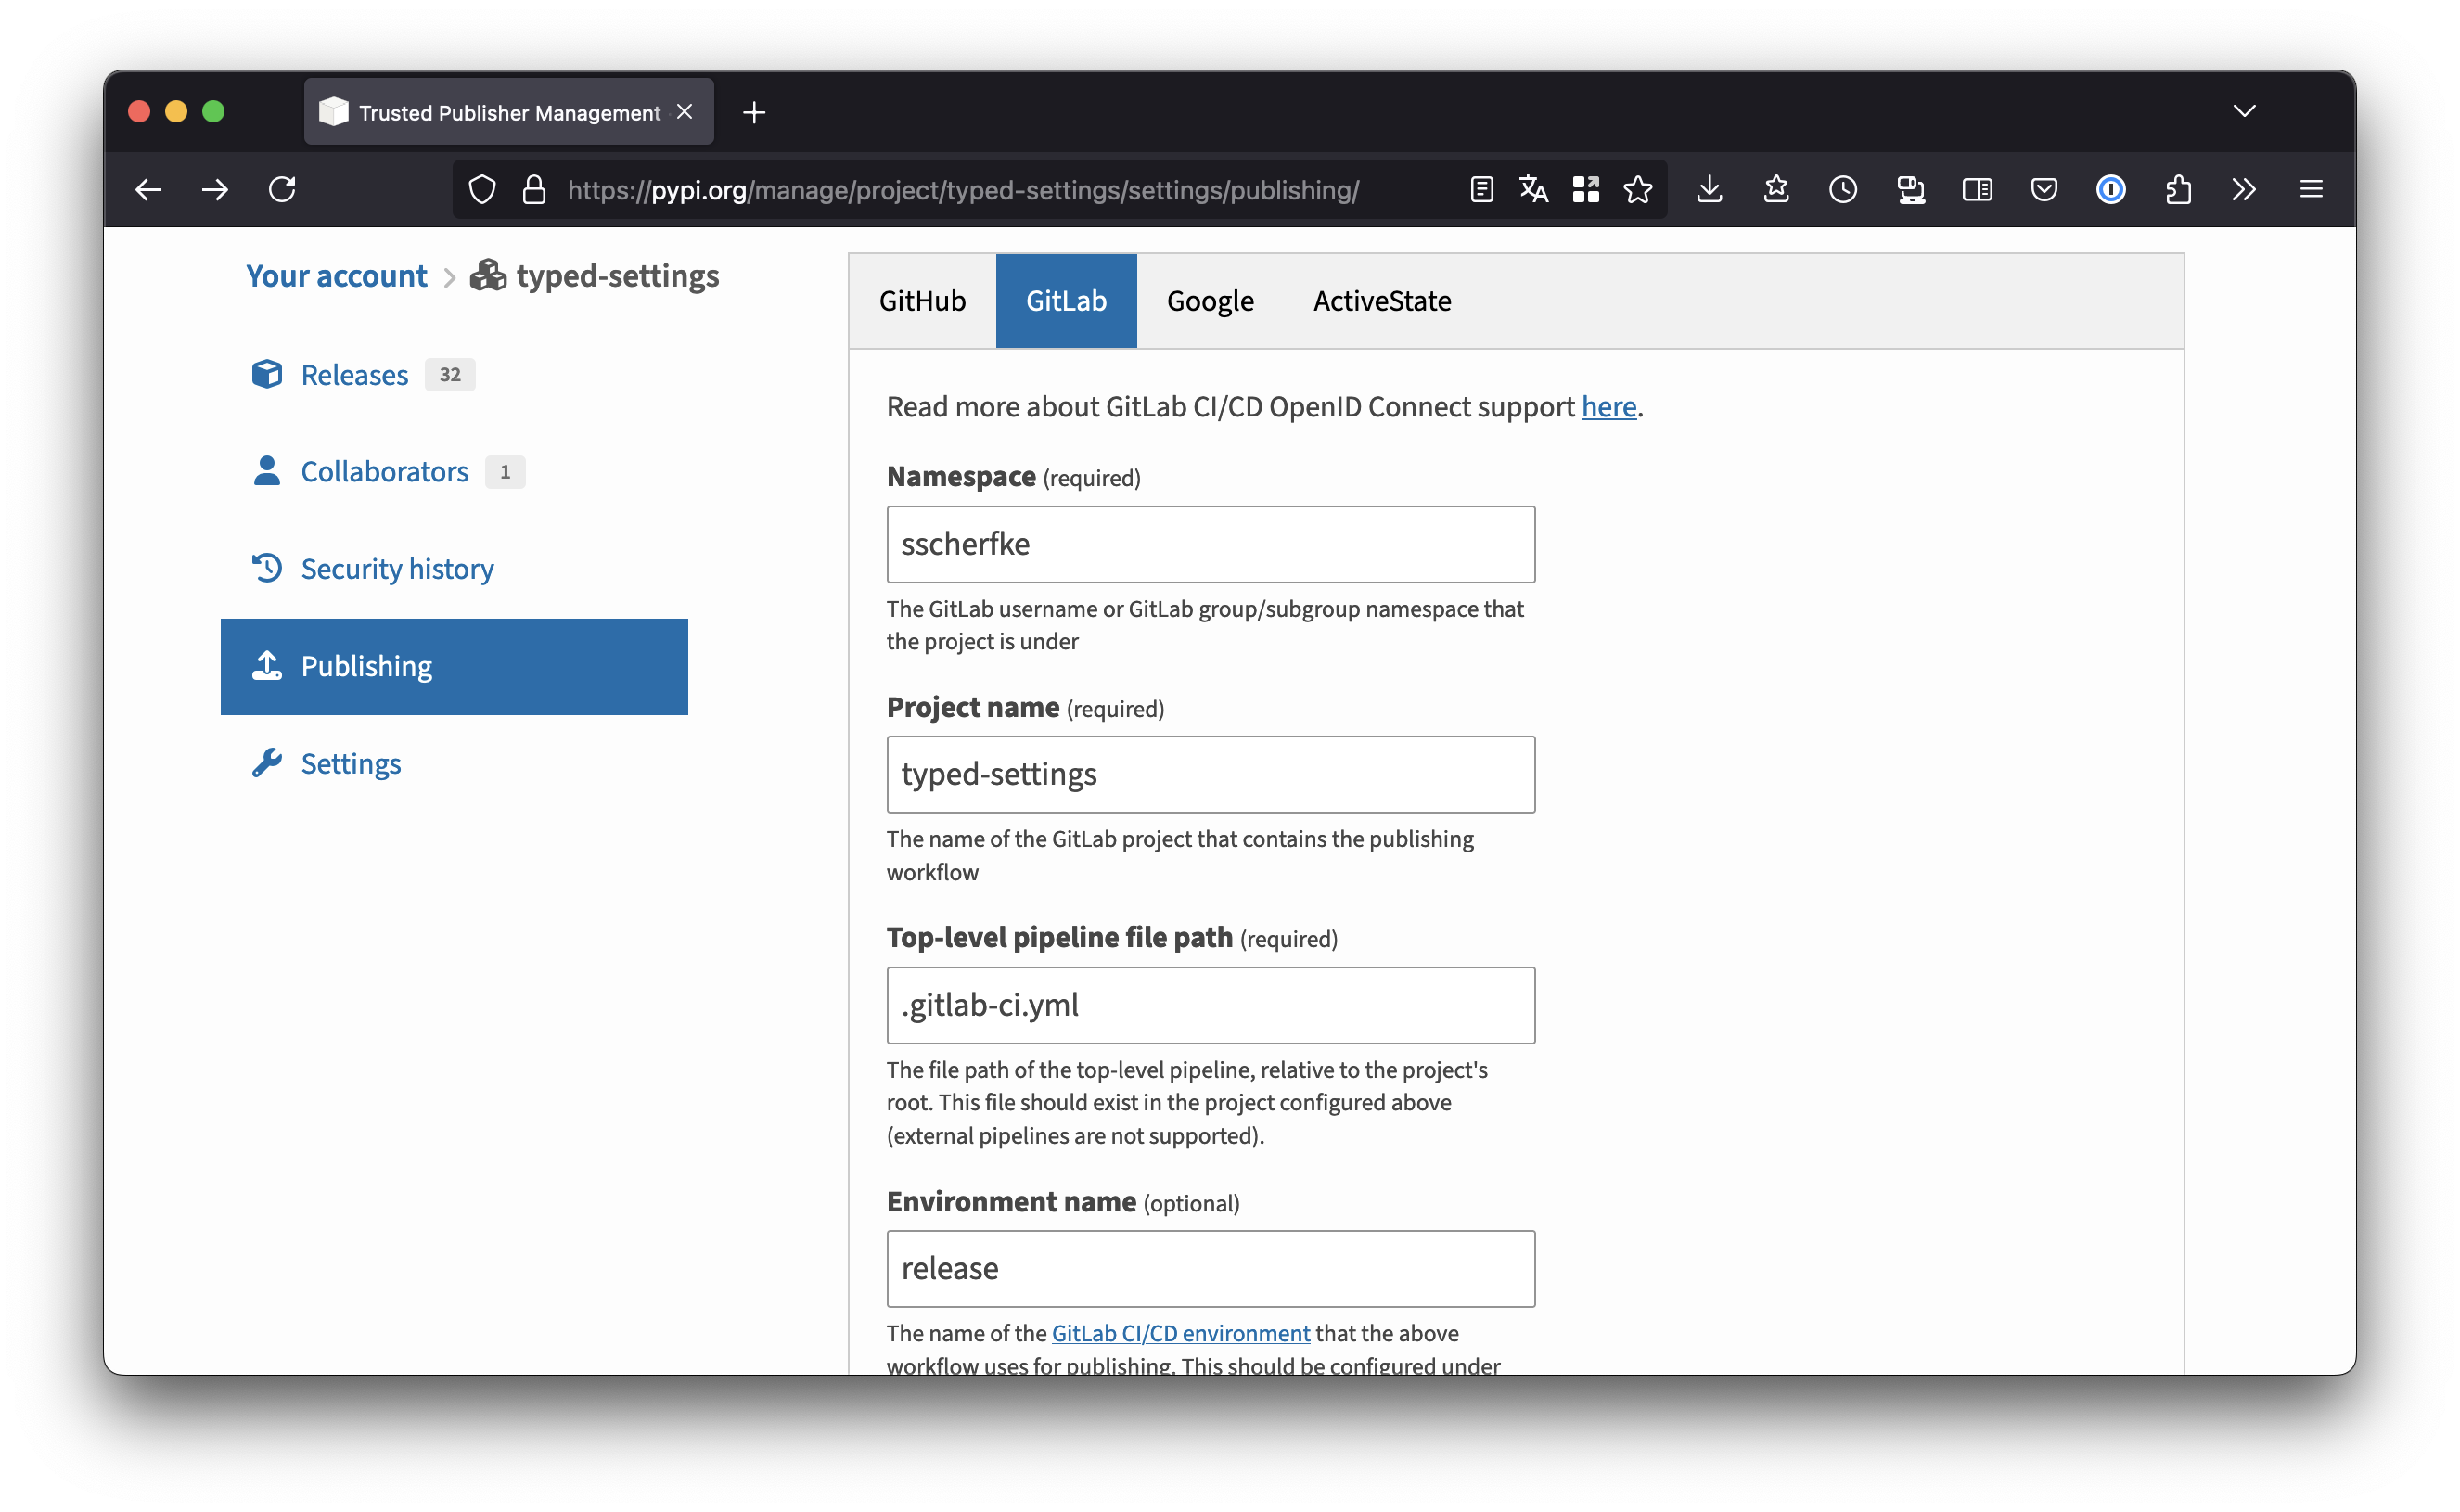
Add a new trusted publisher for GitLab as shown in the screenshot below.
Enter your project’s namespace (your GitLab username or the name of your organization), the project name, the filename of your CI def (usually .gitlab-ci.yml).
Use release as the environment name!
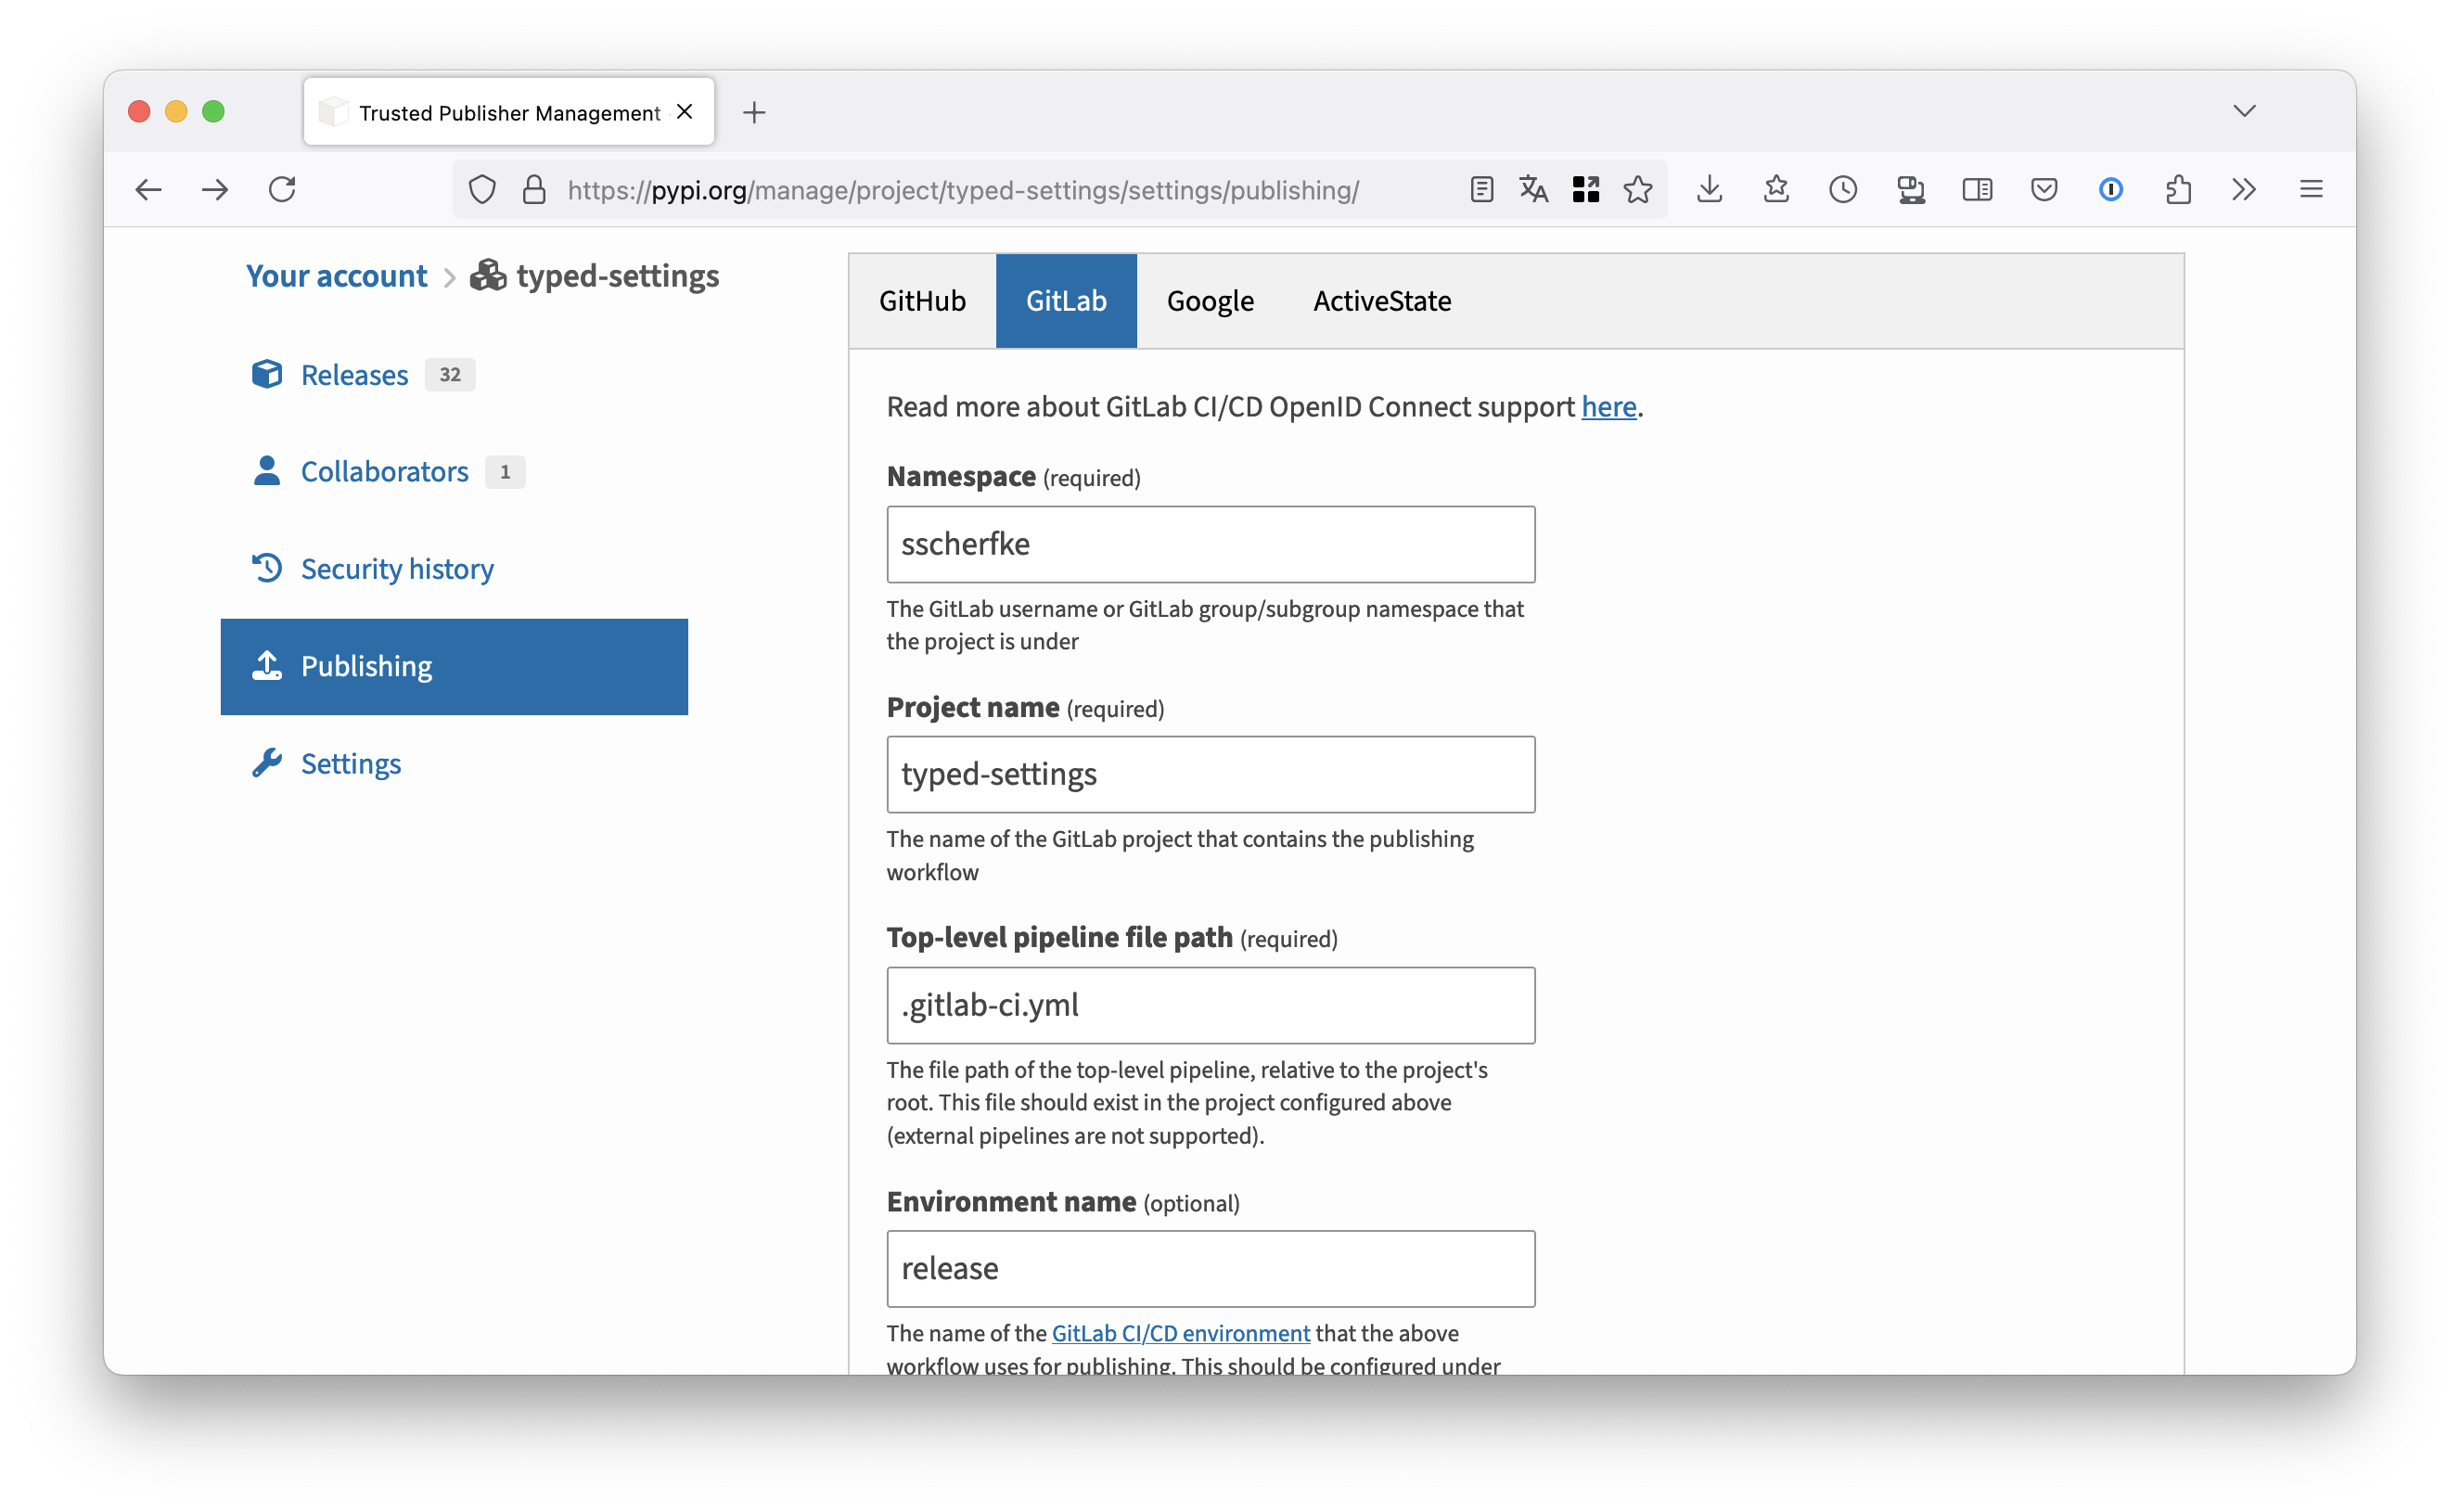
- Repeat the same steps for the TestPyPI, but use release-test as environment name.
You need to create two environments and protect the one for production releases.
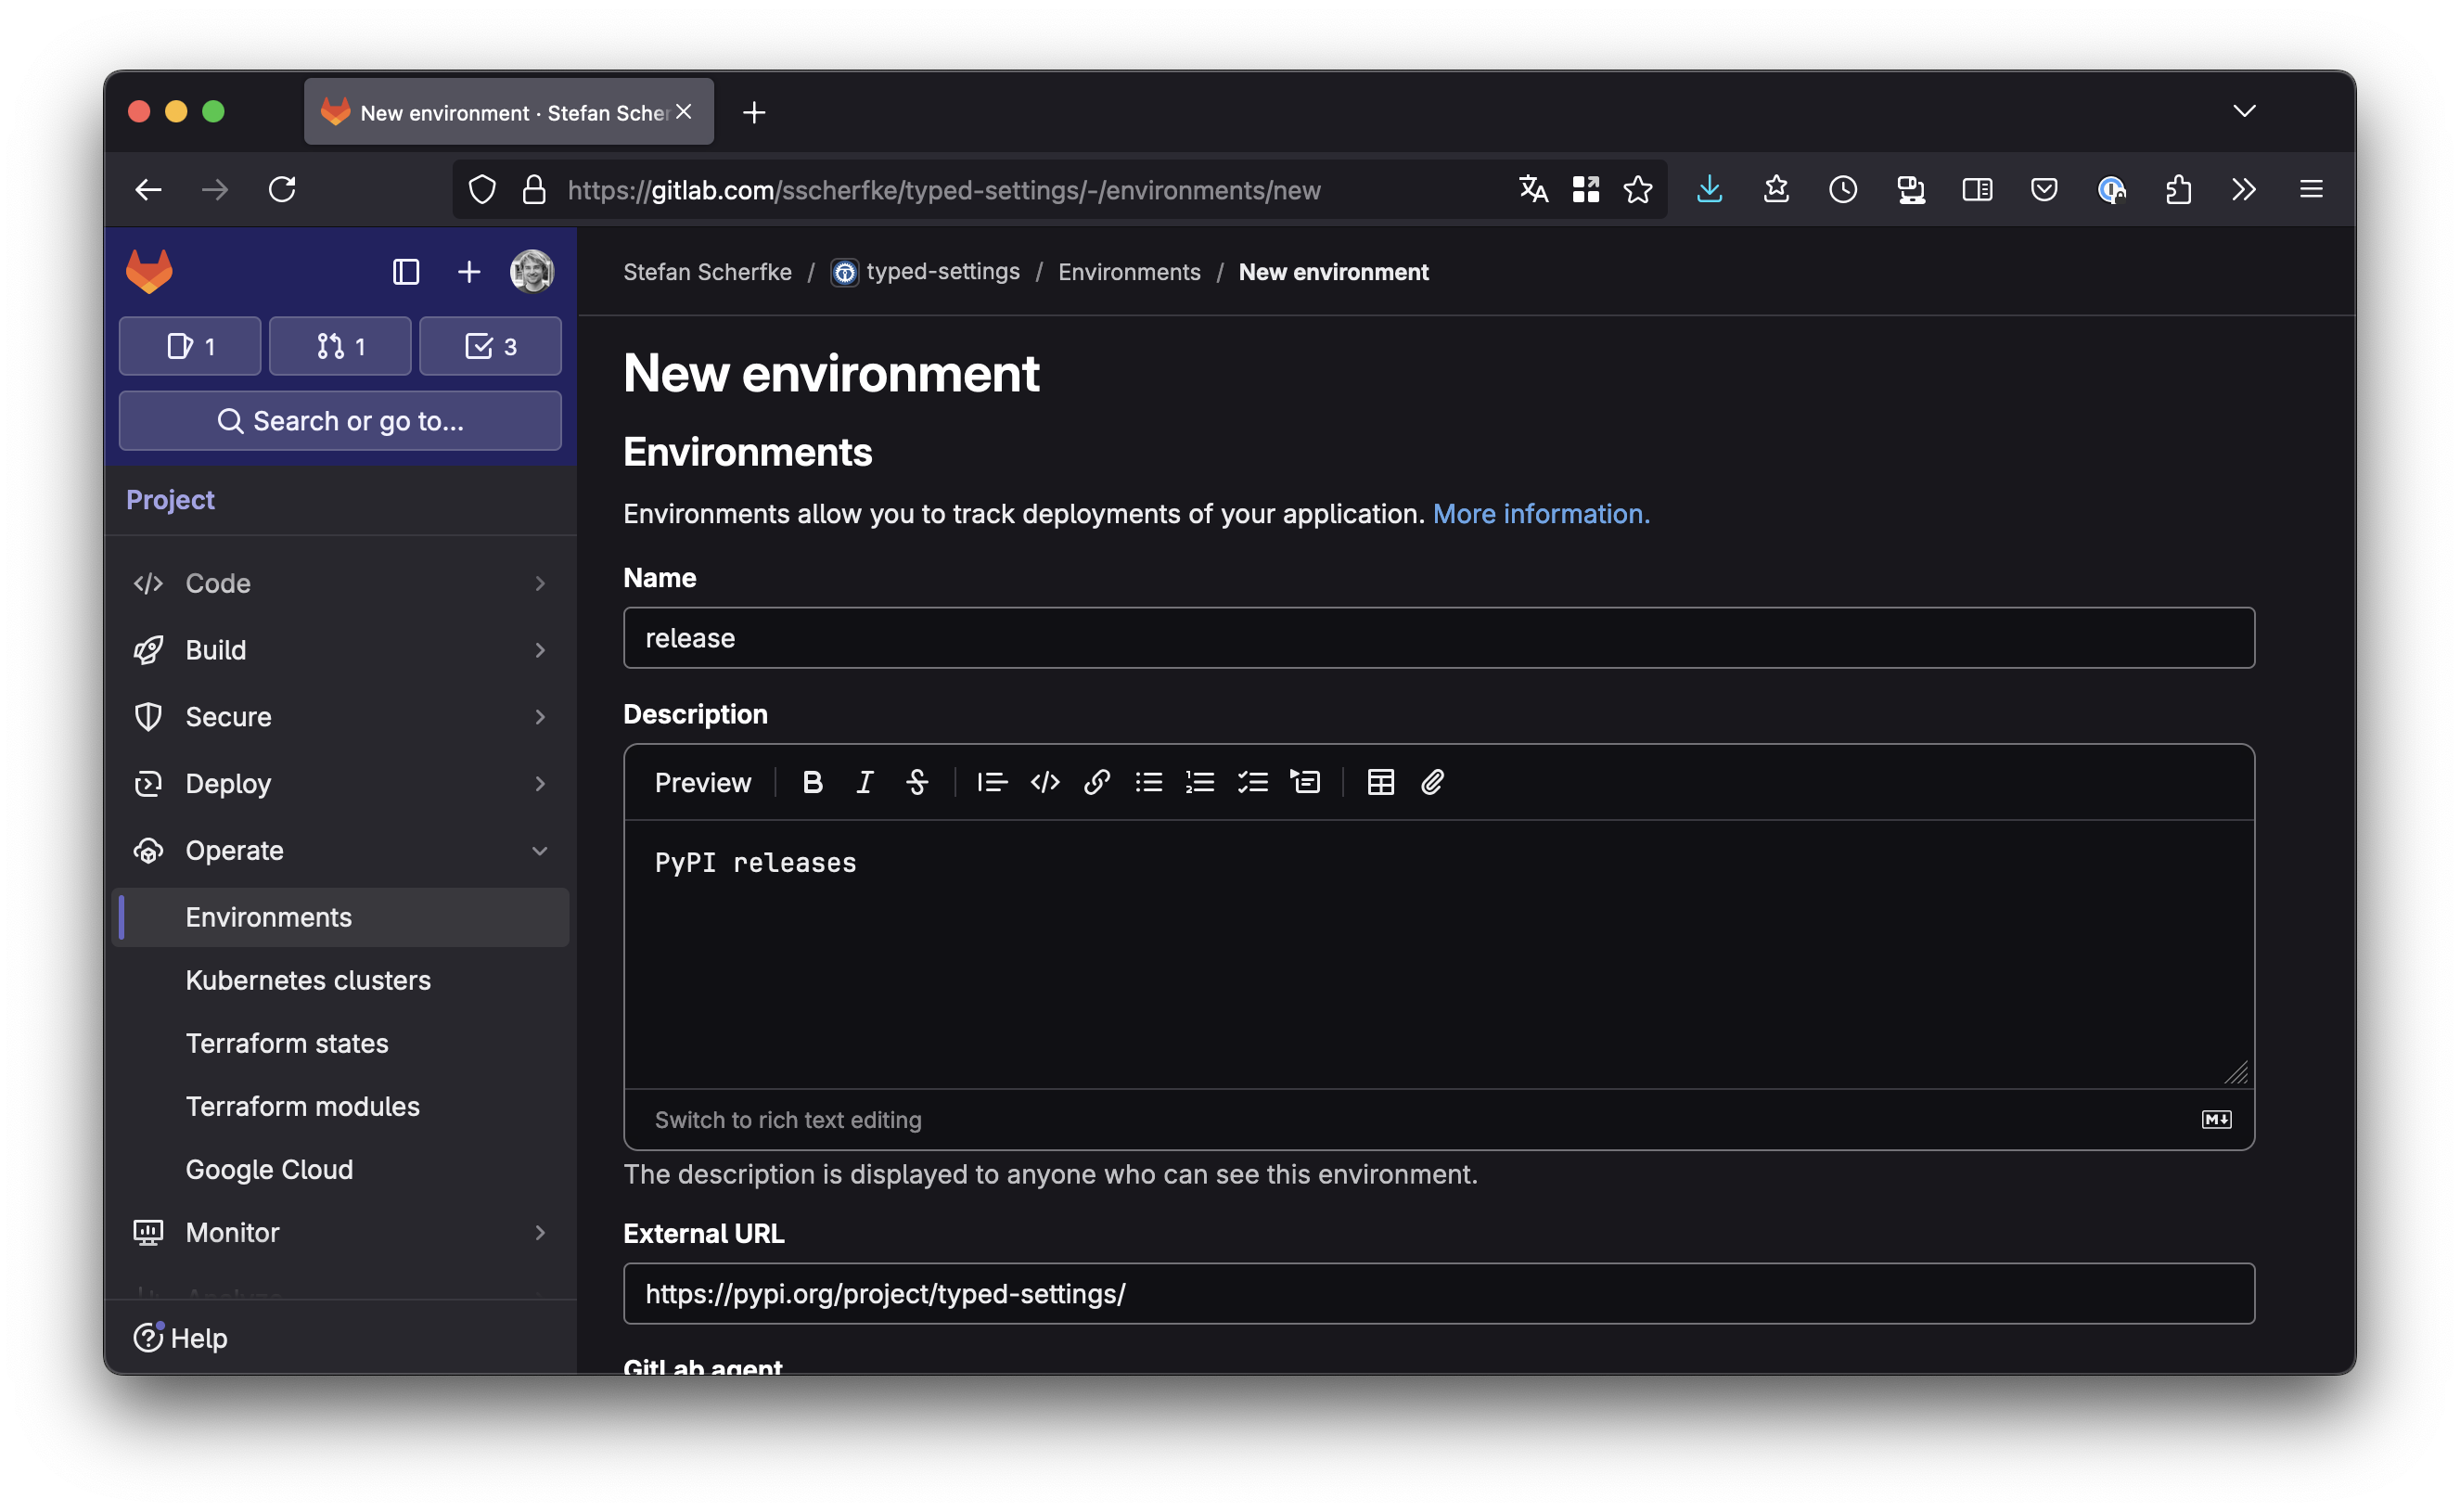
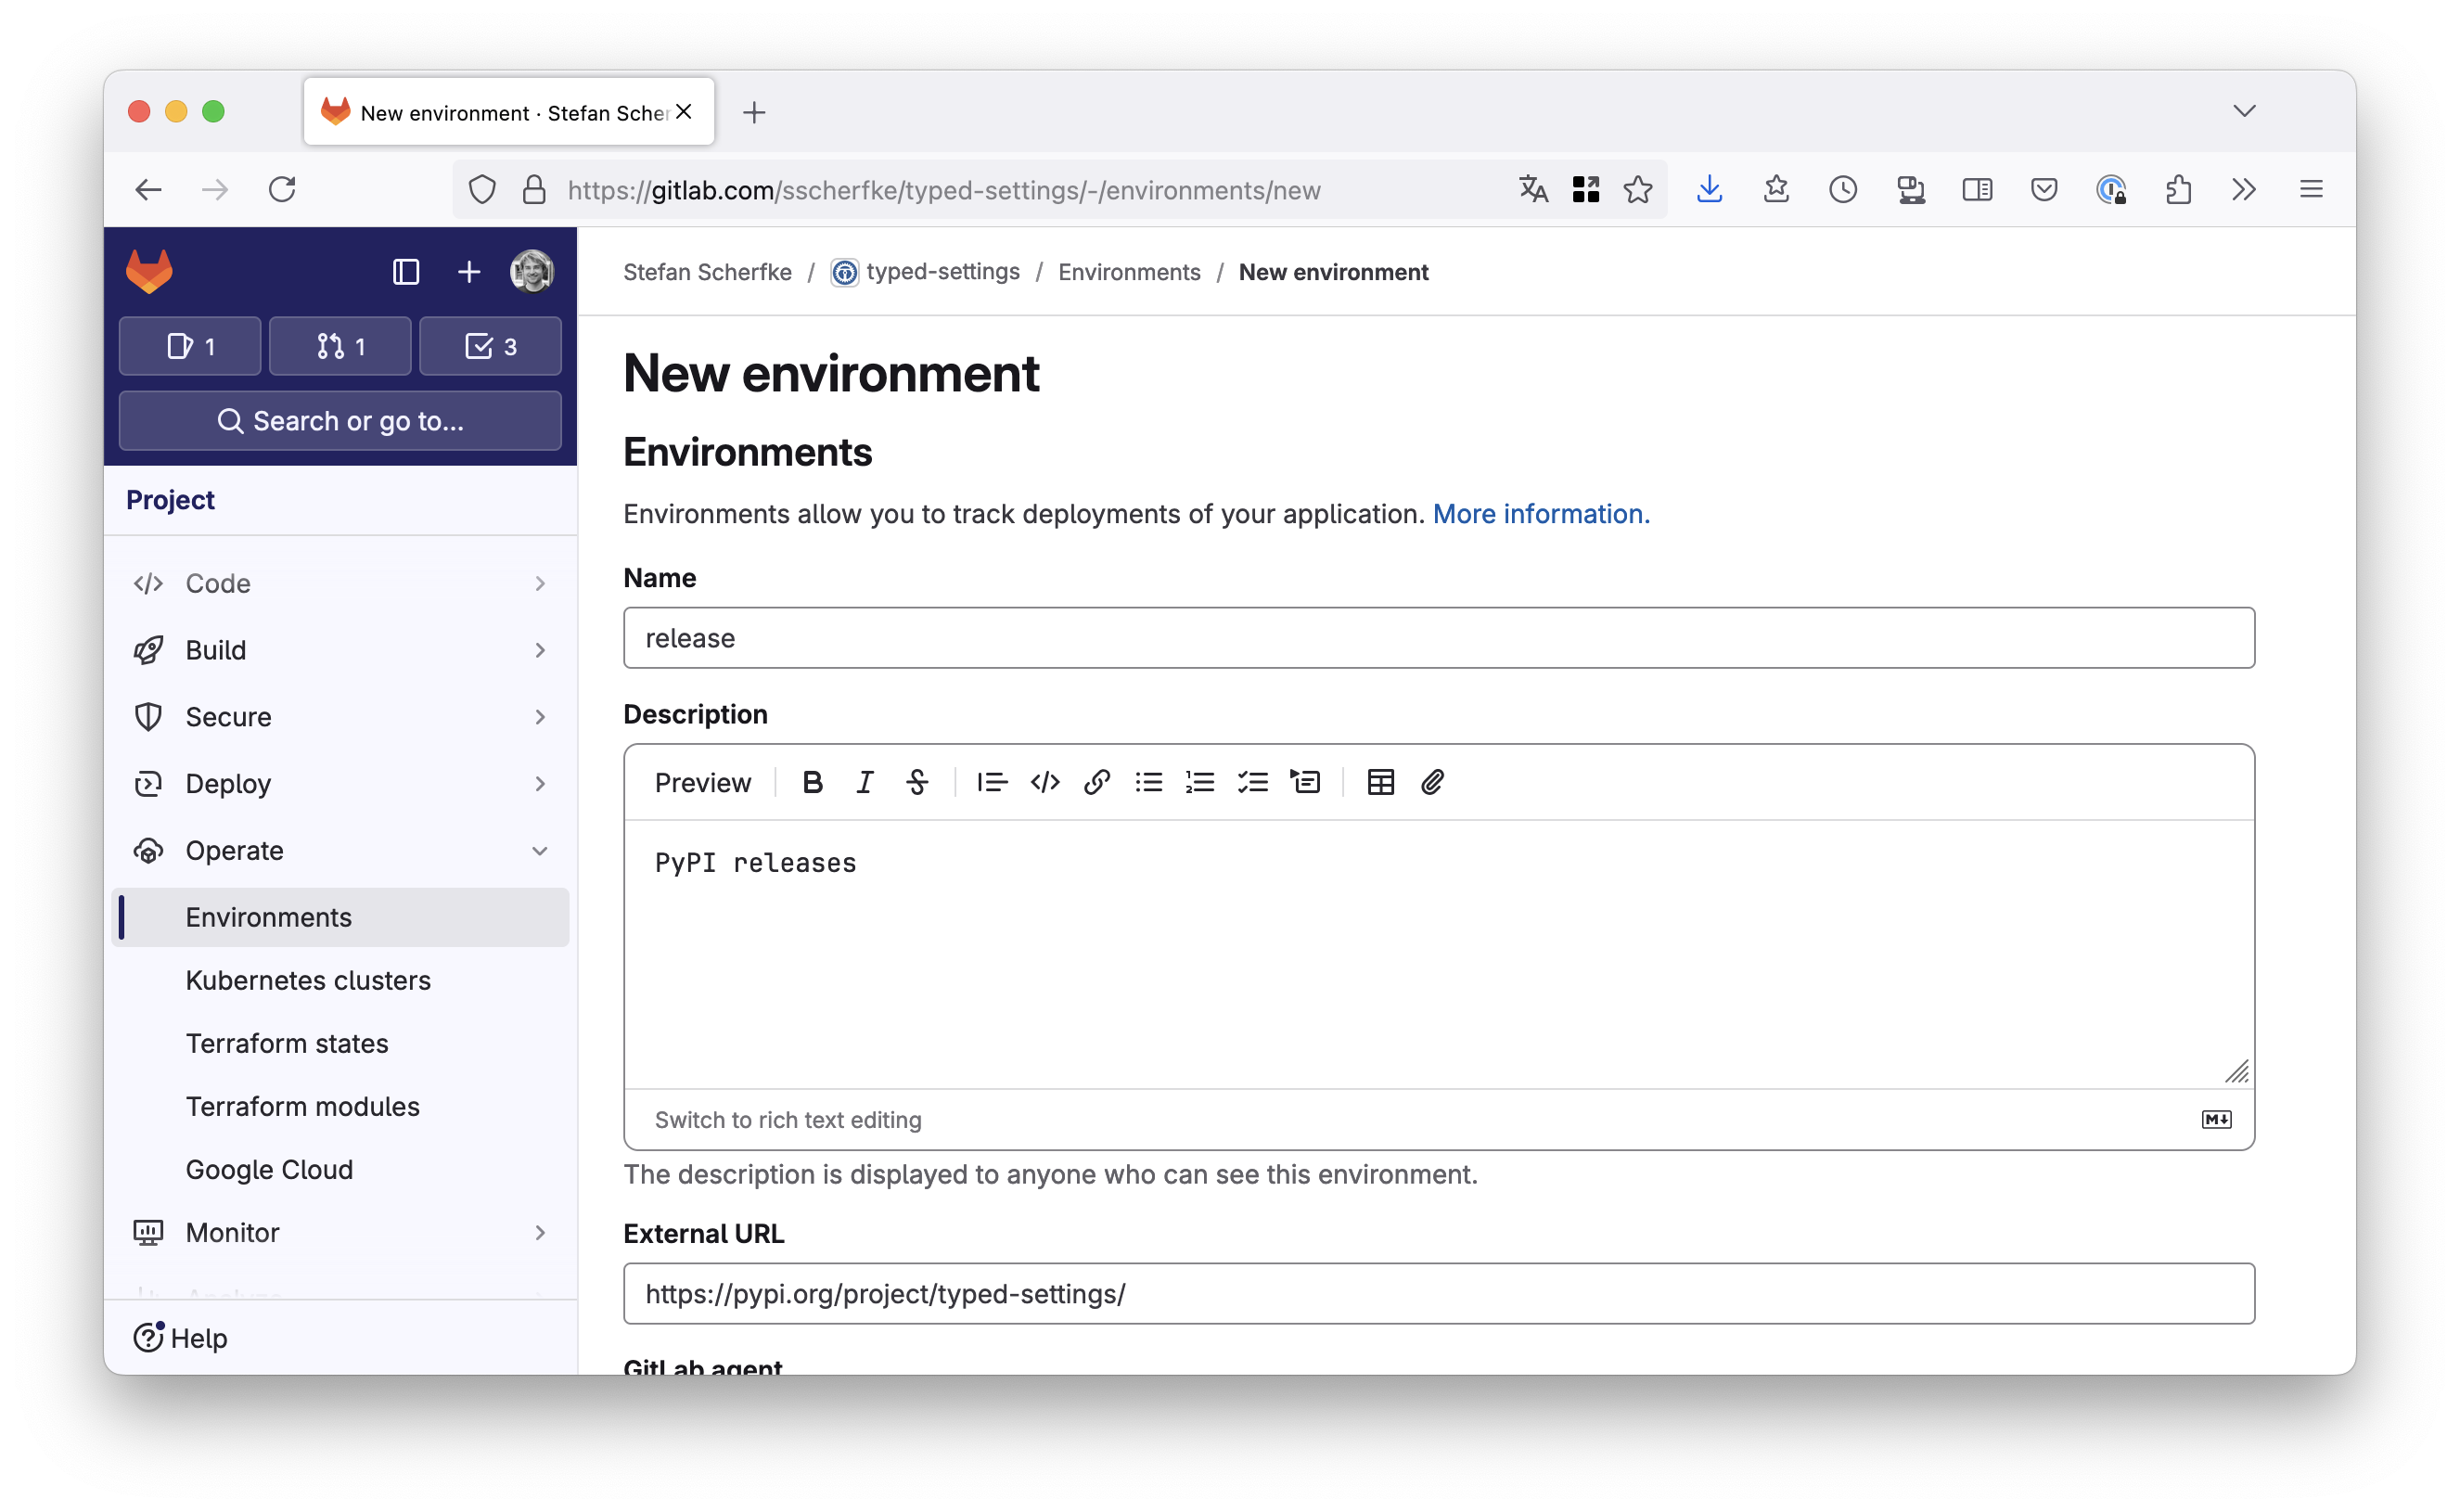
Open your project in GitLab, then go to Operate → Environments and click Create an environment to create the production environment:
- Title: release
- Description: PyPI releases (or whatever you want)
- External URL: https://pypi.org/project/{your-project}/ (the URL is displayed in a few places in GitLab and helps you to quickly navigate to your project on PyPI.)
Click Save.
Click New environment (in the top right corner) to create the test environment:
- Title: release-test
- Description: TestPyPI releases (or whatever you want)
- External URL: https://test.pypi.org/project/{your-project}/
Click Save.
If protected environments are available (see the note above), navigate to Settings → CI/CD and open the Protected environments section. Click the Protect an environment button.
- Select environment: release
- Allowed to deploy: Choose a role or user, e.g. Maintainers.
- Approvers: Choose a role or user, e.g. yourself.
In order to be able to upload each commit to the TestPyPI, we need a different version for each build. To achieve this, we can use hatch-vcs, setuptools_scm, or similar.
In the following example, we are going to use hatchling with hatch-vcs as the build backend and uv for everything else.
We configure the build backend in our pyproject.toml as follows:
[build-system] requires = ["hatchling", "hatch-vcs"] build-backend = "hatchling.build" [tool.hatch.version] source = "vcs" raw-options = { local_scheme = "no-local-version" } # TestPyPI lacks support for this [project] dynamic = ["version"]Hint
Versions with a local component cannot be uploaded to to (Test)PyPI, so we must disable this feature.
Now lets open our project’s .gitlab-ci.yml which we’ll edit during the next steps.
Hint
The snippets in the next steps only show fragments of the .gitlab-ci.yml. I’ll post the complete file at the end of the article.
We need at least a build and a deploy stage:
stages: - 'build' # - 'test' # - ... - 'deploy'Python build tools usually put their artifacts (binary wheels and source distributions) into dist/. This directory needs to be added to your pipeline artifacts, so that these files are available in later pipeline jobs:
build: stage: 'build' script: - 'uv build --out-dir=dist' artifacts: paths: - 'dist/'For our use-case, we need two release jobs: One that uploads to the TestPyPI on each push (release-test) and one that uploads to the PyPI in tag pipelines (release).
Since both jobs are nearly the same, we’ll also define an “abstract base job” .release-base which the other two extend.
Hint
To improve readability and avoid issues with excaping, we’ll use YAML multiline strings.
The >- operator joins the following lines without a line break and strips additional whitespace.
See yaml-multiline.info for details.
.release-base: # Abstract base job for "release" jobs. # Extending jobs must define the following variables: # - PYPI_OIDC_AUD: Audience for the ID token that GitLab # issues to the pipeline job # - PYPI_OIDC_URL: PyPI endpoint for retrieving a publish # token with GitLab’s ID token # - UV_PUBLISH_URL: PyPI endpoint for the actual upload stage: 'deploy' id_tokens: PYPI_ID_TOKEN: aud: '$PYPI_OIDC_AUD' script: # Use the GitLab ID token to retrieve an API token from PyPI - >- resp="$(curl -X POST "${PYPI_OIDC_URL}" -d "{\"token\":\"${PYPI_ID_TOKEN}\"}")" # Parse the response and extract the token - >- publish_token="$(python -c "import json; print(json.load('${resp}')['token'])")" # Upload the files from "dist/" - 'uv publish --token "$publish_token"' # Print the link to PyPI so we can quickly go there to verify the result: - 'version="$(uv run --with hatch-vcs hatchling version)"' - 'echo -e "\033[34;1mPackage on PyPI:\033[0m ${CI_ENVIRONMENT_URL}${version}/"'Now we can add the release-test job. It extends .release-base, defines variables for the base job, and rules for when the job should run:
release-test: extends: '.release-base' rules: # Only run if it's a pipeline for the default branch or a tag: - if: '$CI_COMMIT_BRANCH == $CI_DEFAULT_BRANCH || $CI_COMMIT_TAG' environment: name: 'release-test' url: 'https://test.pypi.org/project/typed-settings/' variables: PYPI_OIDC_AUD: 'testpypi' PYPI_OIDC_URL: 'https://test.pypi.org/_/oidc/mint-token' UV_PUBLISH_URL: 'https://test.pypi.org/legacy/'The release job looks very similar, but the variables have different values and the job only runs in tag pipelines.
release: extends: '.release-base' rules: # Only run in tag pipelines: - if: '$CI_COMMIT_TAG' environment: name: 'release' url: 'https://pypi.org/project/typed-settings/' variables: PYPI_OIDC_AUD: 'pypi' PYPI_OIDC_URL: 'https://pypi.org/_/oidc/mint-token' UV_PUBLISH_URL: 'https://upload.pypi.org/legacy/'
That’s it. You should now be able to automatically create PyPI releases directly from your GitLab CI/CD pipeline. 🎉
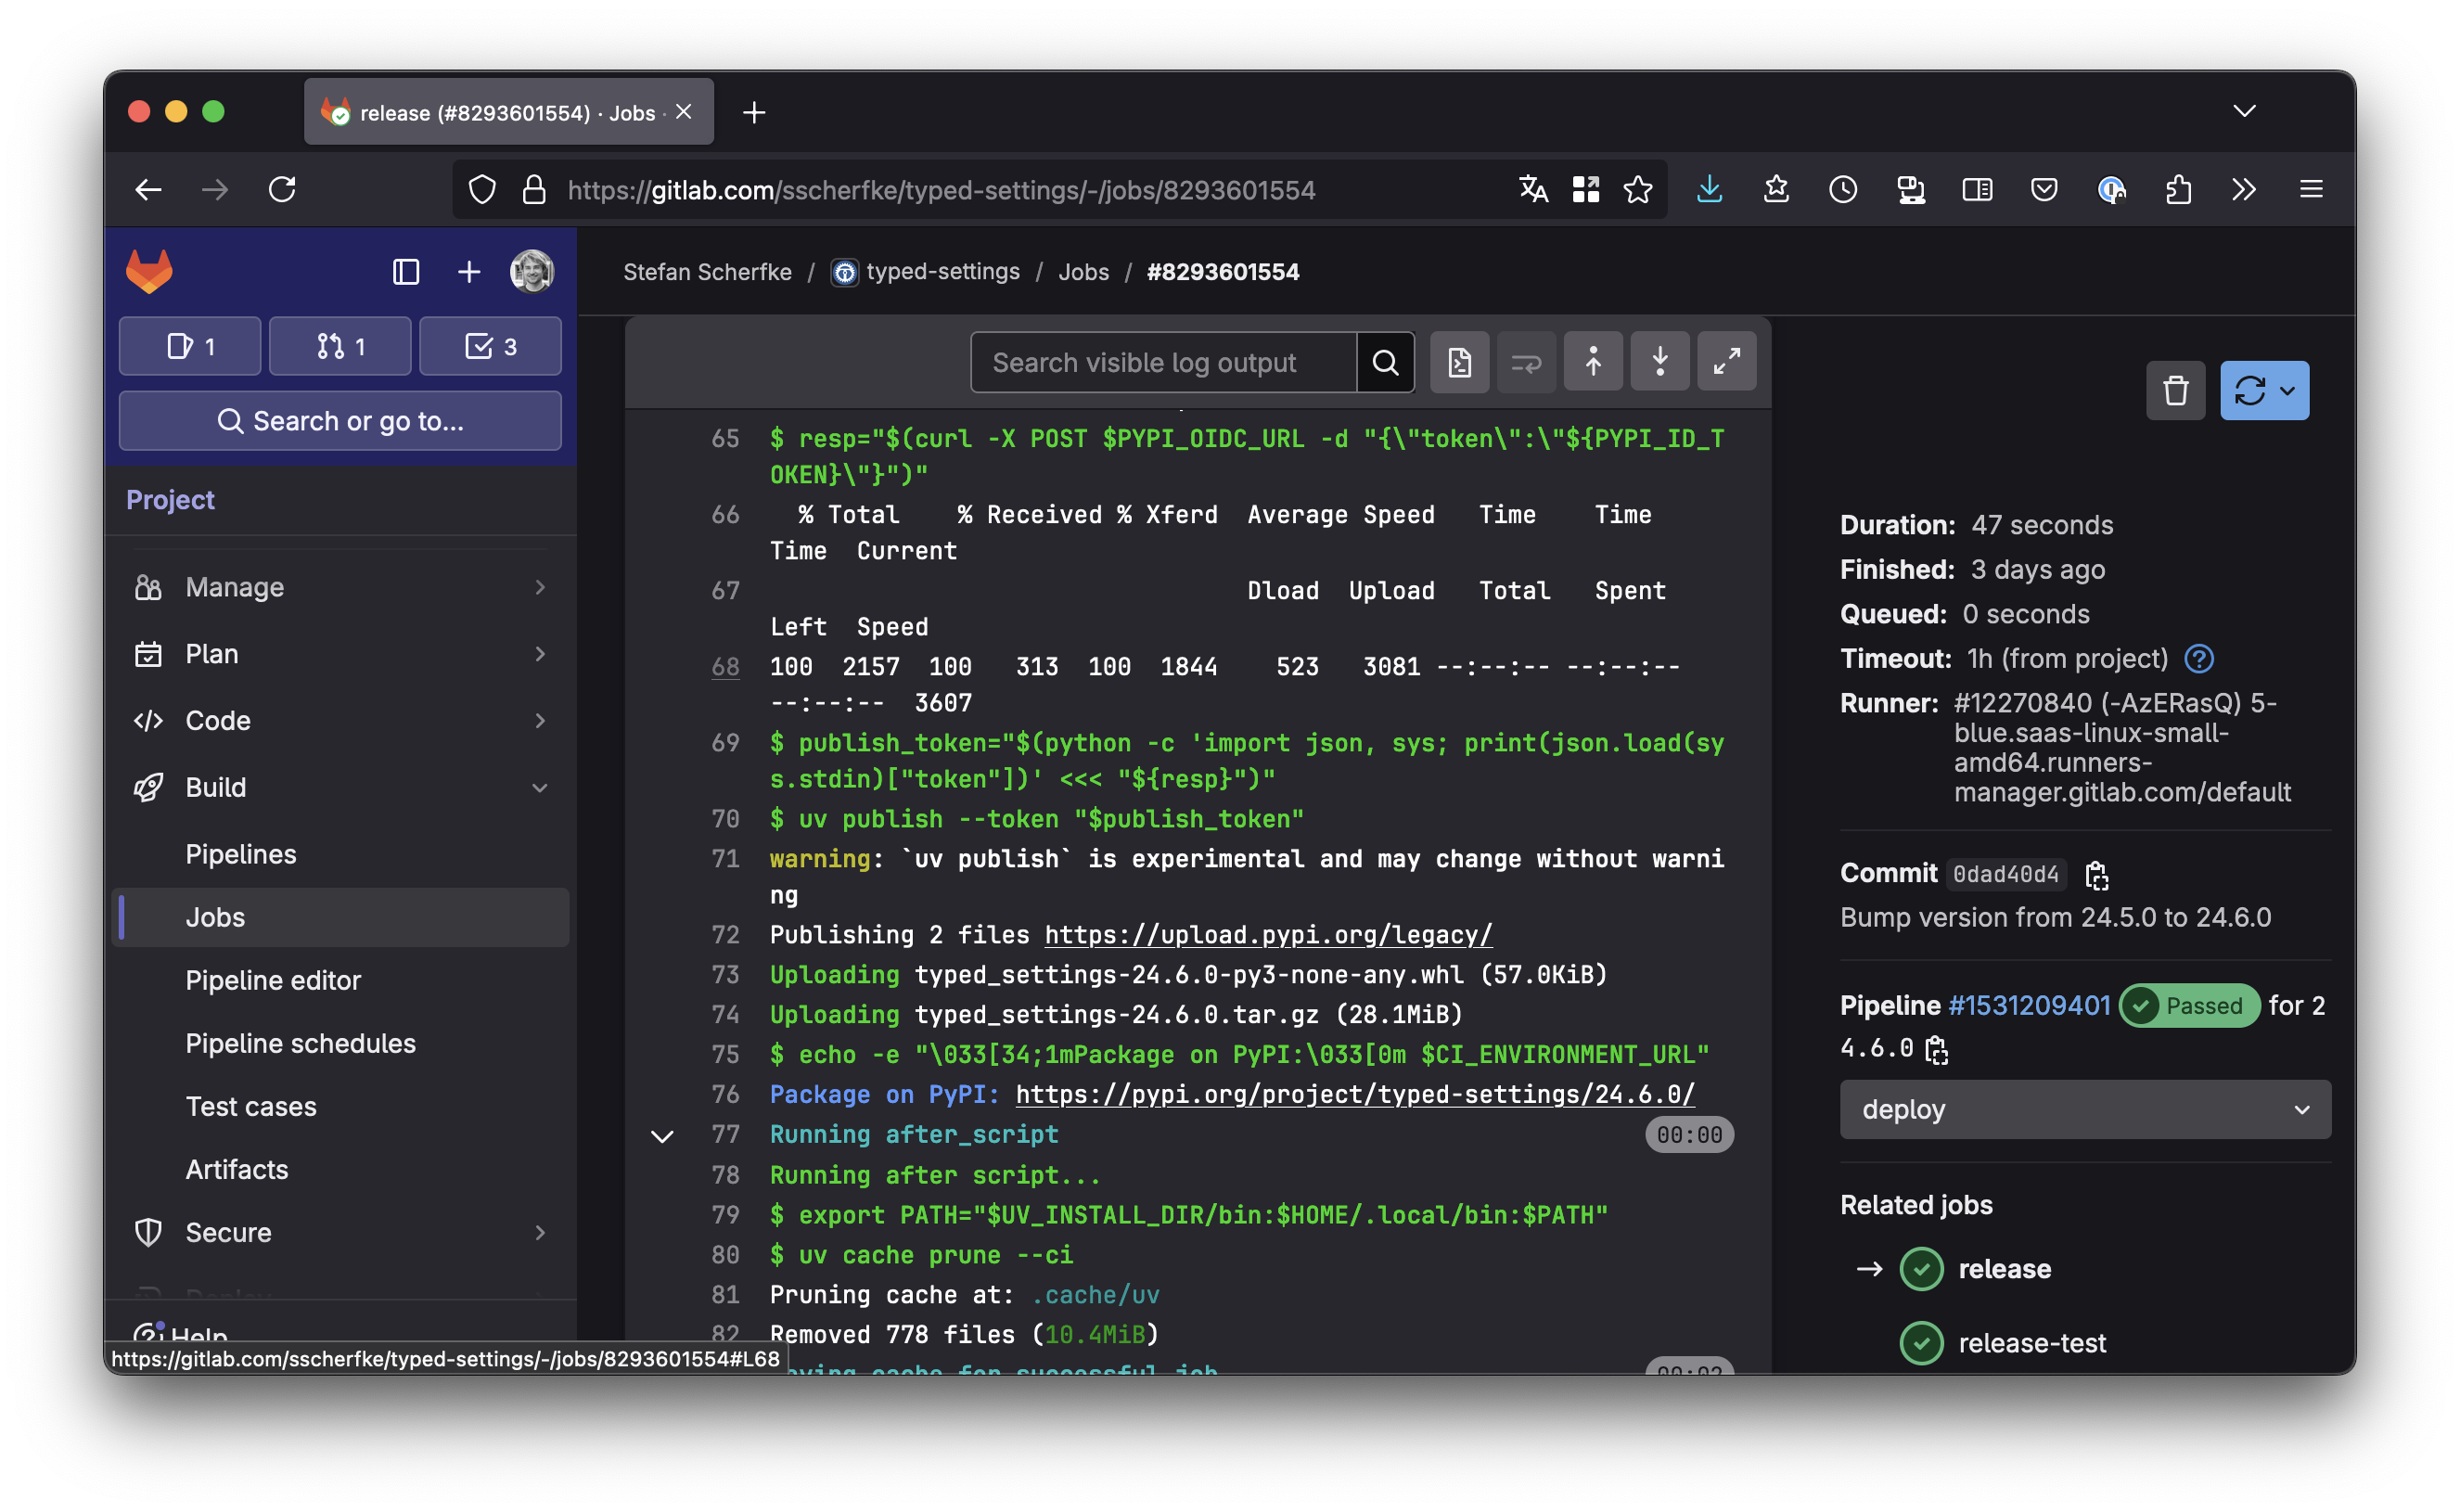
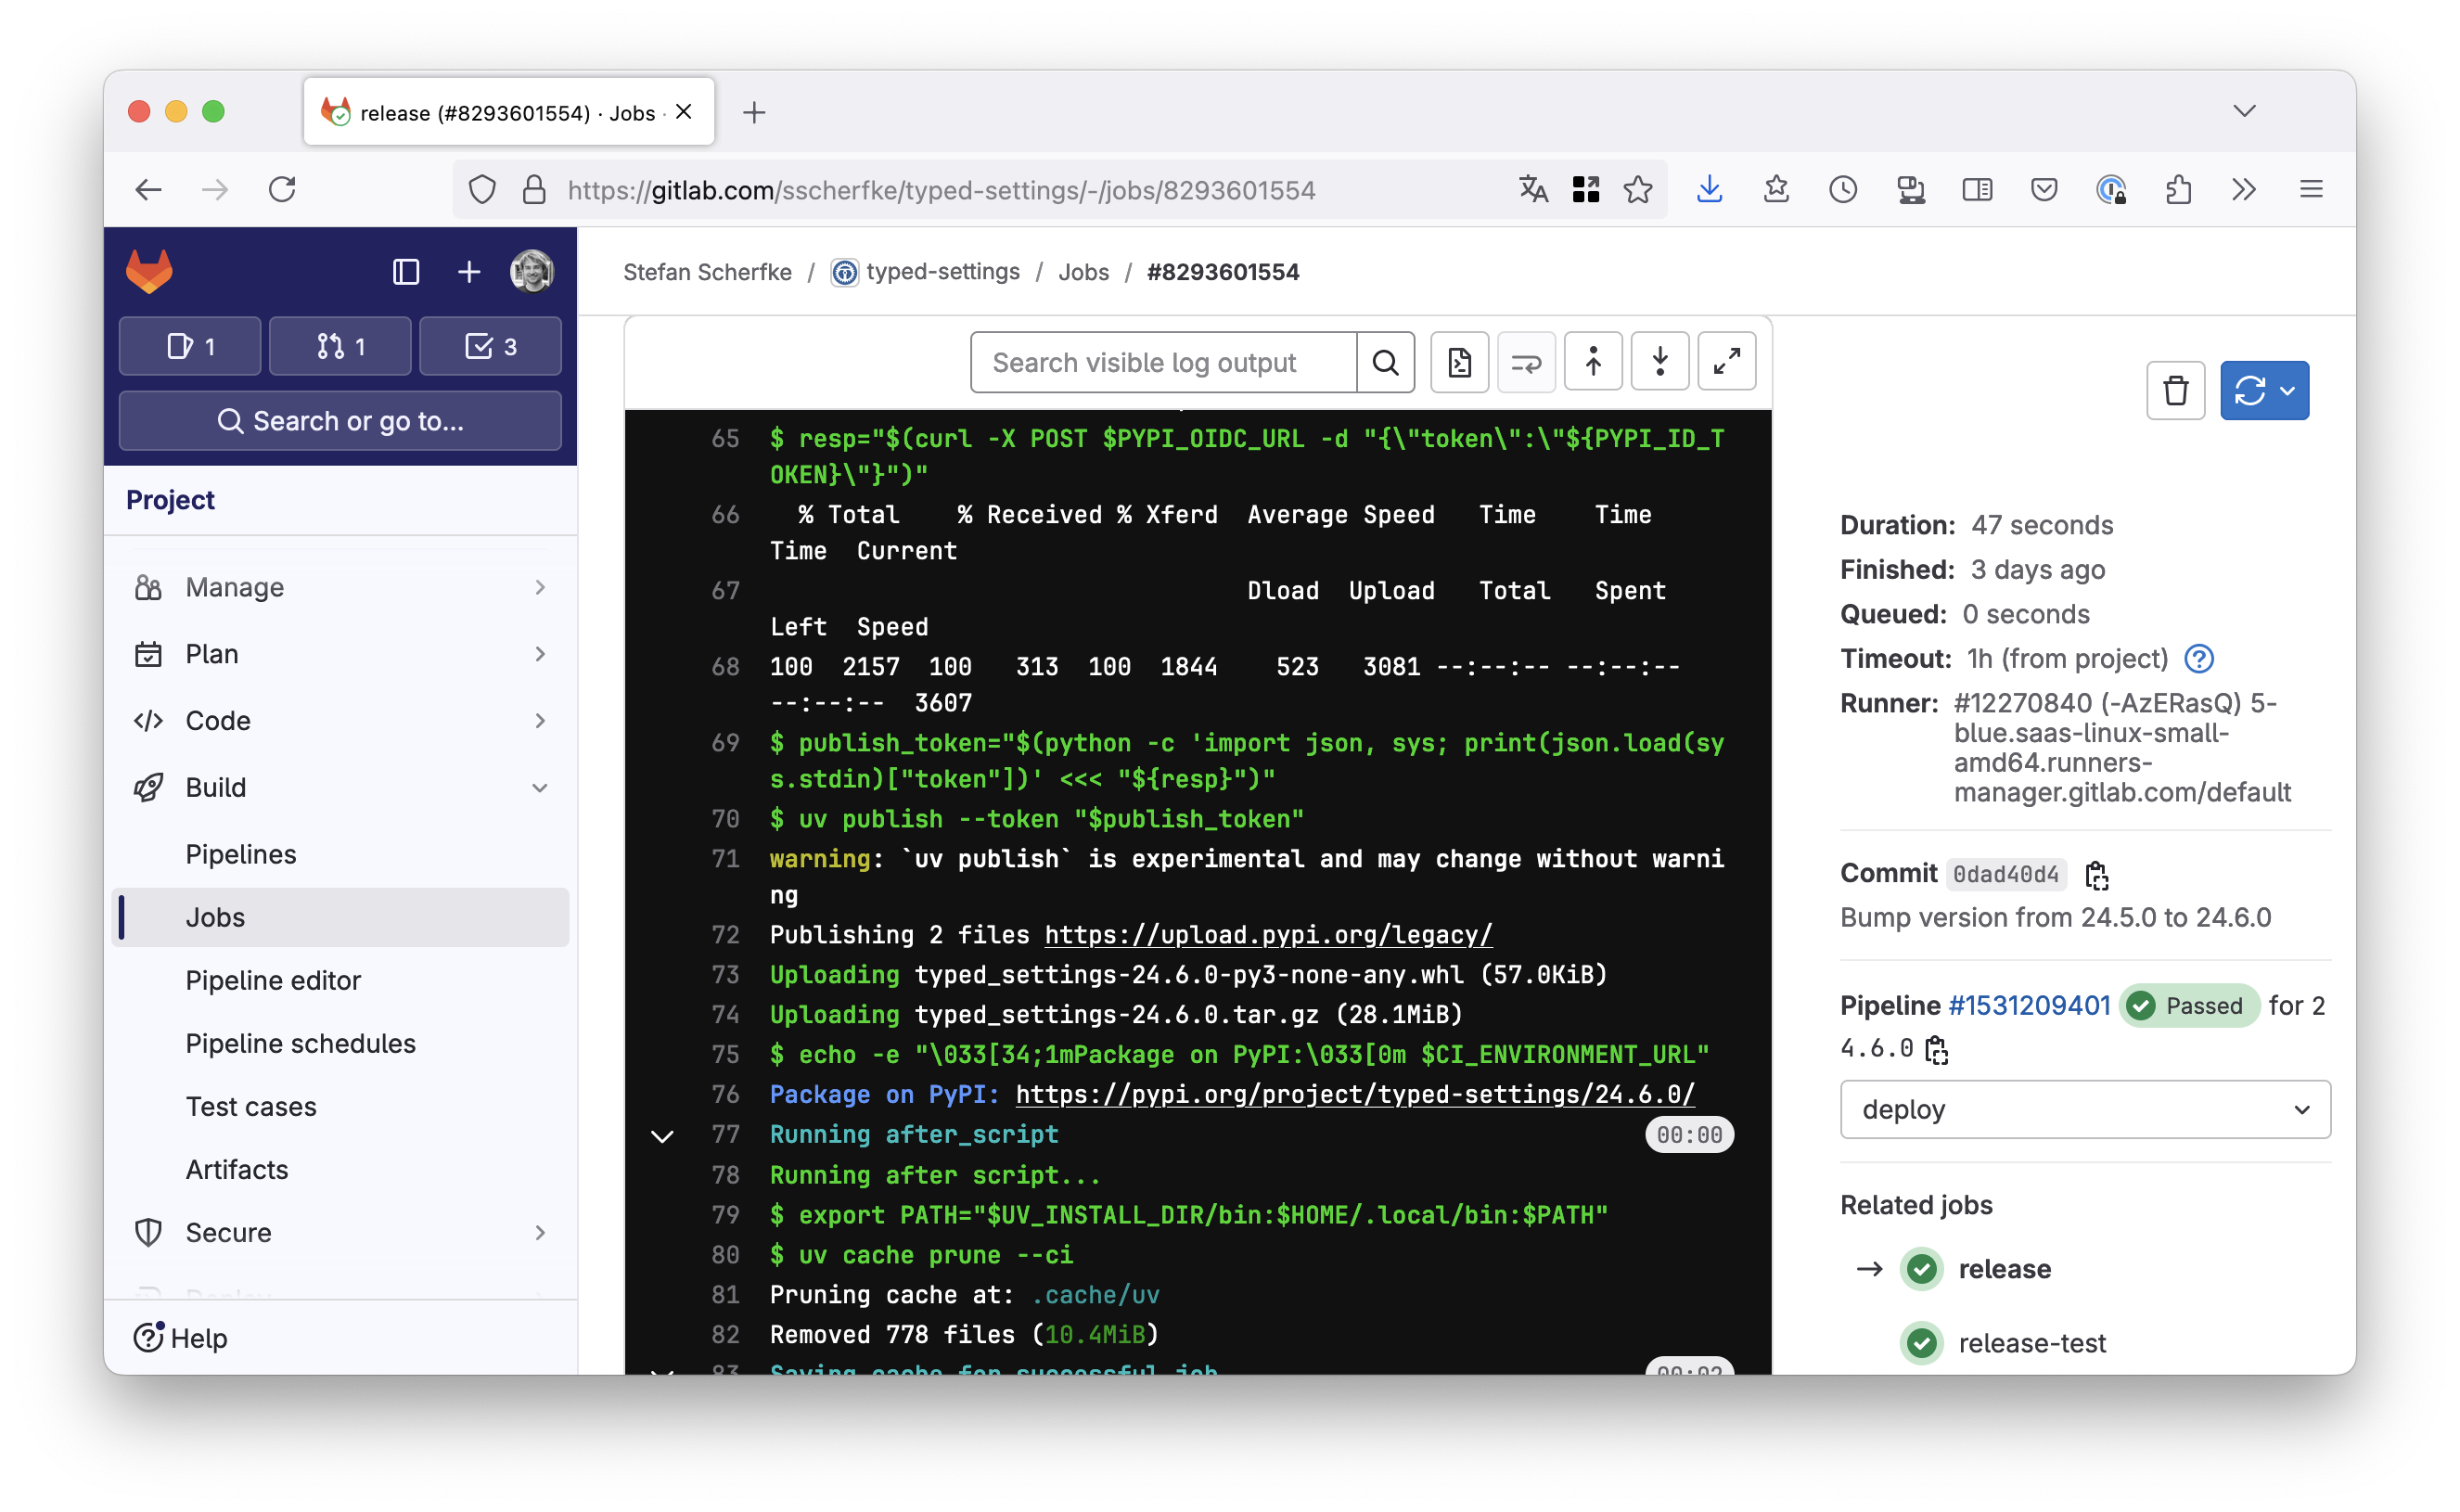
A successful GitLab CI/CD pipeline for Typed Settings’ v24.6.0 release. A successful GitLab CI/CD pipeline for Typed Settings’ v24.6.0 release.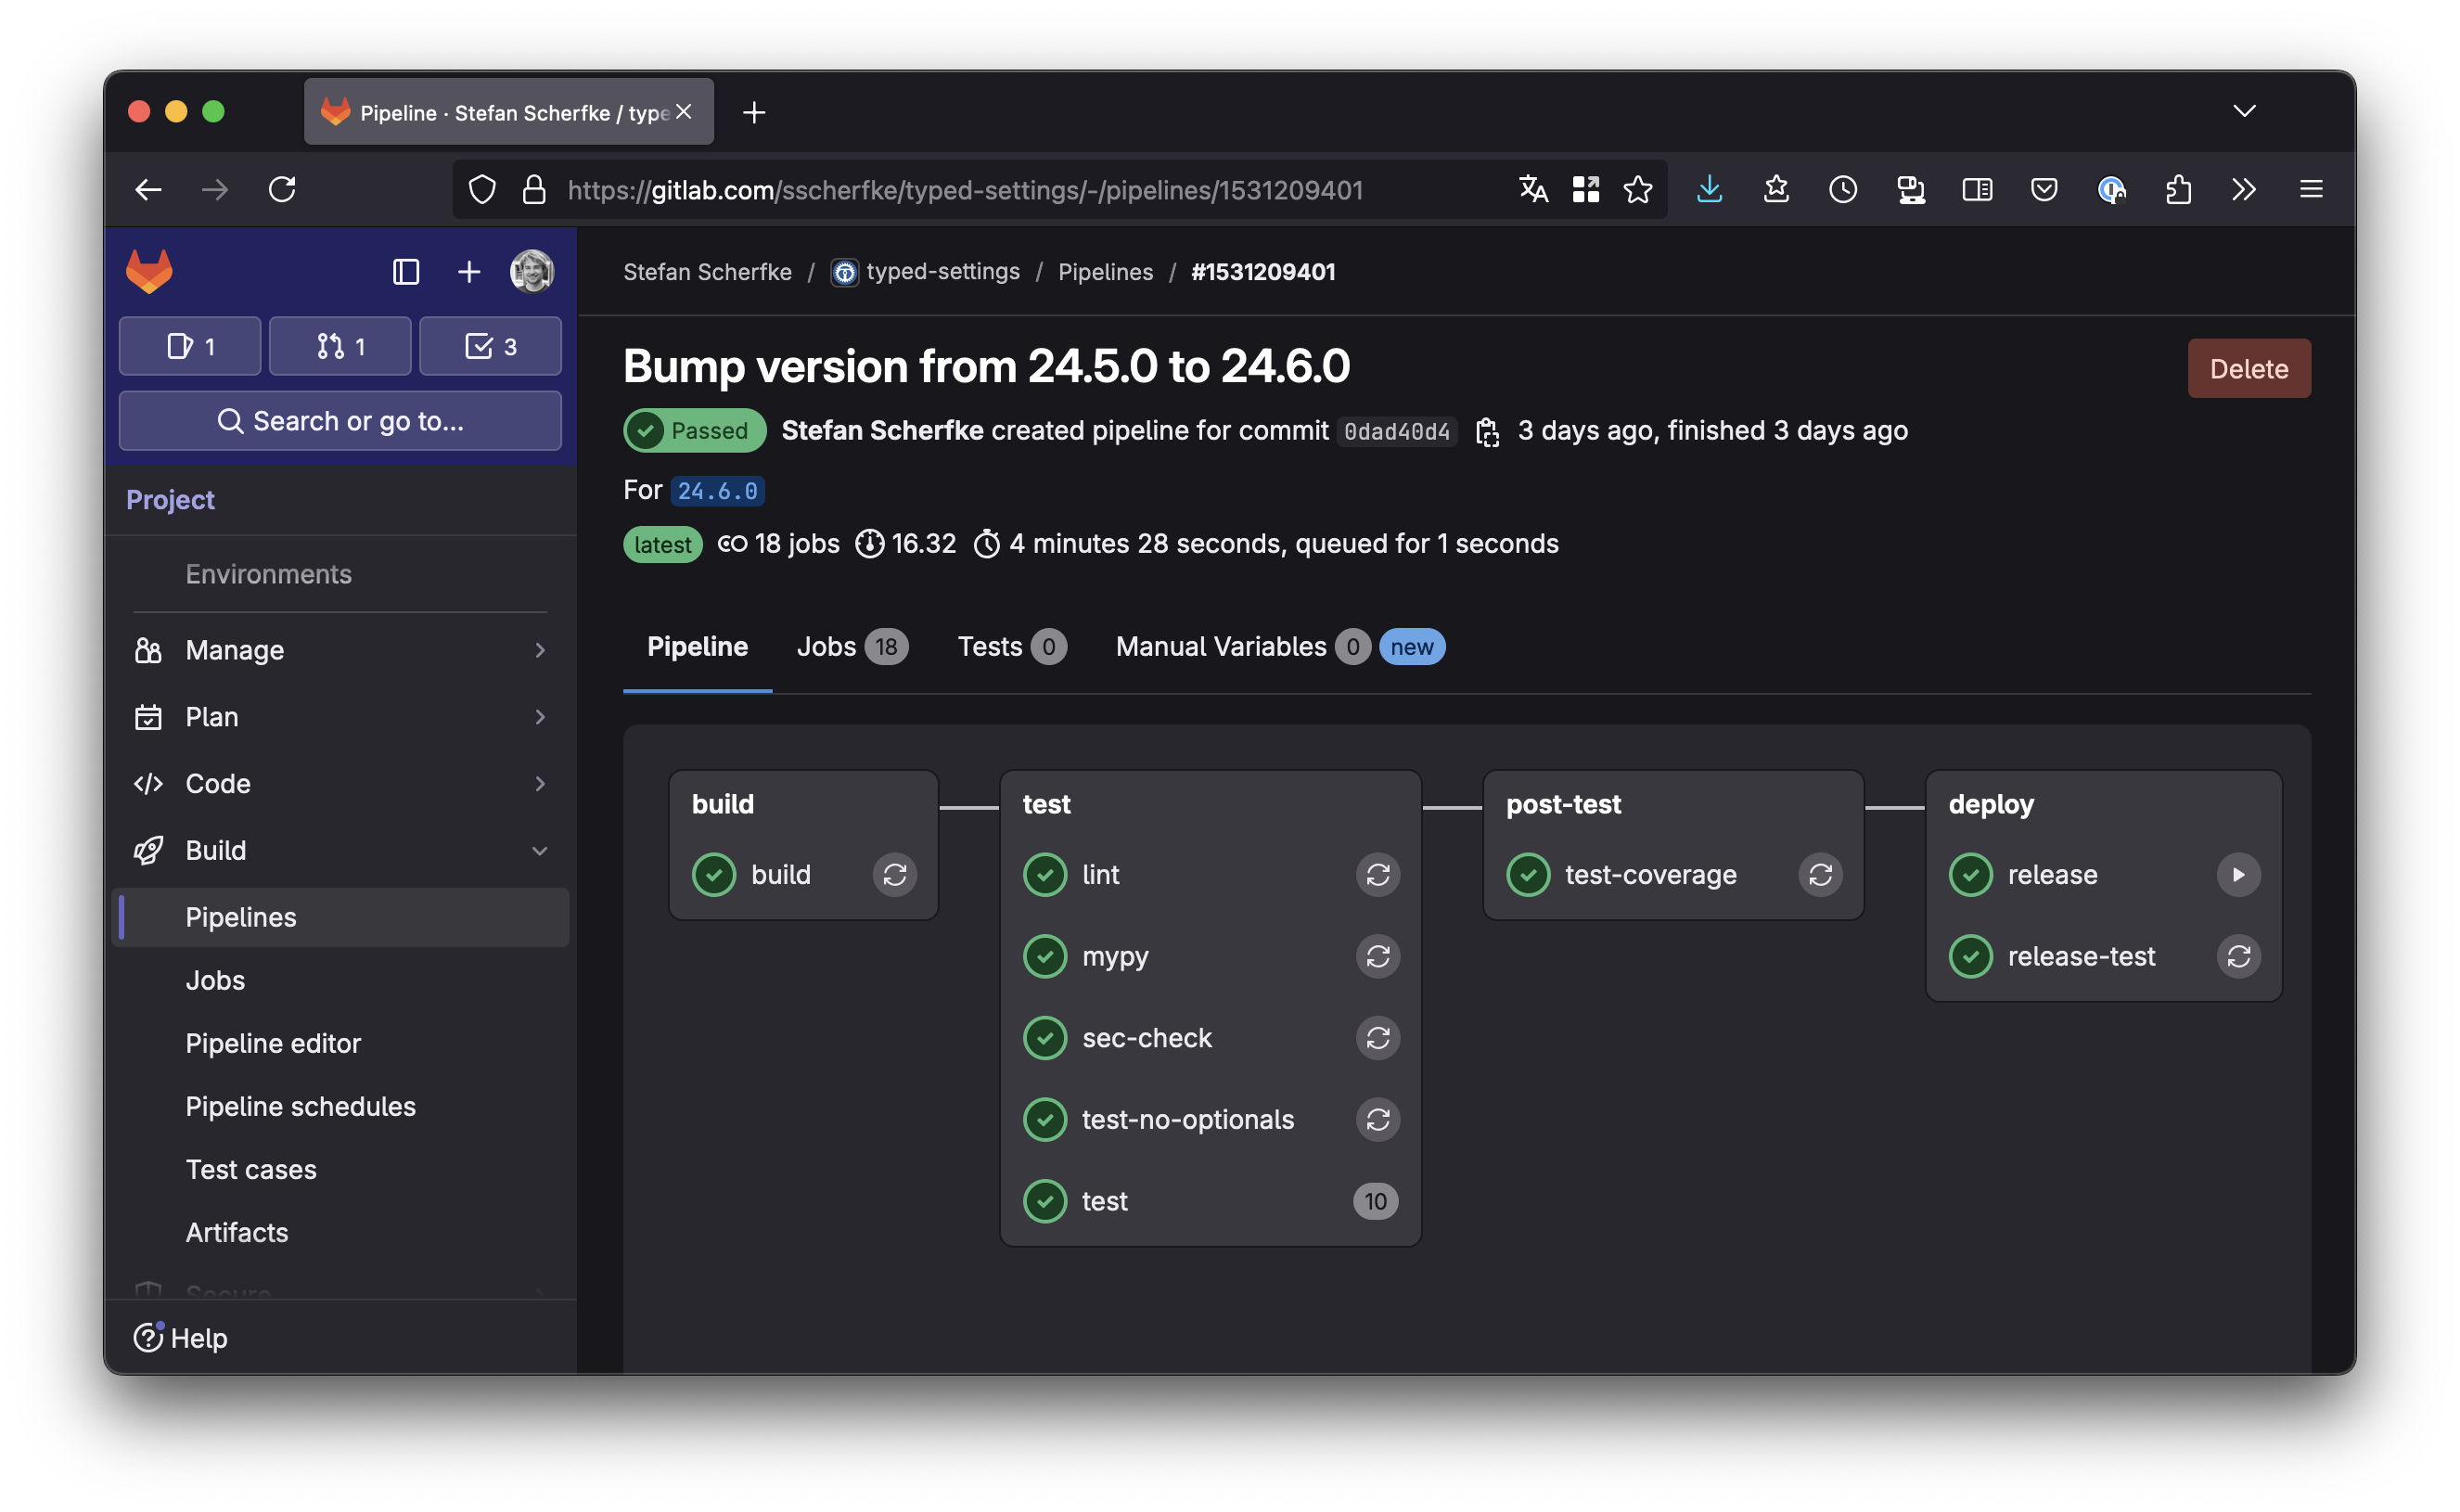
If you run into any problems, you can
- check if the settings on PyPI match your GitLab project,
- read the Trusted Publishers docs,
- read the GitLAB CI/CD YAML syntax reference,
- read the docs for GitLab environments and GitLab OIDC authentication.
You can leave comments over at Mastodon or Bluesky.
And, as promised, here is the complete (but still minimal) .gitlab-ci.yml from the snippets above. If you want to see a real-world example, you can take a look at Typed Settings pipeline definition.
# .gitlab-ci.yml stages: - 'build' # - 'test' # - ... - 'deploy' build: stage: 'build' script: - 'uv build --out-dir=dist' artifacts: paths: - 'dist/' .release-base: # Abstract base job for "release" jobs. # Extending jobs must define the following variables: # - PYPI_OIDC_AUD: Audience for the ID token that GitLab issues to the pipeline job # - PYPI_OIDC_URL: PyPI endpoint for retrieving a publish token with GitLab’s ID token # - UV_PUBLISH_URL: PyPI endpoint for the actual upload stage: 'deploy' id_tokens: PYPI_ID_TOKEN: aud: '$PYPI_OIDC_AUD' script: - >- resp="$(curl -X POST "${PYPI_OIDC_URL}" -d "{\"token\":\"${PYPI_ID_TOKEN}\"}")" - >- publish_token="$(python -c "import json; print(json.load('${resp}')['token'])")" - 'uv publish --token "$publish_token"' - 'version="$(uv run --with hatch-vcs hatchling version)"' - 'echo -e "\033[34;1mPackage on PyPI:\033[0m ${CI_ENVIRONMENT_URL}${version}/"' release-test: extends: '.release-base' rules: - if: '$CI_COMMIT_BRANCH == $CI_DEFAULT_BRANCH || $CI_COMMIT_TAG' environment: name: 'release-test' url: 'https://test.pypi.org/project/typed-settings/' variables: PYPI_OIDC_AUD: 'testpypi' PYPI_OIDC_URL: 'https://test.pypi.org/_/oidc/mint-token' UV_PUBLISH_URL: 'https://test.pypi.org/legacy/' release: extends: '.release-base' rules: - if: '$CI_COMMIT_TAG' environment: name: 'release' url: 'https://pypi.org/project/typed-settings/' variables: PYPI_OIDC_AUD: 'pypi' PYPI_OIDC_URL: 'https://pypi.org/_/oidc/mint-token' UV_PUBLISH_URL: 'https://upload.pypi.org/legacy/'Seth Michael Larson: Early promising results with SBOMs and Python packages
Published 2024-11-14 by Seth Larson
Reading time: minutes
I've kicked off a project to reduce the "phantom dependency" problem for Python. The phantom dependency problem is where distinct software (sometimes written in Python, but often C, C++, Rust, etc) is included in a Python package but then isn't recorded anywhere in the package metadata.
These distinct pieces of software aren't not recorded because of lack of time or awareness, there is no standardized method to record this information in Python package metadata.
This means that when a software composition analysis (SCA) tool looks at the Python package the tool will "miss" all the software that's included in the package aside from the top-level package itself.
For example, the popular Python image manipulation library "Pillow" is not only "Pillow", the wheel files contain many more libraries to comply with the "manylinux" package platform:
# (the below libraries are bundled by auditwheel) $ unzip -l pillow-11.0.0-cp312-cp312-manylinux_2_28_x86_64.whl | grep 'pillow.libs' pillow.libs/ pillow.libs/libharfbuzz-144af51e.so.0 pillow.libs/libxcb-b8a56d01.so.1.1.0 pillow.libs/libpng16-4cc6a9fc.so.16.44.0 pillow.libs/libXau-154567c4.so.6.0.0 pillow.libs/libbrotlicommon-3ecfe81c.so.1 pillow.libs/liblzma-c9407571.so.5.6.3 pillow.libs/libfreetype-e7d5437d.so.6.20.1 pillow.libs/liblcms2-e69eef39.so.2.0.16 pillow.libs/libopenjp2-05423b53.so pillow.libs/libtiff-0a86184d.so.6.0.2 pillow.libs/libjpeg-45e70d75.so.62.4.0 pillow.libs/libbrotlidec-ba690955.so.1 pillow.libs/libwebp-2fd3cdca.so.7.1.9 pillow.libs/libsharpyuv-898c0cb5.so.0.1.0 pillow.libs/libwebpdemux-f2642bcc.so.2.0.15 pillow.libs/libwebpmux-d524b4d5.so.3.1.0I see many recognizable projects in the list of shared objects, like libjpeg, libwebp, libpng, xz-utils (liblzma), etc. If we try to scan this installed wheel with a tool like Syft we receive this report:
$ syft dir:venv ✔ Indexed file system venv ✔ Cataloged packages [2 packages] NAME VERSION TYPE pillow 11.0.0 python pip 24.2 pythonSyft isn't able to find any of the compiled libraries! So if we were to run a vulnerability scanner we would only receive vulnerability records for Pillow and pip. My plan is to help fix this problem with Software Bill-of-Materials documents (SBOMs) included in a standardized way inside of Python packages.
To test how well this proposal works with today's tools, I forked auditwheel and created a rudimentary patch which:
- For each shared library which is being bundled into a wheel, record the original file path and checksum. Bundle the shared libraries into the wheel as normal.
- Using platform-specific manager query each file path back to the package that provides the file. In this specific case rpm was used (rpm -qf <path>) because manylinux_2_28_x86_64 uses AlmaLinux 8 as the distribution.
- Gather information about that package using rpm, such as the name, version, etc.
- For each package, create the intrinsic "package URL" (PURL) software identifier for later use. This includes information about the packaging format, package name, version, but also the distro and architecture. For example, the PURL for the copy of libwebp used by the wheel is: pkg:rpm/almalinux/libwebp@1.0.0-9.el8_9.1?arch=x86_64&distro=almalinux-8
- Generate a CycloneDX SBOM file containing the above gathered information split into components and with relationship links between the top-level component (Pillow) and the bundled libraries.
- Embed that generated SBOM file into the wheel.
Let's run through building Pillow from source and using our forked auditwheel:
# The manylinux image may differ depending on your platform. $ docker run --rm -it -v.:/tmp/wheelhouse \ quay.io/pypa/manylinux_2_28_x86_64 # Install dependencies for Pillow $ yum install --nogpgcheck libtiff-devel \ libjpeg-devel openjpeg2-devel zlib-devel \ freetype-devel lcms2-devel libwebp-devel \ tcl-devel tk-devel harfbuzz-devel \ fribidi-devel libxcb-devel # Create a virtualenv and install auditwheel fork $ /usr/local/bin/python3.12 -m venv venv $ source venv/bin/activate $ python -m pip install build $ python -m pip install git+https://github.com/sethmlarson/auditwheel@sboms # Download the Pillow source from PyPI $ python -m pip download --no-binary=pillow pillow==11.0.0 $ tar -xzvf pillow-11.0.0.tar.gz # Build a non-manylinux wheel for Pillow $ python -m build ./pillow-11.0.0/ # Repair the wheel using auditwheel $ auditwheel repair ./pillow-11.0.0/dist/ ... Fixed-up wheel written to /wheelhouse/pillow-11.0.0-cp312-cp312-manylinux_2_28_x86_64.whl # Inspect the wheel for our SBOM, there it is! $ unzip -l /wheelhouse/pillow-11.0.0-*.whl | grep '.cdx.json' 5703 11-14-2024 19:39 pillow.libs/auditwheel.cdx.json # Move the wheel outside our container $ mv /wheelhouse/pillow-11.0.0-cp312-cp312-manylinux_2_28_x86_64.whl /tmp/wheelhouse/So now we have a wheel file that contains an SBOM partially describing its contents. Let's try installing that wheel and running Syft:
$ syft dir:venv ✔ Indexed file system /tmp/venv-pillow ✔ Cataloged packages [13 packages] NAME VERSION TYPE Pillow 11.0.0 python bzip2-libs 1.0.6-26.el8 rpm freetype 2.9.1-9.el8 rpm jbigkit-libs 2.1-14.el8 rpm lcms2 2.9-2.el8 rpm libXau 1.0.9-3.el8 rpm libjpeg-turbo 1.5.3-12.el8 rpm libpng 1.6.34-5.el8 rpm libtiff 4.0.9-33.el8_10 rpm libwebp 1.0.0-9.el8_9.1 rpm libxcb 1.13.1-1.el8 rpm openjpeg2 2.4.0-5.el8 rpm pip 24.2 pythonWoo hoo! Now the proper libraries are showing up in Syft. That means we'll be able to get vulnerability information from all the contained software components. This isn't the end, there are many many MANY ways that software ends up in a Python package. This quick validation test only shows that even with today's SBOM and SCA tools that embedding SBOM documents into wheels can be useful for downstream tools. Onwards to even more! 🚀
If you're interested in this project, follow the repository on GitHub and participate in the kick-off discussion on Python Discourse.
That's all for this post! 👋 If you're interested in more you can read the last report.
Have thoughts or questions? Let's chat over email or social:
sethmichaellarson@gmail.com
@sethmlarson@fosstodon.org
Want more articles like this one? Get notified of new posts by subscribing to the RSS feed or the email newsletter. I won't share your email or send spam, only whatever this is!
Want more content now? This blog's archive has ready-to-read articles. I also curate a list of cool URLs I find on the internet.
Find a typo? This blog is open source, pull requests are appreciated.
Thanks for reading! ♡ This work is licensed under CC BY-SA 4.0
︎Bojan Mihelac: Building docker images with private python packages
Bojan Mihelac: Django app name translation in admin
Bojan Mihelac: Django-sites-ext
Bojan Mihelac: Django-simpleadmindoc updated
Bojan Mihelac: Rename uploaded files to ASCII charset in Django
Real Python: Python Dictionary Comprehensions: How and When to Use Them
Dictionary comprehensions are a concise and quick way to create, transform, and filter dictionaries in Python. They can significantly enhance your code’s conciseness and readability compared to using regular for loops to process your dictionaries.
Understanding dictionary comprehensions is crucial for you as a Python developer because they’re a Pythonic tool for dictionary manipulation and can be a valuable addition to your programming toolkit.
In this tutorial, you’ll learn how to:
- Create dictionaries using dictionary comprehensions
- Transform existing dictionaries with comprehensions
- Filter key-value pairs from dictionaries using conditionals
- Decide when to use dictionary comprehensions
To get the most out of this tutorial, you should be familiar with basic Python concepts, such as for loops, iterables, and dictionaries, as well as list comprehensions.
Get Your Code: Click here to download the free sample code that you’ll use to learn about dictionary comprehensions in Python.
Creating and Transforming Dictionaries in PythonIn Python programming, you’ll often need to create, populate, and transform dictionaries. To do this, you can use dictionary literals, the dict() constructor, and for loops. In the following sections, you’ll take a quick look at how to use these tools. You’ll also learn about dictionary comprehensions, which are a powerful way to manipulate dictionaries in Python.
Creating Dictionaries With Literals and dict()To create new dictionaries, you can use literals. A dictionary literal is a series of key-value pairs enclosed in curly braces. The syntax of a dictionary literal is shown below:
Python Syntax {key_1: value_1, key_2: value_2,..., key_N: value_N} Copied!The keys must be hashable objects and are commonly strings. The values can be any Python object, including other dictionaries. Here’s a quick example of a dictionary:
Python >>> likes = {"color": "blue", "fruit": "apple", "pet": "dog"} >>> likes {'color': 'blue', 'fruit': 'apple', 'pet': 'dog'} >>> likes["hobby"] = "guitar" >>> likes {'color': 'blue', 'fruit': 'apple', 'pet': 'dog', 'hobby': 'guitar'} Copied!In this example, you create dictionary key-value pairs that describe things people often like. The keys and values of your dictionary are string objects. You can add new pairs to the dictionary using the dict[key] = value syntax.
Note: To learn more about dictionaries, check out the Dictionaries in Python tutorial.
You can also create new dictionaries using the dict() constructor:
Python >>> dict(apple=0.40, orange=0.35, banana=0.25) {'apple': 0.4, 'orange': 0.35, 'banana': 0.25} Copied!In this example, you create a new dictionary using dict() with keyword arguments. In this case, the keys are strings and the values are floating-point numbers. It’s important to note that the dict() constructor is only suitable for those cases where the dictionary keys can be strings that are valid Python identifiers.
Using for Loops to Populate DictionariesSometimes, you need to start with an empty dictionary and populate it with key-value pairs dynamically. To do this, you can use a for loop. For example, say that you want to create a dictionary in which keys are integer numbers and values are powers of 2.
Here’s how you can do this with a for loop:
Python >>> powers_of_two = {} >>> for integer in range(1, 10): ... powers_of_two[integer] = 2**integer ... >>> powers_of_two {1: 2, 2: 4, 3: 8, 4: 16, 5: 32, 6: 64, 7: 128, 8: 256, 9: 512} Copied!In this example, you create an empty dictionary using an empty pair of curly braces. Then, you run a loop over a range of integer numbers from 1 to 9. Inside the loop, you populate the dictionary with the integer numbers as keys and powers of two as values.
The loop in this example is readable and clear. However, you can also use dictionary comprehension to create and populate a dictionary like the one shown above.
Introducing Dictionary Comprehensions Read the full article at https://realpython.com/python-dictionary-comprehension/ »[ Improve Your Python With 🐍 Python Tricks 💌 – Get a short & sweet Python Trick delivered to your inbox every couple of days. >> Click here to learn more and see examples ]
Mike Driscoll: ANN – The textual-cogs Package – Creating Reusable Dialogs for Textual
Textual-cogs is a collection of Textual dialogs that you can use in your Textual application. You can see a quick demo of the dialogs below:
Dialogs included so far:
- Generic MessageDialog – shows messages to the user
- SaveFileDialog – gives the user a way to select a location to save a file
- SingleChoiceDialog – gives the user a series of choices to pick from
- TextEntryDialog – ask the user a question and get their answer using an Input widget
- and more
You can check out textual-cogs on GitHub.
Installation
You can install textual-cog using pip:
python -m pip install textual-cogYou also need Textual to run these dialogs.
Example Usage
Here is an example of creating a small application that opens the MessageDialog immediately. You would normally open the dialog in response to a message or event that has occurred, such as when the application has an error or you need to tell the user something.
from textual.app import App from textual.app import App, ComposeResult from textual_cogs.dialogs import MessageDialog from textual_cogs import icons class DialogApp(App): def on_mount(self) -> ComposeResult: def my_callback(value: None | bool) -> None: self.exit() self.push_screen( MessageDialog( "What is your favorite language?", icon=icons.ICON_QUESTION, title="Warning", ), my_callback, ) if __name__ == "__main__": app = DialogApp() app.run()When you run this code, you will get something like the following:
Creating a SaveFileDialog
The following code demonstrates how to create a SaveFileDialog:
from textual.app import App from textual.app import App, ComposeResult from textual_cogs.dialogs import SaveFileDialog class DialogApp(App): def on_mount(self) -> ComposeResult: self.push_screen(SaveFileDialog()) if __name__ == "__main__": app = DialogApp() app.run()When you run this code, you will see the following:
Wrapping UpThe textual-cogs package is currently only a collection of reusable dialogs for your Textual application. However, this can help speed up your ability to add code to your TUI applications because the dialogs are taken care of for you.
Check it out on GitHub or the Python Package Index today.
The post ANN – The textual-cogs Package – Creating Reusable Dialogs for Textual appeared first on Mouse Vs Python.
Pages
Recent Publications
- Managing Hidden Dependencies in OO Software: a Study Based on Open Source Projects
- Open Source Communities as Liminal Ecosystems
- Investigating developers' email discussions during decision-making in Python language evolution
- Developers, Quality Control and Download Volume in Open Source Software (OSS) Projects
FLOSS Project Planets
FLOSS Research
- Improving Open Source security with the new GitHub Secure Open Source Fund
- Celebrating 5 years at the Open Source Initiative: a journey of growth, challenges, and community engagement
- Highlights from the Digital Public Goods Alliance Annual Members Meeting 2024
- Give Your Input on the State of Open Source Survey
- Open Data and Open Source AI: Charting a course to get more of both