
Feeds
Specbee: Integrating Single Directory Components (SDC) and Storybook in Drupal
Lukas Märdian: Creating a Netplan enabled system through Debian-Installer
With the work that has been done in the debian-installer/netcfg merge-proposal !9 it is possible to install a standard Debian system, using the normal Debian-Installer (d-i) mini.iso images, that will come pre-installed with Netplan and all network configuration structured in /etc/netplan/.
In this write-up, I’d like to run you through a list of commands for experiencing the Netplan enabled installation process first-hand. Let’s start with preparing a working directory and installing the software dependencies for our virtualized Debian system:
$ mkdir d-i_tmp && cd d-i_tmp $ apt install ovmf qemu-utils qemu-system-x86Now let’s download the official (daily) mini.iso, linux kernel image and initrd.gz containing the Netplan enablement changes:
$ wget https://d-i.debian.org/daily-images/amd64/daily/netboot/gtk/mini.iso $ wget https://d-i.debian.org/daily-images/amd64/daily/netboot/gtk/debian-installer/amd64/initrd.gz $ wget https://d-i.debian.org/daily-images/amd64/daily/netboot/gtk/debian-installer/amd64/linuxNext we’ll prepare a VM, by copying the EFI firmware files, preparing some persistent EFIVARs file, to boot from FS0:\EFI\debian\grubx64.efi, and create a virtual disk for our machine:
$ cp /usr/share/OVMF/OVMF_CODE_4M.fd . $ cp /usr/share/OVMF/OVMF_VARS_4M.fd . $ qemu-img create -f qcow2 ./data.qcow2 20GFinally, let’s launch the debian-installer using a preseed.cfg file, that will automatically install Netplan (netplan-generator) for us in the target system. A minimal preseed file could look like this:
# Install minimal Netplan generator binaryd-i preseed/late_command string in-target apt-get -y install netplan-generator
For this demo, we’re installing the full netplan.io package (incl. the interactive Python CLI), as well as the netplan-generator package and systemd-resolved, to show the full Netplan experience. You can choose the preseed file from a set of different variants to test the different configurations:
- Netplan minimal
- Netplan + systemd-resolved configuration
- Netplan + NetworkManager configuration
We’re using the linux kernel and initrd.gz here to be able to pass the preseed URL as a parameter to the kernel’s cmdline directly. Launching this VM should bring up the official debian-installer in its netboot/gtk form:
$ export U=https://people.ubuntu.com/~slyon/d-i/netplan-preseed+full.cfg $ qemu-system-x86_64 \ -M q35 -enable-kvm -cpu host -smp 4 -m 2G \ -drive if=pflash,format=raw,unit=0,file=OVMF_CODE_4M.fd,readonly=on \ -drive if=pflash,format=raw,unit=1,file=OVMF_VARS_4M.fd,readonly=off \ -device qemu-xhci -device usb-kbd -device usb-mouse \ -vga none -device virtio-gpu-pci \ -net nic,model=virtio -net user \ -kernel ./linux -initrd ./initrd.gz -append "url=$U" \ -hda ./data.qcow2 -cdrom ./mini.iso;Now you can click through the normal Debian-Installer process, using mostly default settings. Optionally, you could play around with the networking settings, to see how those get translated to /etc/netplan/ in the target system.
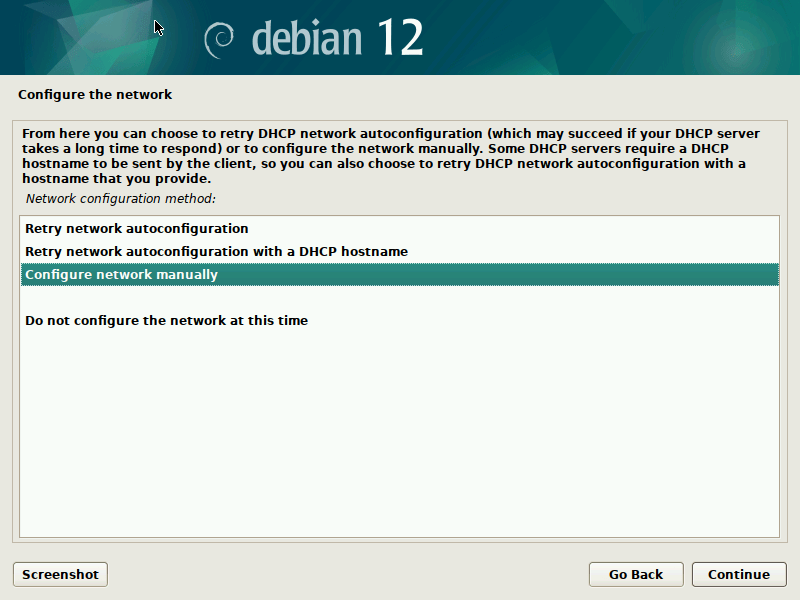
After you confirmed your partitioning changes, the base system gets installed. I suggest not to select any additional components, like desktop environments, to speed up the process.
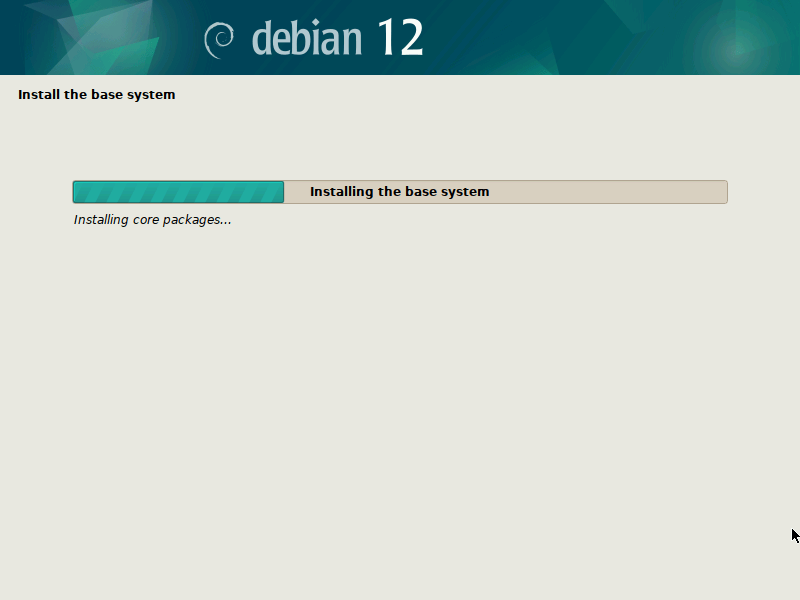
During the final step of the installation (finish-install.d/55netcfg-copy-config) d-i will detect that Netplan was installed in the target system (due to the preseed file provided) and opt to write its network configuration to /etc/netplan/ instead of /etc/network/interfaces or /etc/NetworkManager/system-connections/.
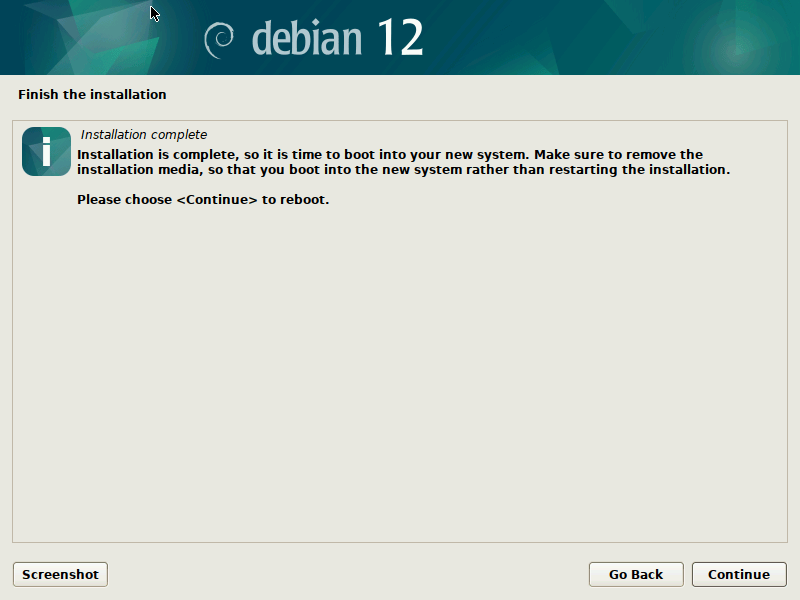
Done! After the installation finished, you can reboot into your virgin Debian Sid/Trixie system.
To do that, quit the current Qemu process, by pressing Ctrl+C and make sure to copy over the EFIVARS.fd file that was modified by grub during the installation, so Qemu can find the new system. Then reboot into the new system, not using the mini.iso image any more:
$ cp ./OVMF_VARS_4M.fd ./EFIVARS.fd $ qemu-system-x86_64 \ -M q35 -enable-kvm -cpu host -smp 4 -m 2G \ -drive if=pflash,format=raw,unit=0,file=OVMF_CODE_4M.fd,readonly=on \ -drive if=pflash,format=raw,unit=1,file=EFIVARS.fd,readonly=off \ -device qemu-xhci -device usb-kbd -device usb-mouse \ -vga none -device virtio-gpu-pci \ -net nic,model=virtio -net user \ -drive file=./data.qcow2,if=none,format=qcow2,id=disk0 \ -device virtio-blk-pci,drive=disk0,bootindex=1 -serial mon:stdioFinally, you can play around with your Netplan enabled Debian system! As you will find, /etc/network/interfaces exists but is empty, it could still be used (optionally/additionally). Netplan was configured in /etc/netplan/ according to the settings given during the d-i installation process.
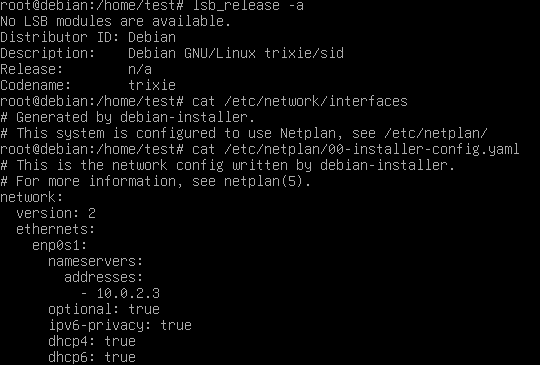
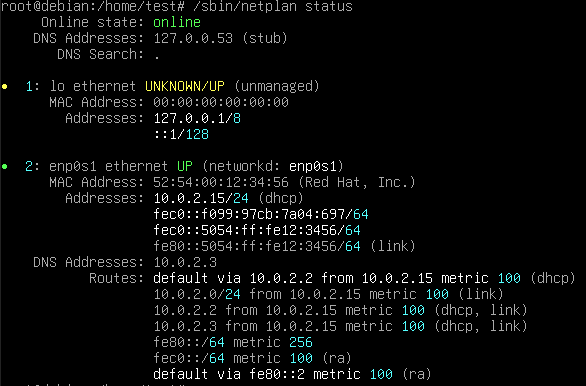
In our case, we also installed the Netplan CLI, so we can play around with some of its features, like netplan status:
Thank you for following along the Netplan enabled Debian installation process and happy hacking! If you want to learn more, find us at GitHub:netplan.
The Drop Times: Drupal 11 is Around the Corner
Dear Readers,
In November 2023, the Drupal community outlined potential release windows for Drupal 11, contingent on meeting specific beta requirements. Today, it is exciting to anticipate that Drupal 11 is on the verge of being officially released, marking a significant milestone in the evolution of this widely used content management system. This release includes crucial updates to key dependencies such as Symfony 7, jQuery 4, and PHPUnit 10 or 11, promising enhanced performance and stability.
Initial challenges, particularly with the update to PHPUnit 10, made the first anticipated release window in June unfeasible. However, with the completion of beta requirements by April, the development team has positioned Drupal 11 for a scheduled release this week. The release candidate, Drupal 11.0.0-rc1, was made available in the week of July 11, 2024, paving the way for the stable release. This new version introduces several features designed to enhance the overall user experience, including more intuitive content management tools, enhanced site builder capabilities, and streamlined processes for upgrading and maintaining Drupal applications.
Noteworthy features in Drupal 11 include an improved administration backend with a faster toolbar and better permission management. The introduction of Single-Directory Components (SDC) simplifies the creation and management of UI components, making it easier for developers to work with the platform. These enhancements reflect Drupal's ongoing commitment to providing a powerful and user-friendly platform for web development.
With that, let's move on to the important stories from last week.
Last week, Janne Kalliola, the Chief Growth Officer and Founder of Exove delved into the origins and evolution of the Drupal Business Survey, which he co-initiated in 2016. The survey, which is in its ninth year, gathers information about the state of Drupal businesses and agencies worldwide. In his conversation with Alka Elizabeth, Janne emphasizes why agencies should respond to the Drupal Business Survey.
In an interview with Kazima Abbas, Brad Jones discusses his "JSON data and schemas FTW!" initiative, which aims to modernize Drupal's data management capabilities by integrating JSON data types and schemas. He highlights the initiative's potential to enhance Drupal's flexibility and interoperability, particularly in decoupled systems. The interview also explores Brad's journey with Drupal and the challenges of incorporating his project into Drupal's core.
In a recent article published on The DropTimes, Grzegorz Pietrzak, a Senior Drupal Developer at the European Commission, outlines five basic rules to keep website dependencies secure. His advice aims to help site maintainers manage and mitigate the risks associated with using third-party dependencies in Drupal projects.
The DropTimes highlighted the key moments from DrupalCamp Asheville 2024, emphasizing the event's engaging workshops, diverse sessions, and inclusive community atmosphere. Organizer April Sides shared insights on the camp's commitment to creating a welcoming environment and the challenges of organizing such events. The camp concluded with a scenic hike, underscoring the community's emphasis on well-being and connection. Read here.
DrupalCamp Colorado 2024, held at the Tivoli Center Ballroom in Denver, provided a unique blend of learning, networking, and community engagement for open-source technology enthusiasts. The event featured keynotes by Lynn Winter and Matthew Saunders, covering topics from digital strategy to diversity in tech. The camp offered workshops, community sessions, and networking activities, including a coffee exchange and an after-party, creating a comprehensive and enriching experience for attendees.
Presently in the Drupal world, Drupal GovCon scheduled for August 13-15, 2024 has opened volunteering opportunities for the event. The deadline for submissions to the 2024 Splash Awards Germany and Austria is rapidly approaching, with entries closing on July 31. The annual event, which recognizes outstanding Drupal projects, will take place on November 7 in Berlin.
The A11yTalks session titled "Empowering People with Disabilities Using GitHub Copilot" has been postponed from July 23 to July 31. Hosted by Carie Fisher and Jesse Dugas from the GitHub Accessibility team, this session aims to enhance coding practices through GitHub Copilot’s accessibility features.
This week, the Drupal community has organized several meetups and events, taking place from July 29th to August 4th, 2024. Find the full list here.
Drupal experts Kevin Quillen and Matt Glaman have announced the forthcoming release of their new book, "Drupal 11 Development Cookbook." It is designed as a comprehensive guide for site builders and developers, building on the success of their previous "Drupal 10 Development Cookbook." The new edition aims to help users navigate the latest features and updates in Drupal 11.
Provus® 2.1.12, developed by Promet Source, has been released, offering advanced features that continue to revolutionize the content management experience for non-technical editors. Provus® is a content management platform that enhances Drupal's capabilities, making it easier for users to create and manage website content.
Acquia has announced the availability of Drupal exams in French, marking a significant advancement for the French-speaking Drupal community. This initiative, in collaboration with Wide | Switzerland, a leading digital agency with a strong presence in several Francophone regions, aims to enhance accessibility and inclusivity.
We acknowledge that there are more stories to share. However, due to selection constraints, we must pause further exploration for now.
To get timely updates, follow us on LinkedIn, Twitter and Facebook. You can also, join us on Drupal Slack at #thedroptimes.
Thank you,
Sincerely
Alka Elizabeth
Sub-editor, The DropTimes.
Talking Drupal: Talking Drupal #461 - Distributions
Today we are talking about The Benefits of Distributions, If they have drawbacks, and what the future of distributions looks like with guest Rajab Natshah and Mohammed Razem. We’ll also cover Google Analytics Reports as our module of the week.
For show notes visit: www.talkingDrupal.com/461
Topics- What is a distribution
- How does this differ from profiles
- What does Varbase provide
- What types of users is Varbase geared towards
- Paragraphs or Layout Builder
- Vardoc
- How do you overcome fear of lock-in
- What do you think the future of distributions look like considering recipes
- Any plans to move Varbase to recipes
- Starshot
- Varbase Distribution
- Vardoc
- Google analytics counter
- United nations refugee agency
- George washington university
- City of Detroit
- Bootstrap Layout Builder
- Bootstrap Styles
- Visual Distribution Operator
- Profile inheritance issue
- Starshot work tracks
- Linux from Scratch
Rajab Natshah - rajab-natshah Mohammed Razem - mohammed-j-razem
HostsNic Laflin - nLighteneddevelopment.com nicxvan John Picozzi - epam.com johnpicozzi Josh Miller - joshmiller
MOTW CorrespondentMartin Anderson-Clutz - mandclu.com mandclu
- Brief description:
- Have you ever wanted to display Google Analytics charts directly within your Drupal website? There’s a module for that.
- Module name/project name:
- Brief history
- Created in Apr 2011 by raspberryman, but recent releases are by today’s guest Rajab Natshah
- Versions available include 7.x-3.2, 8.x-3.2, and 4.0.0, that last two of which support Drupal 10 and 11
- Maintainership
- Actively maintained, recent releases were less than a month ago
- Security coverage
- A documentation guide for older versions, and a README with detailed instructions to get it set up
- Number of open issues: 76 open issues, 9 of which are bugs against the current branch
- Usage stats:
- 4,272 sites
- Module features and usage
- To set up this module, you first need to set up the API connection in the Google Developers Console, and download the client secret JSON
- You’ll then upload that into the Google Analytics Report API submodule along with the property ID to enable the connection
- Next, you need to install the Charts module, and either the Google Charts or Highcharts sub-module to see graphical reports
- You will now have a new Google Analytics Summary in your site’s reports menu, and new "Google Analytics Reports Summary Block" and "Google Analytics Reports Page Block" blocks available
- I haven’t had a chance to try the 4.0 version of this module yet, but I have used older versions with a variety of dashboard solutions, including Moderation Dashboard and Homebox
- One of the many benefits of using a powerful, open source framework like Drupal to build your site is its ability to act as the “glass” for a variety of other systems, and this module is a perfect demonstration of that
FSF Events: Don't miss Craig Topham's talk at FOSSY 2024 in Portland, OR on August 2
The Drop Times: Streamlining Data Integration with Views CSV Source: Insights from Daniel Cothran
Week 9 recap
Real Python: Strings and Character Data in Python
In Python, string objects contain sequences of characters that allow you to manipulate textual data. It’s rare to find an application, program, or library that doesn’t need to manipulate strings to some extent. So, processing characters and strings is integral to programming and a fundamental skill for you as a Python programmer.
In this tutorial, you’ll learn how to:
- Create strings using literals and the str() function
- Use operators and built-in functions with strings
- Index and slice strings
- Do string interpolation and formatting
- Use string methods
To get the most out of this tutorial, you should have a good understanding of core Python concepts, including variables, functions, and operators and expressions.
Get Your Code: Click here to download the free sample code that shows you how to work with strings and character data in Python.
Take the Quiz: Test your knowledge with our interactive “Python Strings and Character Data” quiz. You’ll receive a score upon completion to help you track your learning progress:
Interactive Quiz
Python Strings and Character DataThis quiz will evaluate your understanding of Python's string data type and your knowledge about manipulating textual data with string objects. You'll cover the basics of creating strings using literals and the `str()` function, applying string methods, using operators and built-in functions with strings, indexing and slicing strings, and more!
Getting to Know Strings and Characters in PythonPython provides the built-in string (str) data type to handle textual data. Other programming languages, such as Java, have a character data type for single characters. Python doesn’t have that. Single characters are strings of length one.
In practice, strings are immutable sequences of characters. This means you can’t change a string once you define it. Any operation that modifies a string will create a new string instead of modifying the original one.
A string is also a sequence, which means that the characters in a string have a consecutive order. This feature allows you to access characters using integer indices that start with 0. You’ll learn more about these concepts in the section about indexing strings. For now, you’ll learn about how to create strings in Python.
Creating Strings in PythonThere are different ways to create strings in Python. The most common practice is to use string literals. Because strings are everywhere and have many use cases, you’ll find a few different types of string literals. There are standard literals, raw literals, and formatted literals.
Additionally, you can use the built-in str() function to create new strings from other existing objects.
In the following sections, you’ll learn about the multiple ways to create strings in Python and when to use each of them.
Standard String LiteralsA standard string literal is just a piece of text or a sequence of characters that you enclose in quotes. To create single-line strings, you can use single ('') and double ("") quotes:
Python >>> 'A single-line string in single quotes' 'A single-line string in single quotes' >>> "A single-line string in double quotes" 'A single-line string in double quotes' Copied!In the first example, you use single quotes to delimit the string literal. In the second example, you use double quotes.
Note: Python’s standard REPL displays string objects using single quotes even though you create them using double quotes.
You can define empty strings using quotes without placing characters between them:
Python >>> "" '' >>> '' '' >>> len("") 0 Copied!An empty string doesn’t contain any characters, so when you use the built-in len() function with an empty string as an argument, you get 0 as a result.
To create multiline strings, you can use triple-quoted strings. In this case, you can use either single or double quotes:
Python >>> '''A triple-quoted string ... spanning across multiple ... lines using single quotes''' 'A triple-quoted string\nspanning across multiple\nlines using single quotes' >>> """A triple-quoted string ... spanning across multiple ... lines using double quotes""" 'A triple-quoted string\nspanning across multiple\nlines using double quotes' Copied!The primary use case for triple-quoted strings is to create multiline strings. You can also use them to define single-line strings, but this is a less common practice.
Read the full article at https://realpython.com/python-strings/ »[ Improve Your Python With 🐍 Python Tricks 💌 – Get a short & sweet Python Trick delivered to your inbox every couple of days. >> Click here to learn more and see examples ]
PyCharm: Learning Resources for pytest
In this blog post, we’ll look at how PyCharm helps you when you’re working with pytest, and we will signpost you to a bunch of resources for learning pytest. While some of these resources were created by us here at JetBrains, others were crafted by the storytellers in the pytest community.
Using pytest in PyCharmPyCharm has extensive support for pytest, including a dedicated test pytest runner. PyCharm also gives you code completion for the test subject and pytest fixtures as detailed assert failure reports so you can get to the root of the problem quickly.
Resources for pytestIf you like reading blog posts, we have plenty of those. If videos are more your thing, we have some awesome content there, too. If you prefer a sequential course, we have some pointers for you, and if you prefer to snuggle down and read a book, we’ve got a great recommendation as well. There’s a little something here for everyone!
Although the majority of these resources don’t assume any prior knowledge of pytest, some delve deeper into the subject than others – so there’s plenty to explore when you’re ready.
First, let me point you to two important links:
- The pytest page on the JetBrains Guide serves as a starting point for all the pytest resources we’ve created.
- Brian Okken maintains a website for all his pytest resources (some of which are free, whereas others are paid).
We have a video tutorial series composed of nine videos on pytest that start from the beginning of pytest-time. You can check out the tutorials on YouTube.
If there’s something specific you want to take a look at, the individual video topics are:
- Background
- Setup
- First Test
- Test-Driven Development
- Finding and Fixing Errors
- Skipping Tests
- Using Fixtures
- Debugging Tests
- Testing for Exceptions
If you want a super-speedy refresher of pytest in PyCharm, you can watch PyCharm and pytest in Under 7 Minutes (beware – it’s fast!)
Tutorials about pytestIf you prefer learning by doing, we have some great pytest tutorials for you. First, the above video series is also available as a written tutorial in the JetBrains Guide.
Alternatively, Brian Okken has produced a detailed tutorial on everything pytest if you want to explore all areas. This tutorial is paid content, but it’s well worth it!
Books about pytestIf you prefer reading, we have lots of blog posts for you. Here are some of the pytest resources on the JetBrains Guide:
- An Interview with Brian Okken
- Three pytest Features You Will Love
- pytest vs. unittest: Which Is Better
- Do You Do Enough Testing? pytest to the Rescue!
Additionally, Brian has a blog that covers a diverse range of pytest subjects you can dive into.
While we’re on the subject of reading, Brian has also written an excellent book on pytest that you can purchase and curl up with if that’s your thing.
Official pytest documentationLast but not least, the official pytest documentation is another one to bookmark and keep close by as you go on your journey to pytest mastery.
ConclusionThe Python testing framework pytest is packed with helpful features such as fixtures, mocking, and parametrizing that make testing your applications easier, giving you confidence in the quality of your code. Go ahead and try pytest out and let us know what you learn on your path to Python testing excellence!
Zato Blog: Automating telecommunications networks with Python and SFTP
In telecommunications, the Secure File Transfer Protocol (SFTP) serves as a critical mechanism for secure and reliable file exchange between different network components devices, and systems, whether it is updating configurations, network monitoring, exchanging customer data, or facilitating software updates. Conversely, Python is an ideal tool for the automation of telecommunications networks thanks to its readability and versatility.
Let's dive into how to employ the two effectively and efficiently using the Zato integration and automation platform.
DashboardThe first step is to define a new SFTP connection in your Dashboard, as in the screenshots below.
The form lets you provide all the default options that apply to each SFTP connection - remote host, what protocol to use, whether file metadata should be preserved during transfer, logging level and other details that you would typically provide.
Simply fill it out with the same details that you would use if it were command line-based SFTP connections.
PingingThe next thing, right after the creation of a new connection, is to ping it to check if the server is responding.
Pinging opens a new SFTP connection and runs the ping command - in the screenshot above it was ls . - a practically no-op command whose sole purpose is to let the connection confirm that commands in fact can be executed, which proves the correctness of the configuration.
This will either returns details of why a connection could not be established or the response time if it was successful.
Cloud SFTP consoleHaving validated the configuration by pinging it, we can now execute SFTP commands straight in Dashboard from a command console:
Any SFTP command, or even a series of commands, can be sent and responses retrieved immediately. It is also possible to increase the logging level for additional SFTP protocol-level details.
This makes it possible to rapidly prototype file transfer functionality as a series of scripts that can be next moved as they are to Python-based services.
Python automationNow, in Python, your API automation services have access to an extensive array of capabilities - from executing transfer commands individually or in batches to the usage of SFTP scripts previously created in your Dashboard.
Here is how Python can be used in practice:
# -*- coding: utf-8 -*- # Zato from zato.server.service import Service class MySFTPService(Service): def handle(self): # Connection to use conn_name = 'My SFTP Connection' # Get a handle to the connection object conn = self.out.sftp[conn_name].conn # Execute an arbitrary script with one or more SFTP commands, like in web-admin my_script = 'ls -la /remote/path' conn.execute(my_script) # Ping a remote server to check if it responds conn.ping() # Download an entry, possibly recursively conn.download('/remote/path', '/local/path') # Like .download but remote path must point to a file (exception otherwise) conn.download_file('/remote/path', '/local/path') # Makes the contents of a remote file available on output out = conn.read('/remote/path') # Uploads a local file or directory to remote path conn.upload('/local/path', '/remote/path') # Writes input data out to a remote file data = 'My data' conn.write(data, '/remote/path') # Create a new directory conn.create_directory('/path/to/new/directory') # Create a new symlink conn.create_symlink('/path/to/new/symlink') # Create a new hard-link conn.create_hardlink('/path/to/new/hardlink') # Delete an entry, possibly recursively, no matter what kind it is conn.delete('/path/to/delete') # Like .delete but path must be a directory conn.delete_directory('/path/to/delete') # Like .delete but path must be a file conn.delete_file('/path/to/delete') # Like .delete but path must be a symlink conn.delete_symlink('/path/to/delete') # Get information about an entry, e.g. modification time, owner, size and more info = conn.get_info('/remote/path') self.logger.info(info.last_modified) self.logger.info(info.owner) self.logger.info(info.size) self.logger.info(info.size_human) self.logger.info(info.permissions_oct) # A boolean flag indicating if path is a directory result = conn.is_directory('/remote/path') # A boolean flag indicating if path is a file result = conn.is_file('/remote/path') # A boolean flag indicating if path is a symlink result = conn.is_symlink('/remote/path') # List contents of a directory - items are in the same format that .get_info uses items = conn.list('/remote/path') # Move (rename) remote files or directories conn.move('/from/path', '/to/path') # An alias to .move conn.rename('/from/path', '/to/path') # Change mode of entry at path conn.chmod('600', '/path/to/entry') # Change owner of entry at path conn.chown('myuser', '/path/to/entry') # Change group of entry at path conn.chgrp('mygroup', '/path/to/entry') SummaryGiven how important SFTP is in telecommunications, having a convenient and easy way to automate it using Python is an essential ability in a network engineer's skill-set.
Thanks to the SFTP connections in Zato, you can prototype SFTP scripts in Dashboard and employ them in API services right after that. To complement it, a full Python API is available for programmatic access to remote file servers.
Combined, the features make it possible to create scalable and reusable file transfer services in a quick and efficient manner using the most convenient programming language, Python.
More resources➤ Click here to read more about using Python and Zato in telecommunications
➤ What is a Network Packet Broker? How to automate networks in Python?
➤ What is an integration platform?
➤ Python Integration platform as a Service (iPaaS)
➤ What is an Enterprise Service Bus (ESB)? What is SOA?
Sahil Dhiman: Ola Maps and OpenStreetMap Data
Recently, Ola started rolling out Ola Maps in their main mobile app, replacing Google Maps, while also offering maps as a service to other organizations. The interesting part for me was the usage of OpenStreetMap data as base map with Ola’s proprietary data sources. I’ll mostly about talk about map data part here.
Screenshot of Ola App.OpenStreetMap attribution is shown after clicking the Ola Map icon.
OpenStreetMap (OSM) for staters, is a community owned and edited map data resource which gives freedom to use map data for any purpose. This includes the condition that attribution is given back to OSM which in turn ideally would encourage other users to contribute, correct and edit, helping everyone in turn. Due to this, OSM is also regarded as Wikipedia of maps. OSM data is not just used by Ola. Many others use it for various purposes like Wikipedia Maps, Strava Maps, Snapchat Map, bus tracking in GoIbibo/Redbus.
OSM India community has been following Ola map endeavor to use and contribute to OSM since they went public. As required by OSM for organized mapping efforts, Ola created wiki entry with information regarding their editors, usage, policy and mentions following as their data usage case:
OSM data is used for the road network, traffic signs and signals, buildings, natural features, landuse polygons and some POIs.
Creating a map product is a task in itself, an engineering hurdle creating the tech stack for collection, validation, import and serving the map and the map data part. Ola has done a good job describing the development of tech stack in their blog post. Ola holds an enormous corpus of live and constantly updated GPS trace data. Their drivers, users, and delivery partners generate those, which they harness to validate, correct and add missing map data. Ola employees now regularly contribute new or missing roads (including adding dual carriageway to existing ones), fix road geometry, classification, road access type and restrictions pan India. They have been active and engaging in OSM India community channels, though community members have raised some concerns on their OSM edit practices.
Ola’s venture into the map industry isn’t something out of the ordinary. Grab, a South East Asian company which has business interests in food deliveries, ride hailing and a bunch of other services too switched to their in-house map based on OpenStreetMap, followed by launching of their map product. Grab too contributed back data like Ola. Both Ola and Grab heavily rely on map for their business operations and seem to chose to go independent for it, bootstrapping the products on OSM.
In India too, a bunch of organizations contribute to OSM like Swiggy, Stackbox, Amazon, Apple. Microsoft, Meta/Facebook and many others. Everyone wants a better map (data), so everyone works together.
Ola could have gone their own route, bootstrapping map data from scratch, which would have been a gargantuan task when you’re competing against the likes of Google Maps and Bing Maps, which have been into this since many years. Deciding to use OSM and actively giving back to make data better for everyone deserves accolades. Now I’m waiting to for their second blog post, which they mention would be on map data.
If you’re an Ola map user through Ola Electric or Ola app, and find some road unmapped, you can always edit them in OSM. What I have heard from their employee, they import new OSM data weekly, which means your changes should start reflecting for you (and everyone else) by next week. If you’re new, follow Beginners’ guide and join OSM India community community.osm.be/resources/asia/india/ for any doubts and participating in various mapping events.
PS — You can see live OSM edits in India subcontinent here.
Turnkey Linux: Python PEP 668 - working with "externally managed environment"
Python Linux users would have noticed that python is now an "externally managed environment" on newer releases. I suspect that it has caused many frustrations. It certainly did for me - at least initially. Marcos, a long term friend of TurnKey recently reached out to me to ask about the best way to work around this when developing on our Odoo appliance.
The issueBefore I go on, for those of you who are not sure what I'm talking about, try installing or updating a python package via pip. It will fail with an error message:
error: externally-managed-environment × This environment is externally managed ╰─> To install Python packages system-wide, try apt install python3-xyz, where xyz is the package you are trying to install. If you wish to install a non-Debian-packaged Python package, create a virtual environment using python3 -m venv path/to/venv. Then use path/to/venv/bin/python and path/to/venv/bin/pip. Make sure you have python3-full installed. If you wish to install a non-Debian packaged Python application, it may be easiest to use pipx install xyz, which will manage a virtual environment for you. Make sure you have pipx installed. See /usr/share/doc/python3.11/README.venv for more information. note: If you believe this is a mistake, please contact your Python installation or OS distribution provider. You can override this, at the risk of breaking your Python installation or OS, by passing --break-system-packages. hint: See PEP 668 for the detailed specification.Whilst this does fix a legitmate issue, it's also a big PITA for developers. To read more about the rationale, please see PEP 668.
Resolution optionsAs per the message, installing Python packages via apt is preferable. But what about if you need a python library not available in Debian? Or a newer version that what Debian provides? As noted by the error message, using a Python venv is the next best option. But that means duplication of any apt packages you may already have installed therefore bloat. It also means that you miss out on the automated security updates that TurnKey provides for Debian packages. The only remaining option is to "break system packages". That doesn't sound good! It will revert your system to the behavior before the application of PEP 668 - thus making life more complicated in the future...
Pros and Cons of each approach.Assuming that you want/need versions and/or packages not available in Debian, what is the best path? Obviously each option note has pros and cons, so which way should you go? In his message to me, Marcos nicely laid out the pros and cons of each of the 2 suggested approaches, so I'll share them here:
Virtual Environment Pros:- Isolates application dependencies, avoiding conflicts with system packages.
- Allows for more flexible and up-to-date package management.
- Adds complexity to the setup and maintenance process.
- Increases the overall footprint and resource requirements of the deployment.
- Simpler setup and integration with the system.
- Utilizes the standard Turnkey Linux deployment model.
- Potential conflicts with system-managed packages.
- Limited by the constraints imposed by Debian 12.
Another option not noted in the pip error message is to create a virtual environment, with the system python passed through. Whilst it's still not perfect, in my option it is by far the best option - unless of course you can get by just using system packages alone. TBH, I'm a bit surprised that it's not noted in the error message. It's pretty easy to set up, just include adding the '--system-site-packages' switch when creating your virtual environment. I.e.:
python3 -m venv --system-site-packages /path/to/venv What you get with this approachLet's have a look at what you get when using '--system-site-packages'. First let's create an example venv. Note that all of this is running as root from root's home (/root). Although for any AWS Marketplace users (or non TurnKey users) most of these commands should work fine as a "sudo" user (for apt installs).
root@core ~# mkdir ~/test_venv root@core ~# python3 -m venv --system-site-packages ~/test_venv root@core ~# source ~/test_venv/bin/activate (test_venv) root@core ~#Now for a demonstration of what happens when you use it.
I'll use a couple of apt packages with my examples:
- python3-pygments (initially installed)
- python3-socks (initially not-installed)
Continuing on from creating the venv above, let's confirm the package versions and status:
(test_venv) root@core ~# apt list python3-pygments python3-socks Listing... Done python3-pygments/stable,now 2.14.0+dfsg-1 all [installed,automatic] python3-socks/stable 1.7.1+dfsg-1 allSo we have python3-pygments installed and it's version 2.14.0. python3-socks is not installed, but the available version is 1.7.1. Now let's check that the installed package (pygments) is available in the venv and that it's the system version. For those not familiar with grep, the grep command does a case-insensitive search for lines that include socks or pygments.
(test_venv) root@core ~# pip list | grep -i 'socks\|pygments' Pygments 2.14.0Let's install python3-socks and check the status again:
(test_venv) root@core ~# apt install -y python3-socks [...] (test_venv) root@core ~# apt list python3-pygments python3-socks Listing... Done python3-pygments/stable,now 2.14.0+dfsg-1 all [installed,automatic] python3-socks/stable,now 1.7.1+dfsg-1 all [installed]Ok so python3-socks is installed now. And it's instantly available in our venv:
(test_venv) root@core ~# pip list | grep -i 'socks\|pygments' Pygments 2.14.0 PySocks 1.7.1Woohoo! :) And we can still install and/or update packages in our venv with pip?:
(test_venv2) root@core ~# pip install --upgrade pygments Requirement already satisfied: pygments in /usr/lib/python3/dist-packages (2.14.0) Collecting pygments Downloading pygments-2.18.0-py3-none-any.whl (1.2 MB) ━━━━━━━━━━━━━━━━━━━━━━━━━━━━━━━━━━━━━━━━ 1.2/1.2 MB 6.5 MB/s eta 0:00:00 Installing collected packages: pygments Attempting uninstall: pygments Found existing installation: Pygments 2.14.0 Not uninstalling pygments at /usr/lib/python3/dist-packages, outside environment /root/test_venv2 Can't uninstall 'Pygments'. No files were found to uninstall. Successfully installed pygments-2.18.0Yes! When using pip install in our venv there are some extra lines related to the system package, but otherwise it's the same as using a standalone venv. Let's double check the new version:
(test_venv) root@core ~# pip list | grep -i 'socks\|pygments' Pygments 2.18.0 PySocks 1.7.1So we've updated from the system version of Pygments to 2.18.0, but the system version still exists - and is still 2.14.0:
(test_venv) root@core ~# apt list python3-pygments Listing... Done python3-pygments/stable,now 2.14.0+dfsg-1 all [installed,automatic]So what happens if we remove the pip installed version?:
(test_venv) root@core ~# pip uninstall pygments Found existing installation: Pygments 2.18.0 Uninstalling Pygments-2.18.0: Would remove: /root/test_venv2/bin/pygmentize /root/test_venv2/lib/python3.11/site-packages/pygments-2.18.0.dist-info/* /root/test_venv2/lib/python3.11/site-packages/pygments/* Proceed (Y/n)? y Successfully uninstalled Pygments-2.18.0This time there is no mention of the system package. Let's double check the system and the venv:
(test_venv) root@core ~# apt list python3-pygments Listing... Done python3-pygments/stable,now 2.14.0+dfsg-1 all [installed,automatic] (test_venv) root@core ~# pip list | grep -i 'pygments' Pygments 2.14.0Yep, the system package is still there and it's still in the venv!
The best of both worldsSo using '--system-site-packages' is essentially the best of both worlds. Where possible you can use system packages via apt, but you still have all the advantages of a virtual environment. In my opinion it's the best option by far! What do you think? Feel free to share your thoughts and feedback below.
Blog Tags: pythonvirtual environmentvenvaptpipdebianlinuxAkansha Tech Journal: Build Smart Drupal Chatbots with RAG Integration and Ollama
Spinning Code: Writing for Developers and Consultants: Listening
My first few articles in this series have been focused on the messages we send to others – mostly our written messages. This time I am focusing on Listening as key skills when communicating with others.
Listening is a skill. In general in our lives we are expected to know how to listen, even though most teaching is informal.
If you aren’t listening to your colleagues and clients (friends, family, etc.), which can include reading carefully the materials they write, how can you communicate back to them clearly? And when they can tell you didn’t listen closely, why should they listen to you carefully?
The Importance of ListeningListening when other people speak, or reading their words when they send you an email or chat message, is how we learn about other people’s needs. As developers and consultants we need to understand the needs of our users and clients. If we don’t understand what they need, we will provide the wrong thing.
Active ListeningListening is not a passive activity. If you are simply allowing someone’s words to wash over you, but not engaged with their meaning you are missing critical details of what’s being communicated.
Active Listening is a skill you can teach yourself and improve on over time.
When we speak we communicate with more than words. Our body language, tone, pace of speaking, and a host of other details go into how we communicate our message. When we actively listen, we are absorbing all those details to make sure we’re getting the whole message.
Active Listening involves also reflecting back that you’re paying attention to the speaker. You can use your own body language to send none verbal cues that you’re paying attention. You can also make affirming noises, and other auditory markers that you’re following along. And when you start to speak you can paraphrase their comments to demonstrate you understood the previous person’s contributions.
Active Listening in an Age of Video MeetingsMost materials you’ll find on Active Listening focus on in-person discussions. That’s in part because people have been talking about Active Listening for decades and the technology is still playing catchup.
But you can bring Active Listening skills to video meetings — most easily if you have your camera on.
While affirming noises and other auditory responses can cause audio filters to struggle – clipping one speaker’s audio to provide your supportive sounds – there are still ways to make sure people know you’re listening. When you camera is on, looking at the screen closest to your camera, nodding or shaking your head, making (work place appropriate) hand gestures, and other visual cues can be helpful. Using the reactions features of most systems to give thumbs up, applause, and other indicators can also help send the message that you’re paying attention.
The hardest talk I ever had to give was an online conference early in the Covid Pandemic. I had no real-time feedback from the audience at all. I was not told how many people were listening; I could not see any chat messages: no input at all. It was just me, staring at my slides, trying to maintain good energy. Eventually I got questions read to me at the end that suggested at least someone was watching – but for most of my talk I felt like I was talking to an empty room.
Give people input whenever you can without being distracting. Helping them understand they are being heard will make it easier for them to communicate with you.
Listening as a Form of RespectTruly listening to another person is a marker of respect. You are demonstrating that the other person is worth your time and energy. If that’s not obvious to you already, think about the difference between a friend who is looking at you while you’re talking vs that same friend looking at their phone; which makes it clear your friend cares about you?
At work the same is true with colleagues. If you are looking at your phone, reading email, looking at social media, or any number of other activities that pull your attention away you are communicating the person isn’t as important to you as all those distractions.
We all are guilty of this from time to time. I have been pushing myself recently to admit it to other people because it gets me to stop.
For example, the other day just as I as starting a call, I got a message from someone else that I found very frustrating – and was time sensitive. I started to reply while also starting the call. I wasn’t really respecting my colleague’s time. So I apologized to my colleague, asked for a moment to reply to the message explaining it was both time sensitive and distracting, and then I focused on our call. I was both more focused on our conversation two minutes later, and I avoided annoying her by constantly looking away at the other message. Because she listened to me, it also meant we could restart our conversation by commiserating about distracting messages that pull our attention away from meetings.
Communicating well requires full engagement in the work, but in the messages you send and in making sure you receive messages as well.
As I said in my first post on this topic, communications skills for developers and consultants is an enormous topic. The plan for this series is evolving as I go. If you have suggestions or requests feel free to leave me a message.
The post Writing for Developers and Consultants: Listening appeared first on Spinning Code.
My work in KDE for July 2024
This is a very exciting month if you’re waiting for more artist-oriented improvements in the Wayland session!
PlasmaFeature Pen calibration is merged! If you have the time and supported hardware, try it out in Neon Unstable and see if the math needs tweaking. I also begun adding tests for this calibration tool. 6.2 NLnet
The finalized calibration screen.Feature You can now bind mouse buttons (with modifier keys) to tablet pen or pad buttons, or disable them entirely! 6.2 NLnet
A long-awaited feature in the Wayland session!Bugfix Fixed the pen tester ahead of it breaking in Qt 6.8 since tablet pens can drag the window. 6.2
Feature Mention that setting the orientation is not supported, on hardware where it isn’t. Some people have already commented we can do even better than this, so I plan on tackling that next month. 6.2
What the combo box looks like now, on unsupported hardware.Bugfix Disable the tablet tester when no tablets are connected. This is because the tablet tester only responds to pen input, so it’s useless without any. 6.2
KWinFeature Support disabling buttons in the rebind filter. 6.2 NLnet
Feature Support pressing keyboard modifiers alongside mouse buttons. 6.2 NLnet
Feature Set the mouse cursor position when rebinding tablet buttons to mouse buttons. This is to fix odd situations where you have a tablet button bound to right-click, and context menus open in the wrong place. 6.2 NLnet
Testing Added more test coverage for the ButtonRebindFilter. NLnet
NeoChatFeature Add an option to block invites from users who you may not know, to help users being spammed by bad actors on Matrix. This is could also be useful if you’re only using your Matrix account to communicate with friends & family. 24.08
The option to toggle this new safety feature.Bugfix Try not to display ghost notifications for invites. This is meant to be an addition to the above feature, to prevent users from being spammed. 24.08
Bugfix Don’t mark invite notifications as persistent. This is also meant to cut down on the possible notification spam. This is especially important on KDE Plasma Desktop which doesn’t handle notification spam well at all, at the moment. 24.08
Feature Made the ignored list look better when you have no one in it. 24.11
Feature Cleaned up the account editor page and also add some icons to break up how text-heavy it is here. 24.11
Feature Added a “Show QR code” button to the account menu so you don’t have to dig into the settings to find this. 24.11
Feature Suggest what to do on the empty welcome screen. 24.11
TokodonFeature Added an option to open the pop-out status composer by default. 24.08
Feature Allow pasting images directly from the Internet and just make pasting images all-around better. 24.08
Bugfix Silently fail when servers don’t implement featured tags on profiles. This is common for lots of non-Mastodon servers. 24.08
PlasmaTubeFeature Added basic support for SponsorBlock which is turned off by default, but you can enable under Settings. You can’t configure which server to use (it’s possible, just not through the UI) or what specific categories to block yet. You do have the option to have PlasmaTube inform you when you’re inside of a sponsored segment or have it auto-skip. 24.08
Feature Added a proper error page to the video player while my Invidious server is borked due to YouTube changes. It will display the error given by Invidious, and also a button to open the original webpage. 24.11
Note that there’s a link in there, but even on Invidious it’s unclickable.That’s all for this month!
My work in KDE for June 2024 HomeVincent Bernat: Crafting endless AS paths in BGP
Combining BGP confederations and AS override can potentially create a BGP routing loop, resulting in an indefinitely expanding AS path.
BGP confederation is a technique used to reduce the number of iBGP sessions and improve scalability in large autonomous systems (AS). It divides an AS into sub-ASes. Most eBGP rules apply between sub-ASes, except that next-hop, MED, and local preferences remain unchanged. The AS path length ignores contributions from confederation sub-ASes. BGP confederation is rarely used and BGP route reflection is typically preferred for scaling.
AS override is a feature that allows a router to replace the ASN of a neighbor in the AS path of outgoing BGP routes with its own. It’s useful when two distinct autonomous systems share the same ASN. However, it interferes with BGP’s loop prevention mechanism and should be used cautiously. A safer alternative is the allowas-in directive.1
In the example below, we have four routers in a single confederation, each in its own sub-AS. R0 originates the 2001:db8::1/128 prefix. R1, R2, and R3 forward this prefix to the next router in the loop.
BGP routing loop using a confederationThe router configurations are available in a Git repository. They are running Cisco IOS XR. R2 uses the following configuration for BGP:
router bgp 64502 bgp confederation peers 64500 64501 64503 ! bgp confederation identifier 64496 bgp router-id 1.0.0.2 address-family ipv6 unicast ! neighbor 2001:db8::2:0 remote-as 64501 description R1 address-family ipv6 unicast ! ! neighbor 2001:db8::3:1 remote-as 64503 advertisement-interval 0 description R3 address-family ipv6 unicast next-hop-self as-override ! ! !The session with R3 uses both as-override and next-hop-self directives. The latter is only necessary to make the announced prefix valid, as there is no IGP in this example.2
Here’s the sequence of events leading to an infinite AS path:
-
R0 sends the prefix to R1 with AS path (64500).3
-
R1 selects it as the best path, forwarding it to R2 with AS path (64501 64500).
-
R2 selects it as the best path, forwarding it to R3 with AS path (64500 64501 64502).
-
R3 selects it as the best path. It would forward it to R1 with AS path (64503 64502 64501 64500), but due to AS override, it substitutes R1’s ASN with its own, forwarding it with AS path (64503 64502 64503 64500).
-
R1 accepts the prefix, as its own ASN is not in the AS path. It compares this new prefix with the one from R0. Both (64500) and (64503 64502 64503 64500) have the same length because confederation sub-ASes don’t contribute to AS path length. The first tie-breaker is the router ID. R0’s router ID (1.0.0.4) is higher than R3’s (1.0.0.3). The new prefix becomes the best path and is forwarded to R2 with AS path (64501 64503 64501 64503 64500).
-
R2 receives the new prefix, replacing the old one. It selects it as the best path and forwards it to R3 with AS path (64502 64501 64502 64501 64502 64500).
-
R3 receives the new prefix, replacing the old one. It selects it as the best path and forwards it to R0 with AS path (64503 64502 64503 64502 64503 64502 64500).
-
R1 receives the new prefix, replacing the old one. Again, it competes with the prefix from R0, and again the new prefix wins due to the lower router ID. The prefix is forwarded to R2 with AS path (64501 64503 64501 64503 64501 64503 64501 64500).
A few iterations later, R1 views the looping prefix as follows:4
RP/0/RP0/CPU0:R1#show bgp ipv6 u 2001:db8::1/128 bestpath-compare BGP routing table entry for 2001:db8::1/128 Last Modified: Jul 28 10:23:05.560 for 00:00:00 Paths: (2 available, best #2) Path #1: Received by speaker 0 Not advertised to any peer (64500) 2001:db8::1:0 from 2001:db8::1:0 (1.0.0.4), if-handle 0x00000000 Origin IGP, metric 0, localpref 100, valid, confed-external Received Path ID 0, Local Path ID 0, version 0 Higher router ID than best path (path #2) Path #2: Received by speaker 0 Advertised IPv6 Unicast paths to peers (in unique update groups): 2001:db8::2:1 (64503 64502 64503 64502 64503 64502 64503 64502 64503 64502 64503 64502 64503 64502 64503 64502 64503 64502 64503 64502 64503 64502 64503 64502 64503 64502 64503 64502 64503 64502 64503 64502 64503 64502 64503 64502 64503 64502 64503 64502 64503 64502 64503 64502 64503 64502 64503 64502 64503 64502 64503 64502 64503 64502 64503 64502 64503 64502 64503 64502 64503 64502 64503 64502 64503 64502 64503 64502 64503 64502 64503 64502 64503 64502 64503 64502 64503 64502 64503 64502 64503 64502 64503 64502 64503 64502 64503 64502 64503 64502 64503 64502 64503 64502 64503 64502 64503 64502 64503 64502 64503 64502 64500) 2001:db8::4:0 from 2001:db8::4:0 (1.0.0.3), if-handle 0x00000000 Origin IGP, metric 0, localpref 100, valid, confed-external, best, group-best Received Path ID 0, Local Path ID 1, version 37 best of AS 64503, Overall bestThere’s no upper bound for an AS path, but BGP messages have size limits (4096 bytes per RFC 4271 or 65535 bytes per RFC 8654). At some point, BGP updates can’t be generated. On Cisco IOS XR, the BGP process crashes well before reaching this limit. 😑
The main lessons from this tale are:
- never use BGP confederations under any circumstances, and
- be cautious of features that weaken BGP routing loop detection.
-
When using BGP confederations with Cisco IOS XR, use allowconfedas-in instead. It’s available since IOS XR 7.11. ↩︎
-
Using BGP confederations is already inadvisable. If you don’t use the same IGP for all sub-ASes, you’re inviting trouble! However, the scenario described here is also possible with an IGP. ↩︎
-
When an AS path segment is composed of ASNs from a confederation, it is displayed between parentheses. ↩︎
-
By default, IOS XR paces eBGP updates. This is controlled by the advertisement-interval directive. Its default value is 30 seconds for eBGP peers (even in the same confederation). R1 and R2 set this value to 0, while R3 sets it to 2 seconds. This gives some time to watch the AS path grow. ↩︎
GNU Taler news: GNU Taler 0.12 released
Scarlett Gately Moore: KDE Snaps, Kubuntu, Debian updates and “Oh no, not again..”
This week our family suffered another loss with my brother in-law. We will miss him dearly. On our way down to Phoenix to console our nephew that just lost his dad our car blew up. Last week we were in a roll over accident that totaled our truck and left me with a broken arm. We are now in great need of a new vehicle. Please consider donating to this fund: https://gofund.me/033eb25d . Kubuntu is out of money and I am between work packages with the ‘project’. We are 50 miles away from the closest town for supplies, essentials such as water requires a vehicle.
I have had bad years before ( covid ) in which I lost my beloved job at Blue Systems. I made a vow to myself to never let my personal life affect my work again. I have so far kept that promise to myself and without further ado I present to you my work.
Kubuntu:
- Many SRUs awaiting verification stage including the massive apparmor policy bug.
- sddm fix for the black screen on second boot has passed verification and should make .1 release.
- See Debian for the qt6 Plasma / applications work.
Debian:
- qtmpv – in NEW
- arianna – in NEW
- kamera – uploading today
- kcharselect – Experimental
- Tokodon – Done, but needs qtmpv to pass NEW
- Gwenview – WIP needs kamera, kio-extras
- kio-extras – WIP
KDE Snaps:
Please note: for the most part the Qt6 snaps are in –edge except the few in the ‘project’ that are heavily tested. Please help test the –edge snaps so I can promote them.
- Elisa
- Okular
- Konsole ( please note this is a confined terminal for the ‘project’ and not very useful except to ssh to the host system )
- Kwrite
- Gwenview
- Kate ( –classic )
- Gcompris
- Alligator
- Ark
- Blinken
- Bomber
- Bovo
- Calindori
- Digikam
- Dragon
- Falkon
- Filelight
WIP Snaps or MR’s made
- KSpacedual
- Ksquares
- KSudoku
- KTuberling
- Kubrick
- lskat
- Palapeli
- Kajongg
- Kalzium
- Kanagram
- Kapman
- Katomic
- KBlackBox
- KBlocks
- KBounce
- KBreakOut
- KBruch
Please note that 95% of the snaps are free-time work. The project covers 5. I am going as fast as I can between Kubuntu/Debian and the project commitments. Not to mention I have only one arm! My GSOC student is also helping which you can read all about here: https://soumyadghosh.github.io/website/interns/gsoc-2024/gsoc-week-3-week-7/
There is still much work to do in Kubuntu to be Plasma 6 ready for Oracular and they are out of funds. I will still continue my work regardless, but please consider donating until we can procure a consistent flow of funding : https://kubuntu.org/donate/
Thank you for reading and have a blessed day!
KDE Snaps, Kubuntu, Debian updates and “Oh no, not again..”
This week our family suffered another loss with my brother in-law. We will miss him dearly. On our way down to Phoenix to console our nephew that just lost his dad our car blew up. Last week we were in a roll over accident that totaled our truck and left me with a broken arm. We are now in great need of a new vehicle. Please consider donating to this fund: https://gofund.me/033eb25d . Kubuntu is out of money and I am between work packages with the ‘project’. We are 50 miles away from the closest town for supplies, essentials such as water requires a vehicle.
I have had bad years before ( covid ) in which I lost my beloved job at Blue Systems. I made a vow to myself to never let my personal life affect my work again. I have so far kept that promise to myself and without further ado I present to you my work.
Kubuntu:
- Many SRUs awaiting verification stage including the massive apparmor policy bug.
- sddm fix for the black screen on second boot has passed verification and should make .1 release.
- See Debian for the qt6 Plasma / applications work.
Debian:
- qtmpv – in NEW
- arianna – in NEW
- kamera – uploading today
- kcharselect – Experimental
- Tokodon – Done, but needs qtmpv to pass NEW
- Gwenview – WIP needs kamera, kio-extras
- kio-extras – WIP
KDE Snaps:
Please note: for the most part the Qt6 snaps are in –edge except the few in the ‘project’ that are heavily tested. Please help test the –edge snaps so I can promote them.
- Elisa
- Okular
- Konsole ( please note this is a confined terminal for the ‘project’ and not very useful except to ssh to the host system )
- Kwrite
- Gwenview
- Kate ( –classic )
- Gcompris
- Alligator
- Ark
- Blinken
- Bomber
- Bovo
- Calindori
- Digikam
- Dragon
- Falkon
- Filelight
WIP Snaps or MR’s made
- KSpacedual
- Ksquares
- KSudoku
- KTuberling
- Kubrick
- lskat
- Palapeli
- Kajongg
- Kalzium
- Kanagram
- Kapman
- Katomic
- KBlackBox
- KBlocks
- KBounce
- KBreakOut
- KBruch
Please note that 95% of the snaps are free-time work. The project covers 5. I am going as fast as I can between Kubuntu/Debian and the project commitments. Not to mention I have only one arm! My GSOC student is also helping which you can read all about here: https://soumyadghosh.github.io/website/interns/gsoc-2024/gsoc-week-3-week-7/
There is still much work to do in Kubuntu to be Plasma 6 ready for Oracular and they are out of funds. I will still continue my work regardless, but please consider donating until we can procure a consistent flow of funding : https://kubuntu.org/donate/
Thank you for reading and have a blessed day!
Jonathan Dowland: ouch
In mid-June I picked up an unknown infection in my left ankle which turned out to be antibiotic resistant. The infection caused cellulitis. After five weeks of trial and error and treatment, the infection is beaten but I am still recovering from the cellulitis. I don’t know how long it will take to be fully recovered, nor how long before I can be “useful” again: I’m currently off work (and thus off my open source and other commitments too). Hopefully soon! That’s why I’ve been quiet.
- RIP Jose Luis Vasquez↩
Pages
Recent Publications
- Managing Hidden Dependencies in OO Software: a Study Based on Open Source Projects
- Open Source Communities as Liminal Ecosystems
- Investigating developers' email discussions during decision-making in Python language evolution
- Developers, Quality Control and Download Volume in Open Source Software (OSS) Projects