
Planet Python
Talk Python to Me: #475: Python Language Summit 2024
Real Python: The Real Python Podcast – Episode #218: Exploring Robotics and Python Through Electronic Projects
Are you interested in learning robotics with Python? Can physical electronics-based projects grow a child's interest in coding? This week on the show, we speak with author Marwan Alsabbagh about his book "Build Your Own Robot - Using Python, CRICKIT, and Raspberry Pi."
[ Improve Your Python With 🐍 Python Tricks 💌 – Get a short & sweet Python Trick delivered to your inbox every couple of days. >> Click here to learn more and see examples ]
Matt Layman: Golang Middleware and DBs - Building SaaS #199
Python Engineering at Microsoft: Announcing the General Availability of the VS Code extension for Azure Machine Learning
Machine learning and artificial intelligence are transforming the world as we know it. With the power of data, you will have countless opportunities to create something new, unique, and exciting. Whether you are a seasoned data scientist or a curious beginner, you need a platform that can help you build, train, deploy, and manage your machine learning models with ease and efficiency. Azure Machine Learning has always been the backbone for machine learning tasks, and we want to further help you in your machine learning journey by improving the way you write code.
The VS Code extension for Azure Machine Learning has been in preview for a while and we are excited to announce the general availability of the VS Code extension for Azure Machine Learning. You can use your favorite VS Code setup, either desktop or web, to build, train, deploy, debug, and manage machine learning models with Azure Machine Learning from within VS Code. This means that the extension is stable, reliable, ready for production use, and comes with additional features, such as VNET support.
“We have been using the VS Code extension for Azure Machine Learning since its preview release, and it has significantly streamlined our workflow. The ability to manage everything from building to deploying models directly within our preferred VS Code environment has been a game-changer. The seamless integration and robust features like interactive debugging and VNET support have enhanced our productivity and collaboration. We are thrilled about its general availability and look forward to leveraging its full potential in our AI projects.” – Ornaldo Ribas Fernandes: Co-founder and CEO, Fashable
Azure Machine LearningAzure Machine Learning (Azure ML) is a cloud-based service that enables you to build, train, deploy, and manage machine learning models.
With Azure Machine Learning service, you can:
- Build and train machine learning models faster, and easily deploy to the cloud or the edge.
- Use the latest open-source technologies such as TensorFlow, PyTorch, or Jupyter.
- Experiment locally and then quickly scale up or out with large GPU-enabled clusters in the cloud.
- Interactively debug experiments, pipelines, and deployments using the built-in VS Code debugger.
- Speed up data science with automated machine learning and hyper-parameter tuning.
- Track your experiments, manage models, and easily deploy with integrated CI/CD tooling.
With this extension installed, you can accomplish much of this workflow directly from Visual Studio Code. The VS Code extension provides a user interface to create and manage Azure ML resources, such as experiments, compute targets, environments, and deployments. It also supports the Azure ML 2.0 CLI, which is the new command-line tool that simplifies the specification and execution of machine learning tasks.
Get Started with Azure Machine Learning Extension One click Connect to VS Code from Azure ML StudioTo get started with VS Code, navigate to the compute section of your Azure Machine Learning Studio. Find the desired compute instance and click on the VS Code (Web) or VS Code (Desktop) links under the “Applications” section.
Don’t have an Azure ML workspace or compute instance? Check out the guide here: Tutorial: Create workspace resources – Azure Machine Learning | Microsoft Learn
VS Code Desktop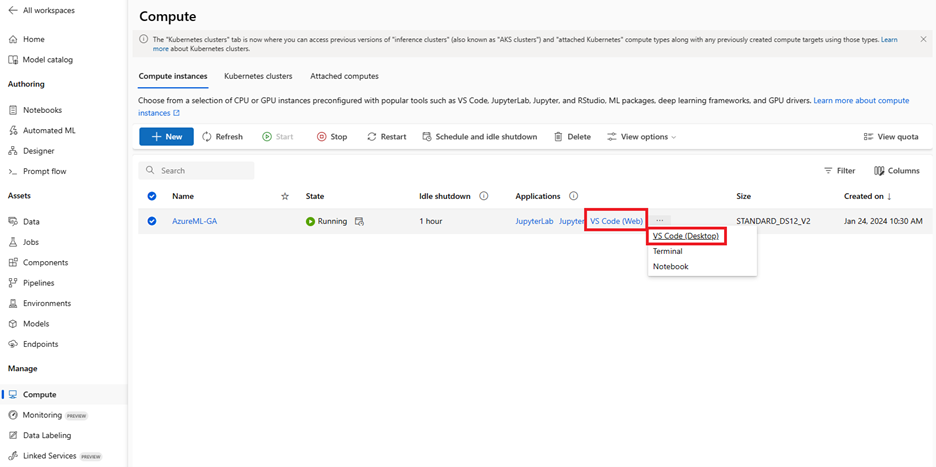
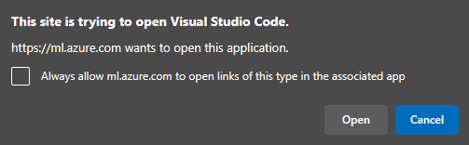
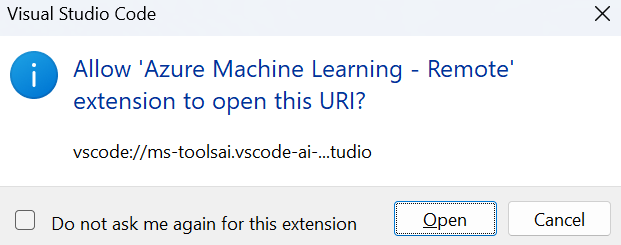
After clicking on the link for VS Code desktop, the browser will ask you for your permission to launch the VS Code Desktop application. VS Code desktop will ask you to sign in using your Microsoft/Azure account.
Follow the sign-in prompts, then you should be all set up to develop your own machine learning models using your favorite VS Code set up!
VS Code WebAfter clicking on the link, VS Code (Web) will open to a new tab on your browser. It may ask you to sign in using your Microsoft/Azure account, so VS Code will have permission to access your Azure subscription and workspace. Note the connection process may take a few minutes.
After signing in, you should now be connected to your Azure Machine Learning workspace inside of VS Code. Time to build your own machine learning model using the full power of VS Code!
Feedback
Give the Azure Machine Learning extension a try and let us know what you think. If you have any questions or feedback, please let us know your thoughts in this survey! You can also file an issue on our public GitHub repo with any questions or concerns you may have.
Need a guide to help you get started or documentation? Check out the tutorials here: Azure Machine Learning documentation | Microsoft Learn
The post Announcing the General Availability of the VS Code extension for Azure Machine Learning appeared first on Python.
EuroPython: EuroPython August 2024 Newsletter
Hello and welcome to the post-conference newsletter! We really hope you enjoyed EuroPython 2024, cause we sure did and are still recovering from all the fun and excitement :)
We have some updates to share with you, and also wanted to use this newsletter to nostalgically look back at all the good times we had just last month, surrounded by old friends and new in the beautiful city of Prague ❤️.
🏛️ EuroPython Society (EPS)This year we had a booth for the EuroPython Society at the conference. What is the EPS? The EPS is the running engine behind the EuroPython Conference. The EPS board is made up of up to 9 directors (including 1 chair and 1 vice chair). It runs the day-to-day business of the EuroPython Society, including running the EuroPython conference series, and supports the community through various initiatives such as our grants programme. The board collectively takes up the fiscal and legal responsibility of the Society.
For the next few weeks, the board is working with our accountant and auditor to get our financial reports in order. As soon as that is finalised, we will be excited to call for the next Annual General Assembly (GA); the actual GA will be held at least 14 days after our formal notice.
General Assembly is a great opportunity to hear about EuroPython Society&aposs developments and updates in the last year and a new board will also be elected at the end of the GA.
All EPS members are invited to attend the GA and have voting rights. Find out how to sign up to become an EPS member for free here: https://www.europython-society.org/applicationAt the moment, running the annual EuroPython conference is a major task for the EPS. As such, the board members are expected to invest significant time and effort towards overseeing the smooth execution of the conference, ranging from venue selection, contract negotiations, and budgeting, to volunteer management. Every board member has the duty to support one or more EuroPython teams to facilitate decision-making and knowledge transfer.
In addition, the Society prioritises building a close relationship with local communities. Board members should not only be passionate about the Python community but have a high-level vision and plan for how the EPS could best serve the community.
How can you become an EPS 2024 board member?Any EPS member can nominate themselves for the EPS 2024 board. Nominations will be published prior to the GA.
Though the formal deadline for self-nomination is at the GA, it is recommended that you send in yours as early as possible (yes, now is a good time!) to board@europython.eu.We look forward to your email :)
📝 Feedback & NumbersThanks to everyone who filled in the feedback form! In total, 157 attendees gave their feedback, which represents around 13% of the onsite attendees and around 11% of total attendees. One caveat when reading the results below: it’s difficult to say whether this sample was representative of all attendees as we didn’t collect demographic data.
Satisfaction with the conferenceOn average, attendees let us know that they were very satisfied with the conference, with a mean overall satisfaction rating of 4.3. Moreover, attendees were satisfied with most specific aspects of the conference, including the venue (mean = 4.6), food (mean = 4.0), and the social event (mean = 4.0). Prague was a particularly popular choice of location, getting a mean rating of 4.7.
We also had a look to see which of these aspects were most strongly related to overall satisfaction with the conference. Using a Spearman correlation, we found that satisfaction with the food (rs = 0.20) and the social event (rs = 0.17) had the highest relationship with overall satisfaction with the conference. However, any fellow stats nerds reading this might have noticed that these are not particularly strong relationships, likely meaning that other factors we didn’t explicitly measure are driving how much people liked the conference.
If you’re interested in seeing more of the results we got from the feedback form, we published a blog post where we deep dive into everything we found in much more detail. And we promise there will be lots of pretty graphs!
https://blog.europython.eu/europython-2024-post-conference-feedback/
🦒 Speaker’s Mentorship ProgrammeIt was another successful year for our Speaker Mentorship Programme! Here are some key highlights from this year:
- Each mentee had the opportunity to receive personalized feedback, support, and guidance on their talk or proposal from an experienced mentor. We successfully supported 29 mentees, most from underrepresented communities, by pairing them with 29 seasoned mentors!
- Six mentees were given the opportunity to attend a public speaking workshop to further enhance their skills.
- On June 3rd, we held a fantastic first-time speakers&apos workshop where attendees engaged with experienced speakers, receiving valuable advice and feedback for their presentations.
Last but not least, a huge THANK YOU to all our mentors who volunteered their time to guide mentees in submitting their proposals and delivering their talks
🐍 PyLadies dayEuroPython this year had an entire day dedicated to PyLadies events. We started with Moderni Soberana giving a workshop on how to establish boundaries and stop abusive behaviour in society. This was followed up by the PyLadies lunch, sponsored by Kraken Technologies, that had 120 allies joining us for a truly empowerment session.
PyThe afternoon had a #IAmRemarkable workshop hosted by Lola Onipko! We also had a Meet & Greet session where beginners and experienced PyLadies shared knowledge and insights of the tech industry.
Picture by Deborah Foroni (PyLadies SP)💬 Python Organisers DiscussionWe had +35 community members joining us to discuss how the EuroPython Society can better support Python Communities.
✍️ Community write-upsIt warms our hearts to see posts from the community about their experience and stories this year! Here are some of them, please feel free to share yours by tagging us on socials @europython or mailing us at news@europython.eu
Anwesha Das about EuroPython 2024:
A conference that believes community matters, human values and feelings matter, and not afraid to walk the talk. And how the conference stood up to my expectations in every bit.Keep reading here: https://anweshadas.in/looking-back-to-euro-python-2024/
Grete Tungla, PyCon Estonia’s Head Organiser shares her insights from EuroPython 2024: https://www.linkedin.com/pulse/europython-2024-insights-from-pycon-estonias-head-organiser-
Jakub Cervinka shares how he was to participate in the Operations team organising EuroPython 2024: https://www.linkedin.com/pulse/thank-you-europython-2024-jakub-červinka-eusme
❤️ Thank you Volunteers & SponsorsYear after year EuroPython shines because of the hard work of our amazing team of volunteers!
But beyond the logistics and the schedules, it&aposs your smiles, your enthusiasm, and your genuine willingness to go the extra mile that truly made EuroPython 2024 truly special. Your efforts have not only fostered a sense of belonging among first time attendees but also exemplified the power of community and collaboration that lies at the heart of this conference. (And if you check out our blog post about the post-conference feedback, you&aposll see that community was the thing people reported liking most about EuroPython this year!)
Once again, thank you for being the backbone of EuroPython, for your dedication, and for showing the world yet again why people who come for the Python language end up staying for the amazing community :)
We built a page on our website to thank everyone for their effort on making EuroPython 2024 what it was! Check it out: https://ep2024.europython.eu/thank-you
And a special thank you to all of the Sponsors for all of their support!
Yay sponsors!Special thanks to StickerApp for the awesome stickers, Evolabel for shipping, Pretalx for the partnership and Kraken Technologies for the PyLadies lunch!
🎥 Conference Photos & VideosThe official conference photos are up on Flickr! Do not forget to tag us when you share your favourite clicks on your socials 😉.
https://www.flickr.com/photos/europython/albums/
While our team edits the conference videos, we&aposve put together a EuroPython 2024 livestream playlist with all the daily links. We hope this helps you easily find and enjoy the talks you want to catch up on Youtube.
We also have a sweet video featuring the amazing humans of EuroPython sharing why they volunteer!
🤝 Code of ConductCode of Conduct Transparency Report is now published on our website: https://www.europython-society.org/europython-2024-code-of-conduct-transparency-report/
🐍 Note from The PSFThe Python Software Foundation is proud to support EuroPython Prague 2024 with a grant in support of our mission to promote, protect, and advance the Python programming language and to support and facilitate the growth of a diverse and international community of Python programmers. We send congratulations and thanks to the organizers for their work to create a wonderful experience for the Python community!
The PSF is the non-profit charitable organization behind the Python language. We empower the Python community in a variety of ways including paying developers to work directly on CPython, PyPI, and security, hosting projects like PyLadies and Pallets, organizing PyCon US, and awarding community grants like this one. We welcome you to be a part of the PSF by signing up for PSF membership or supporting our mission and initiatives with a one-time, monthly, or annual donation. If your company uses Python and wants to support our community, you can find more information and submit a sponsor application on our website. We’re happy to answer any questions at sponsors@python.org.🗓️ Upcoming Events in the Python CommunityEuroPython might over but fret not there are a bunch of more PyCons happening
- PyCon Estonia https://pycon.ee/ 🇪🇪
- PyCon PT https://2024.pycon.pt/ 🇵🇹
- PyCon ES https://2024.es.pycon.org/ 🇪🇸
- PyCon SE https://www.pycon.se/ 🇸🇪
- PyCon IE https://python.ie/pycon-2024 🇮🇪
- PyLadiesCon https://conference.pyladies.com/ 🌎
- Swiss Python Summit https://www.python-summit.ch/ 🇨🇭
- EuroScipy: https://euroscipy.org/2024/ 🇪🇺
- PyCon FR: https://www.pycon.fr/2024/ 🇫🇷
- PyCon PL: https://pl.pycon.org/2024/ 🇵🇱
- PyCon NL: https://nl.pycon.org/ 🇳🇱
Enjoy a 30% discount for PyCon Estonia 2024 on Late Snake tickets with the code "EPSXPYCONEST24" over here: https://gateme.com/event/98762/
PyJok.es$ pip install pyjokes
$ pyjoke
Hardware: The part of a computer that you can kick.
Python Anywhere: Belated announcement of latest updates
Here is a slightly delayed (and short) run-down of the new stuff that we deployed recently.
The main change for this update is that we have updated the underlying OS running PythonAnywhere to Ubuntu 22.04. This is an LTS release so it will be supported for some time to come. This will not affect user environments, but it is setting us up for a new user environment that should be coming soon.
We have also:
- Started the process of updating our file servers to be more robust
- Improved our alerting so that we are alerted to many new forms of failure on PythonAnywhere
- Made some improvements to the ASGI beta systems and their documentation
- Fixed a number of security issues
- Fixed various bugs
Real Python: Primer on Jinja Templating
Templates are an essential ingredient in full-stack web development. With Jinja, you can build rich templates that power the front end of your Python web applications.
But you don’t need to use a web framework to experience the capabilities of Jinja. When you want to create text files with programmatic content, Jinja can help you out.
In this tutorial, you’ll learn how to:
- Install the Jinja template engine
- Create your first Jinja template
- Render a Jinja template in Flask
- Use for loops and conditional statements with Jinja
- Nest Jinja templates
- Modify variables in Jinja with filters
- Use macros to add functionality to your front end
You’ll start by using Jinja on its own to cover the basics of Jinja templating. Later you’ll build a basic Flask web project with two pages and a navigation bar to leverage the full potential of Jinja.
Throughout the tutorial, you’ll build an example app that showcases some of Jinja’s wide range of features. To see what it’ll do, skip ahead to the final section.
You can also find the full source code of the web project by clicking on the link below:
Source Code: Click here to download the source code that you’ll use to explore Jinja’s capabilities.
Take the Quiz: Test your knowledge with our interactive “Primer on Jinja Templating” quiz. You’ll receive a score upon completion to help you track your learning progress:
Interactive Quiz
Primer on Jinja TemplatingIn this quiz, you'll test your understanding of Jinja templating. Jinja is a powerful tool for building rich templates in Python web applications, and it can also be used to create text files with programmatic content.
This tutorial is for you if you want to learn more about the Jinja template language or if you’re getting started with Flask.
Get Started With JinjaJinja is not only a city in the Eastern Region of Uganda and a Japanese temple, but also a template engine. You commonly use template engines for web templates that receive dynamic content from the back end and render it as a static page in the front end.
But you can use Jinja without a web framework running in the background. That’s exactly what you’ll do in this section. Specifically, you’ll install Jinja and build your first templates.
Install JinjaBefore exploring any new package, it’s a good idea to create and activate a virtual environment. That way, you’re installing any project dependencies in your project’s virtual environment instead of system-wide.
Select your operating system below and use your platform-specific command to set up a virtual environment:
Windows PowerShell PS> python -m venv venv PS> .\venv\Scripts\activate (venv) PS> Copied! Shell $ python -m venv venv $ source venv/bin/activate (venv) $ Copied!With the above commands, you create and activate a virtual environment named venv by using Python’s built-in venv module. The parentheses (()) surrounding venv in front of the prompt indicate that you’ve successfully activated the virtual environment.
After you’ve created and activated your virtual environment, it’s time to install Jinja with pip:
Shell (venv) $ python -m pip install Jinja2 Copied!Don’t forget the 2 at the end of the package name. Otherwise, you’ll install an old version that isn’t compatible with Python 3.
It’s worth noting that although the current major version is actually greater than 2, the package that you’ll install is nevertheless called Jinja2. You can verify that you’ve installed a modern version of Jinja by running pip list:
Shell (venv) $ python -m pip list Package Version ---------- ------- Jinja2 3.x ... Copied!To make things even more confusing, after installing Jinja with an uppercase J, you have to import it with a lowercase j in Python. Try it out by opening the interactive Python interpreter and running the following commands:
Read the full article at https://realpython.com/primer-on-jinja-templating/ »[ Improve Your Python With 🐍 Python Tricks 💌 – Get a short & sweet Python Trick delivered to your inbox every couple of days. >> Click here to learn more and see examples ]
Real Python: Quiz: Primer on Jinja Templating
In this quiz, you’ll test your understanding of Jinja templating. Jinja is a powerful tool for building rich templates in Python web applications, and it can also be used to create text files with programmatic content.
[ Improve Your Python With 🐍 Python Tricks 💌 – Get a short & sweet Python Trick delivered to your inbox every couple of days. >> Click here to learn more and see examples ]
PyCharm: How to Build Chatbots With LangChain
This is a guest post from Dido Grigorov, a deep learning engineer and Python programmer with 17 years of experience in the field.
Chatbots have evolved far beyond simple question-and-answer tools. With the power of large language models (LLMs), they can understand the context of conversations and generate human-like responses, making them invaluable for customer support applications and other types of virtual assistance.
LangChain, an open-source framework, streamlines the process of building these conversational chatbots by providing tools for seamless model integration, context management, and prompt engineering.
In this blog post, we’ll explore how LangChain works and how chatbots interact with LLMs. We’ll also guide you step by step through building a context-aware chatbot that delivers accurate, relevant responses using LangChain and GPT-3.
What are the chatbots in the realm of LLMs?Chatbots in the field of LLMs are cutting-edge software that simulate human-like conversations with users through text or voice interfaces. These chatbots exploit the advanced capabilities of LLMs, which are neural networks trained on huge amounts of text data which allows them to produce human-like responses to a wide range of input prompts.
One among all other matters is that LLM-based chatbots can take a conversation’s context into account when generating a response. This means they can keep coherence across several exchanges and can process complex queries to produce outputs that are in line with the users’ intentions. Additionally, these chatbots assess the emotional tone of a user’s input and adjust their responses to match the user’s sentiments.
Chatbots are highly adaptable and personalized. They learn from how users interact with them thus improving on their responses by adjusting them according to individual preferences and needs.
What is LangChain?LangChain is a framework that’s open-source developed for creating apps that use large language models (LLMs). It comes with tools and abstractions to better personalize the information produced from these models while maintaining accuracy and relevance.
One common term you can see when you read about LLMs is “prompt chains”. A prompt chain refers to a sequence of prompts or instructions used in the context of artificial intelligence and machine learning, with the purpose to guide the AI model through a multi-step process to generate more accurate, detailed, or refined outputs. This method can be employed for various tasks, such as writing, problem-solving, or generating code.
Developers can create new prompt chains using LangChain, which is one of the strongest sides of the framework. They can even modify existing prompt templates without needing to train the model again when using new datasets.
How does LangChain work?LangChain is a framework designed to simplify the development of applications that utilize language models. It offers a suite of tools that help developers efficiently build and manage applications that involve natural language processing (NLP) and Large Language Models. By defining the steps needed to achieve the desired outcome (this might be a chatbot, task automation, virtual assistant, customer support, and even more), developers can adapt language models flexibly to specific business contexts using LangChain.
Here’s a high-level overview of how LangChain works.
Model integrationLangChain supports various Language models including those from OpenAI, Hugging Face, Cohere, Anyscale, Azure Models, Databricks, Ollama, Llama, GPT4All, Spacy, Pinecone, AWS Bedrock, MistralAI, among others. Developers can easily switch between different models or use multiple models in one application. They can build custom-developed model integration solutions, which allow developers to take advantage of specific capabilities tailored to their specific applications.
ChainsThe core concept of LangChain is chains, which bring together different AI components for context-aware responses. A chain represents a set of automated actions between a user prompt and the final model output. There are two types of chains provided by LangChain:
- Sequential chains: These chains enable the output of a model or function to be used as an input for another one. This is particularly helpful in making multi-step processes that depend on each other.
- Parallel chains: It allows for simultaneous running of multiple tasks, with their outputs merged at the end. This makes it perfect for doing tasks that can be divided into subtasks that are completely independent.
LangChain facilitates the storage and retrieval of information across various interactions. This is essential where there is need for persistence of context such as with chat-bots or interactive agents. There are also two types of memory provided:
- Short-term memory – Helps keep track of recent sessions.
- Long-term memory – Allows retention of information from previous sessions enhancing system recall capability on past chats and user preferences.
LangChain provides many tools, but the most used ones are Prompt Engineering, Data Loaders and Evaluators. When it comes to Prompt Engineering, LangChain contains utilities to develop good prompts, which are very important in getting the best responses from language models.
If you want to load up files like csv, pdf or other format, Data Loaders are here to help you to load and pre-process different types of data hence making them usable in model interactions.
Evaluation is an essential part of working with machine learning models and large language models. That’s why LangChain provides Evaluators – tools used for testing language models and chains so that generated results meet the required criteria, which might include:
Datasets criteria:
- Manually curated examples: Start with high-quality, diverse inputs.
- Historical logs: Use real user data and feedback.
- Synthetic data: Generate examples based on initial data.
Types of evaluations:
- Human: Manual scoring and feedback.
- Heuristic: Rule-based functions, both reference-free and reference-based.
- LLM-as-judge: LLMs score outputs based on encoded criteria.
- Pairwise: Compare two outputs to pick the better one.
Application evaluations:
- Unit tests: Quick, heuristic-based checks.
- Regression testing: Measure performance changes over time.
- Back-testing: Re-run production data on new versions.
- Online evaluation: Evaluate in real-time, often for guardrails and classifications.
Agents
LangChain agents are essentially autonomous entities that leverage LLMs to interact with users, perform tasks, and make decisions based on natural language inputs.
Action-driven agents use language models to decide on optimal actions for predefined tasks. On the other side interactive agents or interactive applications such as chatbots make use of these agents, which also take into account user input and stored memory when responding to queries.
How do chatbots work with LLMs?LLMs underlying chatbots use Natural Language Understanding (NLU) and Natural Language Generation (NLG), which are made possible through pre-training of models on vast textual data.
Natural Language Understanding (NLU)- Context awareness: LLMs can understand the subtlety and allusions in a conversation, and they can keep track of the conversation from one turn to the next. This makes it possible for the chatbots to generate logical and contextually appropriate responses to the clients.
- Intent recognition: These models should be capable of understanding the user’s intent from their queries, whether the language is very specific or quite general. They can discern what the user wants to achieve and determine the best way to help them reach that goal.
- Sentiment analysis: Chatbots can determine the emotion of the user through the tone of language used and adapt to the user’s emotional state, which increases the engagement of the user.
- Response generation: When LLMs are asked questions, the responses they provide are correct both in terms of grammar and the context. This is because the responses that are produced by these models mimic human communication, due to the training of the models on vast amounts of natural language textual data.
- Creativity and flexibility: Apart from simple answers, LLM-based chatbots can tell a story, create a poem, or provide a detailed description of a specific technical issue and, therefore, can be considered to be very flexible in terms of the provided material.
- Learning from interactions: Chatbots make the interaction personalized because they have the ability to learn from the users’ behavior, as well as from their choices. It can be said that it is constantly learning, thereby making the chatbot more effective and precise in answering questions.
- Adaptation to different domains: The LLMs can be tuned to particular areas or specialties that allow the chatbots to perform as subject matter experts in customer relations, technical support, or the healthcare domain.
LLMs are capable of understanding and generating text in multiple languages, making them suitable for applications in diverse linguistic contexts.
Building your own chatbot with LangChain in five stepsThis project aims to build a chatbot that leverages GPT-3 to search for answers within documents. First, we scrape content from online articles, split them into small chunks, compute their embeddings, and store them in Deep Lake. Then, we use a user query to retrieve the most relevant chunks from Deep Lake, which are incorporated into a prompt for generating the final answer with the LLM.
It’s important to note that using LLMs carries a risk of generating hallucinations or false information. While this may be unacceptable for many customer support scenarios, the chatbot can still be valuable for assisting operators in drafting answers that they can verify before sending to users.
Next, we’ll explore how to manage conversations with GPT-3 and provide examples to demonstrate the effectiveness of this workflow
Step 1: Project creation, prerequisites, and required library installationFirst create your PyCharm project for the chatbot. Open up Pycharm and click on “new project”. Then give a name of your project.
Once ready with the project set up, generate your `OPENAI_API_KEY` on the OpenAI API Platform Website, once you are logged in (or sign up on the OpenAI website for that purpose). To do that go to the “API Keys” section on the left navigation menu and then click on the button “+Create new secret key”. Don’t forget to copy your key.
After that get your `ACTIVELOOP_TOKEN` by signing up on the Activeloop website. Once logged in, just click on the button “Create API Token” and you’ll be navigated to the token creation page. Copy this token as well.
Once you have both the token and the key, open your configuration settings in PyCharm, by clicking on the 3 dots button next to the run and debug buttons, and choose “Edit”. You should see the following window:
Now locate the field “Environment variables” and find the icon on the right side of the field. Then click there – you’ll see the following window:
And now by clicking the + button start adding your environmental variables and be careful with their names. They should be the same as mentioned above: `OPENAI_API_KEY` and `ACTIVELOOP_TOKEN`. When ready just click OK on the first window and then “Apply” and “OK” on the second one.
That’s a very big advantage of PyCharm and I very much love it, because it handles the environment variables for us automatically without the requirement for additional calls to them, allowing us to think more about the creative part of the code.
Note: ActiveLoop is a technology company that focuses on developing data infrastructure and tools for machine learning and artificial intelligence. The company aims to streamline the process of managing, storing, and processing large-scale datasets, particularly for deep learning and other AI applications.
DeepLake is an ActiveLoop’s flagship product. It provides efficient data storage, management, and access capabilities, optimized for large-scale datasets often used in AI.
Install the required librariesWe’ll use the `SeleniumURLLoader` class from LangChain, which relies on the `unstructured` and `selenium` Python libraries. Install these using pip. It is recommended to install the latest version, although the code has been specifically tested with version 0.7.7.
To do that use the following command in your PyCharm terminal:
pip install unstructured seleniumNow we need to install langchain, deeplake and openai. To do that just use this command in your terminal (same window you used for Selenium) and wait a bit until everything is successfully installed:
pip install langchain==0.0.208 deeplake openai==0.27.8 psutil tiktokenTo make sure all libraries are properly installed, just add the following lines needed for our chatbot app and click on the Run button:
from langchain.embeddings.openai import OpenAIEmbeddings from langchain.vectorstores import DeepLake from langchain.text_splitter import CharacterTextSplitter from langchain import OpenAI from langchain.document_loaders import SeleniumURLLoader from langchain import PromptTemplateAnother way to install your libraries is through the settings of PyCharm. Open them and go to the section Project -> Project Interpreter. Then locate the + button, search for your package and hit the button “Install Package”. Once ready, close it, and on the next window click “Apply” and then “OK”.
Step 2: Splitting content into chunks and computing their embeddingsAs previously mentioned, our chatbot will “communicate” with content coming out of online articles, that’s why I picked Digitaltrends.com as my source of data and selected 8 articles to start. All of them are organized into a Python list and assigned to a variable called “articles”.
articles = ['https://www.digitaltrends.com/computing/claude-sonnet-vs-gpt-4o-comparison/', 'https://www.digitaltrends.com/computing/apple-intelligence-proves-that-macbooks-need-something-more/', 'https://www.digitaltrends.com/computing/how-to-use-openai-chatgpt-text-generation-chatbot/', 'https://www.digitaltrends.com/computing/character-ai-how-to-use/', 'https://www.digitaltrends.com/computing/how-to-upload-pdf-to-chatgpt/']We load the documents from the provided URLs and split them into chunks using the `CharacterTextSplitter` with a chunk size of 1000 and no overlap:
# Use the selenium to load the documents loader = SeleniumURLLoader(urls=articles) docs_not_splitted = loader.load() # Split the documents into smaller chunks text_splitter = CharacterTextSplitter(chunk_size=1000, chunk_overlap=0) docs = text_splitter.split_documents(docs_not_splitted)If you run the code till now you should receive the following output, if everything works well:
[Document(page_content="techcrunch\n\ntechcrunch\n\nWe, TechCrunch, are part of the Yahoo family of brandsThe sites and apps that we own and operate, including Yahoo and AOL, and our digital advertising service, Yahoo Advertising.Yahoo family of brands.\n\n When you use our sites and apps, we use \n\nCookiesCookies (including similar technologies such as web storage) allow the operators of websites and apps to store and read information from your device. Learn more in our cookie policy.cookies to:\n\nprovide our sites and apps to you\n\nauthenticate users, apply security measures, and prevent spam and abuse, and\n\nmeasure your use of our sites and apps\n\n If you click '", metadata={'source': ……………]
Next, we generate the embeddings using OpenAIEmbeddings and save them in a DeepLake vector store hosted in the cloud. Ideally, in a production environment, we could upload an entire website or course lesson to a DeepLake dataset, enabling searches across thousands or even millions of documents.
By leveraging a serverless Deep Lake dataset in the cloud, applications from various locations can seamlessly access a centralized dataset without the necessity of setting up a vector store on a dedicated machine.
Why do we need embeddings and documents in chunks?When building chatbots with Langchain, embeddings and chunking documents are essential for several reasons that relate to the efficiency, accuracy, and performance of the chatbot.
Embeddings are vector representations of text (words, sentences, paragraphs, or documents) that capture semantic meaning. They encapsulate the context and meaning of words in a numerical form. This allows the chatbot to understand and generate responses that are contextually appropriate by capturing nuances, synonyms, and relationships between words.
Thanks to the embeddings, the chatbot can also quickly identify and retrieve the most relevant responses or information from a knowledge base, because they allow matching user queries with the most semantically relevant chunks of information, even if the wording differs.
Chunking, on the other side, involves dividing large documents into smaller, manageable pieces or chunks. Smaller chunks are faster to process and analyze compared to large, monolithic documents. This results in quicker response times from the chatbot.
Document chunking helps also with the relevancy of the output, because when a user asks a question, it is often only in a specific part of a document. Chunking allows the system to pinpoint and retrieve just the relevant sections and the chatbot can provide more precise and accurate answers.
Now let’s get back to our application and let’s update the following code by including your Activeloop organization ID. Keep in mind that, by default, your organization ID is the same as your username.
# TODO: use your organization id here. (by default, org id is your username) my_activeloop_org_id = "didogrigorov" my_activeloop_dataset_name = "jetbrains_article_dataset" dataset_path = f"hub://{my_activeloop_org_id}/{my_activeloop_dataset_name}" db = DeepLake(dataset_path=dataset_path, embedding_function=embeddings) # add documents to our Deep Lake dataset db.add_documents(docs)Another great feature of PyCharm I love is the option TODO notes to be added directly in Python comments. Once you type TODO with capital letters, all notes go to a section of PyCharm where you can see them all:
# TODO: use your organization id here. (by default, org id is your username)You can click on them and PyCharm directly shows you where they are in your code. I find it very convenient for developers and use it all the time:
If you execute the code till now you should see the following output, if everything works normal:
To find the most similar chunks to a given query, we can utilize the similarity_search method provided by the Deep Lake vector store:
# Check the top relevant documents to a specific query query = "how to check disk usage in linux?" docs = db.similarity_search(query) print(docs[0].page_content) Step 3: Let’s build the prompt for GPT-3We will design a prompt template that integrates role-prompting, pertinent Knowledge Base data, and the user’s inquiry. This template establishes the chatbot’s persona as an outstanding customer support agent. It accepts two input variables: chunks_formatted, containing the pre-formatted excerpts from articles, and query, representing the customer’s question. The goal is to produce a precise response solely based on the given chunks, avoiding any fabricated or incorrect information.
Step 4: Building the chatbot functionalityTo generate a response, we begin by retrieving the top-k (e.g., top-3) chunks that are most similar to the user’s query. These chunks are then formatted into a prompt, which is sent to the GPT-3 model with a temperature setting of 0.
# user question query = "How to check disk usage in linux?" # retrieve relevant chunks docs = db.similarity_search(query) retrieved_chunks = [doc.page_content for doc in docs] # format the prompt chunks_formatted = "\n\n".join(retrieved_chunks) prompt_formatted = prompt.format(chunks_formatted=chunks_formatted, query=query) # generate answer llm = OpenAI(model="gpt-3.5-turbo-instruct", temperature=0) answer = llm(prompt_formatted) print(answer)If everything works fine, your output should be:
To upload a PDF to ChatGPT, first log into the website and click the paperclip icon next to the text input field. Then, select the PDF from your local hard drive, Google Drive, or Microsoft OneDrive. Once attached, type your query or question into the prompt field and click the upload button. Give the system time to analyze the PDF and provide you with a response.
Step 5: Build conversational history # Create conversational memory memory = ConversationBufferMemory(memory_key="chat_history", input_key="input") # Define a prompt template that includes memory template = """You are an exceptional customer support chatbot that gently answers questions. {chat_history} You know the following context information. {chunks_formatted} Answer the following question from a customer. Use only information from the previous context information. Do not invent stuff. Question: {input} Answer:""" prompt = PromptTemplate( input_variables=["chat_history", "chunks_formatted", "input"], template=template, ) # Initialize the OpenAI model llm = OpenAI(openai_api_key="YOUR API KEY", model="gpt-3.5-turbo-instruct", temperature=0) # Create the LLMChain with memory chain = LLMChain( llm=llm, prompt=prompt, memory=memory ) # User query query = "What was the 5th point about on the question how to remove spotify account?" # Retrieve relevant chunks docs = db.similarity_search(query) retrieved_chunks = [doc.page_content for doc in docs] # Format the chunks for the prompt chunks_formatted = "\n\n".join(retrieved_chunks) # Prepare the input for the chain input_data = { "input": query, "chunks_formatted": chunks_formatted, "chat_history": memory.buffer } # Simulate a conversation response = chain.predict(**input_data) print(response)Let’s walk through the code in a more conversational manner.
To start with, we set up a conversational memory using `ConversationBufferMemory`. This allows our chatbot to remember the ongoing chat history, using `input_key=”input”` to manage the incoming user inputs.
Next, we design a prompt template. This template is like a script for the chatbot, including sections for chat history, the chunks of information we’ve gathered, and the current user question (input). This structure helps the chatbot know exactly what context it has and what question it needs to answer.
Then, we move on to initializing our language model chain, or `LLMChain`. Think of this as assembling the components: we take our prompt template, the language model, and the memory we set up earlier, and combine them into a single workflow.
When it’s time to handle a user query, we prepare the input. This involves creating a dictionary that includes the user’s question (`input`) and the relevant information chunks (`chunks_formatted`). This setup ensures that the chatbot has all the details it needs to craft a well-informed response.
Finally, we generate a response. We call the `chain.predict` method, passing in our prepared input data. The method processes this input through the workflow we’ve built, and out comes the chatbot’s answer, which we then display.
This approach allows our chatbot to maintain a smooth, informed conversation, remembering past interactions and providing relevant answers based on the context.
Another favorite trick with PyCharm that helped me a lot to build this functionality was the opportunity to put my cursor over a method, to hit the key “CTRL” and click on it.
In conclusionGPT-3 excels at creating conversational chatbots capable of answering specific questions based on contextual information provided in the prompt. However, ensuring the model generates answers solely based on this context can be challenging, as it often tends to hallucinate (i.e., generate new, potentially false information). The impact of such false information varies depending on the use case.
In summary, we developed a context-aware question-answering system using LangChain, following the provided code and strategies. The process included splitting documents into chunks, computing their embeddings, implementing a retriever to find similar chunks, crafting a prompt for GPT-3, and using the GPT-3 model for text generation. This approach showcases the potential of leveraging GPT-3 to create powerful and contextually accurate chatbots while also emphasizing the importance of being vigilant about the risk of generating false information.
About the author Dido GrigorovDido is a seasoned Deep Learning Engineer and Python programmer with an impressive 17 years of experience in the field. He is currently pursuing advanced studies at the prestigious Stanford University, where he is enrolled in a cutting-edge AI program, led by renowned experts such as Andrew Ng, Christopher Manning, Fei-Fei Li and Chelsea Finn, providing Dido with unparalleled insights and mentorship.
Dido’s passion for Artificial Intelligence is evident in his dedication to both work and experimentation. Over the years, he has developed a deep expertise in designing, implementing, and optimizing machine learning models. His proficiency in Python has enabled him to tackle complex problems and contribute to innovative AI solutions across various domains.
Armin Ronacher: Rye and uv: August is Harvest Season for Python Packaging
It has been a few months since I wrote about Rye here last. You might remember that in February I passed over stewardship of my Rye packaging too to Astral. The folks over there have been super busy in building a lot of amazing tooling for Python packaging in the last few months. If you have been using Rye in the last few months you will have noticed that the underlying resolver and installer uv got a lot better and faster.
As of the most recent release, uv also gained a lot of functionality that previously required Rye such as manipulating pyproject.toml files, workspace support, local package references and script installation. It now also can manage Python installations for you so it's getting much closer.
If you are using Rye today, consider this blog post as a reminder that you should probably starting having a closer look at uv and give feedback to the Astral folks.
I gave a talk just recently in Prague at EuroPython about my current view of the Python packaging, the lessons I learned when creating Rye and one of the things I mentioned there is that the goal of a packaging tool has to be that it will dominate the space. The tool that absolutely everybody uses has to be the best tool: it's the thing any new person to Python gets to see when they start their programming journey. After that talk a lot of people walked up to me and had a lot of questions about that in particular.
Python in the last two years has become an incredibly hot and popular platform for many new developers. That has in part been fueled by all the investments and interest that went into AI and ML. I really want everybody who gets to learn and experience Python not to remember it as an old language with bad tooling, but as an amazing language with a stellar developer experience. Unfortunately that's not the case today because there is so much choice, so many tools that are not quite compatible, and by the inconsistency everywhere. I have seen people walk down one tool, just to re-emerge moving their entire stack to conda and back because they hit some wall.
Domination is a goal because it means that most investment will go into one stack. I can only re-iterate my wish and desire that Rye (and with it a lot of other tools in the space) should cease to exist once the dominating tool has been established. For me uv is poised to be that tool. It's not quite there today yet for all cases, but it will be in no time, and now is the moment to step up as a community and start to start to rally around it. That doesn't mean that this tool will be the tool forever. Things come and go and maybe there is a future for some other tool.
But today I'm looking forward to the moment when there will be a final release of Rye that is no remaining functionality other than to just largely alias to uv, that retires Rye specific functionality and migrates you over to uv.
However I only have the power to retire one tool, and that won't be enough. Today we are using so many other package managing solutions for Python and we should be advertising fewer. I understand how much time and effort went into many of those, and everybody's contributions are absolutely appreciated. Software like Rye and uv were built on the advancements of the ecosystem underneath it. They leverage years and years of work that went into migrating the Python ecosystems from setup.py files to eggs and finally wheels. From not having a metadata standard to having one. From coupled to decoupled build systems. Much of what makes Rye so enjoyable were individuals that worked towards making redistributable and downloadable Python binaries a possibility. There was a lot of work that was put into building out an amazing ecosystem of Rust crates and Python libraries needed to make these tools work. All of that brought us to that point where we are today.
But it is my believe that we need to take the next step and be willing to say as a community that some tools are no longer recommended. Maybe not today, but that moment will come quicker than we think. I remember a time when many of us who maintained Python libraries pointed new developers to using ez_setup.py and easy_install in our onboarding guides. Years later we removed the mentions of ez_setup.py from our guides to replace them with pip. Some of us have pointed developers at pip-tools, at poetry or PDM. Many projects today even show 5 different installation guides because of that wild variety of tools available because they no longer feel like they can recommend one.
If you maintain an important Python project I would ask you to give uv a try and ask yourself if you would consider pointing people towards it. I think that this is our best shot in the community at finding ourselves in a much better position than we have ever been.
Have a look at the blog post that Charlie from Astral wrote about what uv can do today. It's a true accomplishment worth celebrating and enjoying.
Postscriptum: there is an elephant in the room which is that Astral is a VC funded company. What does that mean for the future of these tools? Here is my take on this: for the community having someone pour money into it can create some challenges. For the PSF and the core Python project this is something that should be considered. However having seen the code and what uv is doing, even in the worst possible future this is a very forkable and maintainable thing. I believe that even in case Astral shuts down or were to do something incredibly dodgy licensing wise, the community would be better off than before uv existed.
Trey Hunner: 10-Week Hands-On Python Course
Ever wished you could take an Intro to Python training with me, but you don’t work for a company with a generous training budget? I’m running a Python-learning program just for this situation.
Python High Five is a 10-week Python jumpstart program that starts this September.
Set aside the time to learn ⌚One of the biggest problems for folks starting to learn Python is setting aside the time. And even if you do manage to set aside the time, you’ll often hit a roadblock where you feel confused.
Python High Five is a way to keep a daily learning habit and to get help when find yourself stuck.
This program is based around daily practice. Monday through Friday you’ll pick 30 minutes from your schedule, at any time that works you. During those 30 minutes, you’ll watch a 5 minute video, work on the day’s exercise, and reflect on your progress.
The most effective learning is hands-on 🖐️Python High Five is all about learning through writing Python code. Each week we’ll dive deeper into Python, building upon what we’ve learned so far.
When you find yourself stuck you can get help through an asynchronous group chat and weekly office hour sessions. In addition to our weekly office hours together, I’ll check the chat each day, respond to questions, and provide guidance.
Proven learning techniques behind the scenes 📝The daily check-ins allow for daily accountability. The group chat also provides both a community of peers to rely on, and guidance from an experienced Python trainer (me).
We’ll also be using proven learning techniques behind the scenes:
- Retrieval practice: you don’t learn by putting information into your head, but by trying to take it out; for Python learning, that means writing code.
- Spaced repetition: cramming is less effective than learning spaced out over time, which is why we’ll spend 30 minutes each weekday instead of spending a few hours every week.
- Interleaving: each day’s exercise isn’t predictably themed because a bit of unpredictability can be really improve learning outcomes.
- Elaboration: your daily check-in isn’t just about reflection: it’s also a helpful learning tool!
Plus, we’ll be working through curriculum I’ve been developing and iterating on for many years. I have taught these topics in many different settings to folks from many different backgrounds.
Form a daily learning habit 🔁Any 10-week program will be just the start of a Python learning habit. You’ll need to keep up your Python after Python High Five ends, either by promptly applying your skills to a new project or diving deeper into Python with continued daily practice.
That’s why I’m offering an 80% discount for High Five attendees on one year of Python Morsels, which is my skill-building service designed to help deepen your Python skills every week. You can see more details on that here.
Ready to start your Python journey? ⛰️Are you ready to start your Python journey with a solid foundation?
Read more about Python High Five and decide whether this is for you.
Keep in mind that while the program begins on September 9, enrollment closes on August 31. So check the FAQs and if you have additional questions, be sure to email me soon!
Python Morsels: Checking for an empty list in Python
Python programmers typically check for empty lists by relying on truthiness.
Table of contents
- Checking the length of a list
- Evaluating the truthiness of a list
- Comparing for equality with an empty list
- Truthiness checks are non-emptiness checks on lists
One way to check whether a list is empty is to check the length of that list. If the length is 0, the list must be empty:
>>> numbers = [] >>> if len(numbers) == 0: ... print("The list is empty.") ... The list is empty.Or if we wanted to check for non-empty lists, we could make sure that the length is greater than 0:
>>> if len(numbers) > 0: ... print("The list is NOT empty.") ...But this is actually not the most typical way to check for an empty list in Python.
Evaluating the truthiness of a listMany Python users prefer to …
Read the full article: https://www.pythonmorsels.com/checking-for-an-empty-list-in-python/PyCoder’s Weekly: Issue #643 (Aug. 20, 2024)
#643 – AUGUST 20, 2024
View in Browser »
The Scrapy crawl stat logs are useful for tracking and monitoring the performance of a spider. If you want to keep them longer rather than just see the console printout, you can have them written to a database.
XIEGERTS.COM • Shared by Stephen
In this video course, you’ll learn how to use Python to communicate with REST APIs. You’ll learn about REST architecture and how to use the requests library to get data from a REST API. You’ll also explore different Python tools you can use to build REST APIs.
REAL PYTHON course
Tired of tediously send files and trying to use general-purpose collaboration tools? Posit Connect makes it easy to share, collaborate, and get feedback on your data science work including Jupyter notebooks, Plotly dashboards, Streamlit, Quarto, Shiny or other interactive analytics applications →
POSIT sponsor
argparse, the standard library module that Django uses for parsing command line options, supports sub-commands. These are pretty neat for providing an expansive API without hundreds of individual commands. This article shows you how to write your own.
ADAM JOHNSON
When crawling websites with Scrapy you’ll quickly come across all sorts of scenarios that require you to get creative or interact with the page that you’re trying to scrape. One of these scenarios is when you need to crawl an infinite scroll page. This type of website page loads more content as you scroll down the page like a social media feed.
STEPHEN SIEGERT • Shared by Stephen Siegert
SQL injection is the process of tricking a database into doing unintended things by modifying the input values to a query. Boolean-based blind injection is a subset that reveals structural information about the database. These can be hard to craft by hand, this article shows you how to automate the process to help do penetration testing.
TREBLEDJ
Experience near-human accuracy, low-latency performance, and advanced Speech AI capabilities with AssemblyAI’s Speech-to-Text API. Sign up today and receive free API credits—No credit card required. Get $50 Credit →
ASSEMBLY AI sponsor
If you use Python’s print() function to get information about the flow of your programs, then logging is the natural next step for you. This tutorial will guide you through creating your first logs and show you ways to curate them to grow with your projects.
REAL PYTHON
How costly it is to call functions and builtins in your python code? Does inlining help? How have the recent CPython releases improved performance in these areas? This article dives deep on function performance.
ABHINAV UPADHYAY
On *nix systems with GDB installed, you can attach to already running processes. This article shows you how to combine that with Python’s PDB debugger to then add breakpoints to Python in a running script.
DOMINIK CZARNOTA
This is a deeper dive into types and Pydantic around how to build “correct by construction” design patterns. Building your objects so that validation becomes a single call.
WILLIAM WOODRUFF
PyTorch vs Tensorflow: Which one should you use? Learn about these two popular deep learning libraries and how to choose the best one for your project.
REAL PYTHON
Have you ever wanted to create a plot or graph in your terminal? Learn how with the textual-plotext package.
MIKE DRISCOLL
A list of things to check when something works on your computer but not on someone else’s.
MATHEUS RICHARD
Juan talks about his love for the uv tool and how it has simplified Python packaging.
JUAN LUIS CANO RODRIGUEZ
GITHUB.COM/BNKC • Shared by lev ostatnigrosh
Events Weekly Real Python Office Hours Q&A (Virtual) August 21, 2024
REALPYTHON.COM
August 21 to August 23, 2024
PYCON.ORG.SO
August 23 to August 26, 2024
KIWIPYCON.NZ
August 24, 2024
MEETUP.COM
August 26 to August 31, 2024
EUROSCIPY.ORG
August 29 to September 1, 2024
PYCON.ORG
Happy Pythoning!
This was PyCoder’s Weekly Issue #643.
View in Browser »
[ Subscribe to 🐍 PyCoder’s Weekly 💌 – Get the best Python news, articles, and tutorials delivered to your inbox once a week >> Click here to learn more ]
Stack Abuse: Building Custom Email Templates with HTML and CSS in Python
An HTML email utilizes HTML code for presentation. Its design is heavy and looks like a modern web page, rich with visual elements like images, videos, etc., to emphasize different parts of an email's content.
Building email templates tailored to your brand is useful for various email marketing purposes such as welcoming new customers, order confirmation, and so on. Email template customization allows you to save time by not having to create emails from scratch each time. You can also include an email link in HTML to automatically compose emails in your email client.
In this step-by-step guide, you'll learn how to build an HTML email template, add a CSS email design to it, and send it to your target audience.
Setting Up Your Template Directory and Jinja2Follow the steps below to set up your HTML email template directory and Jinja2 for Python email automation:
-
Create a Template Directory: To hold your HTML email templates, you will need to set up a template directory inside your project module. Let's name this directory - html_emailtemp.
-
Install Jinja2: Jinja is a popular templating engine for Python that developers use to create configuration files, HTML documents, etc. Jinja2 is its latest version. It lets you create dynamic content via loops, blocks, variables, etc. It's used in various Python projects, like building websites and microservices, automating emails with Python, and more.
Use this command to install Jinja2 on your computer:
pip install jinja2
To create an HTML email template, let's understand how to code your email step by step. If you want to modify your templates, you can do it easily by following the steps below:
Step 1: Structure HTMLA basic email will have a proper structure - a header, a body, and a footer.
- Header: Used for branding purposes (in emails, at least)
- Body: It will house the main text or content of the email
- Footer: It's at the end of the email if you want to add more links, information, or call-to-actions (CTA)
Begin by creating your HTML structure, keeping it simple since email clients are less compatible than web browsers. For example, using tables is preferable for custom email layouts.
Here's how you can create a basic HTML mail with a defined structure:
<!DOCTYPE html> <html lang="en"> <head> <meta charset="UTF-8"> <meta name="viewport" content="width=device-width, initial-scale=1"> <title>HTML Email Template</title> <style type="text/css"> /* Add your CSS here */ </style> </head> <body> <table width="100%" cellpadding="0" cellspacing="0"> <tr> <td align="center"> <table width="600" cellpadding="0" cellspacing="0"> <!-- Header --> <tr> <td style="background-color: #1c3f60; color: #ffffff; text-align: center; padding: 20px;"> <h1>Your order is confirmed</h1> </td> </tr> <!-- Body --> <tr> <td style="padding: 20px; font-size: 16px; line-height: 1.6; color:#ffffff;"> <p>The estimated delivery date is 22nd August 2024.</p> </td> </tr> <!-- Footer --> <tr> <td style="background-color: #ff6100; color: #000000; text-align: center; padding: 20px;"> <p>For additional help, contact us at support@domain.com</p> </td> </tr> </table> </td> </tr> </table> </body> </html>Explanation:
- <!DOCTYPE html>: This declares HTML as your document type.
- <html>: This is an HTML page's root element.
- <head>: This stores the document's metadata, like CSS styles.
- <style>: CSS styles are defined here.
- <body>: This stores your email's main content.
- <table>: This tag defines the email layout, giving it a tabular structure with cells and rows, which makes rendering easier for email clients.
- <tr>: This tag defines the table's row, allowing vertical content stacking.
- <td>: This tag is used to define a cell inside a row. It contains content like images, text, buttons, etc.
Now, let's create the structure of your HTML email. To ensure it's compatible with different email clients, use tables to generate a custom email layout, instead of CSS.
<table width="100%" cellpadding="0" cellspacing="0"> <tr> <td align="center"> <table width="600" cellpadding="0" cellspacing="0" style="border: 1px solid #1c3f60; padding: 20px;"> <tr> <td align="center"> <h1 style="color: #7ed957;">Hi, Jon!</h1> <p style="font-size: 16px; color: #ffde59;">Thank you for being our valuable customer!</p> </td> </tr> </table> </td> </tr> </table> Styling the Email with CSSOnce you've defined your email structure, let's start designing emails with HTML and CSS:
Inline CSSUse inline CSS to ensure different email clients render CSS accurately and preserve the intended aesthetics of your email style.
<p style="font-size: 16px; color: blue;">Styled paragraph.</p> Adjusting StyleUsers might use different devices and screen sizes to view your email. Therefore, it's necessary to adapt the style to suit various screen sizes. In this case, we'll use media queries to achieve this goal and facilitate responsive email design.
<style type="text/css"> @media screen and (max-width: 600px) { .container { width: 100% !important; padding: 10px !important; } } </style> <table class="container" width="600"> <!-- Content --> </table>Explanation:
- @media screen and (max-width: 600px) {....}: This is a media query that targets device screens of up to 600 pixels, ensuring the style applies only to these devices, such as tablets and smartphones.
- width: 100% !important;: This style changes the width of the table - .container. The code instructs that the table width be set to full screen, not 600px.
- !important: This rule overrides other styles that may conflict with it.
- padding: 10px !important;: Inside the .container table, a padding of 10px is added to the table.
Here, we are adding a call to action (CTA) link at the button - "Get a 30-day free trial" that points to this page - https://www.mydomain.com.
<table cellpadding="0" cellspacing="0" style="margin: auto;"> <tr> <td align="center" style="background-color: #8c52ff; padding: 10px 20px; border-radius: 5px;"> <a href="https://www.mydomain.com" target="_blank" style="color: #ffffff; text-decoration: none; font-weight: bold;">Get a 30-day free trial</a> </td> </tr> </table>Let's Now Look at the Complete HTML Email Template:
<!DOCTYPE html> <html lang="en"> <head> <meta charset="UTF-8"> <meta name="viewport" content="width=device-width, initial-scale=1"> <title>HTML Email Template</title> <style type="text/css"> /* Adding the CSS */ body { margin: 0; padding: 0; background-color: #f4f4f4; font-family: Arial, sans-serif; } table { border-collapse: collapse; } .mailcontainer { width: 100%; max-width: 600px; margin: auto; background-color: #ffffff; } .header { background-color: #1c3f60; color: #ffffff; text-align: center; padding: 20px; } .body { padding: 20px; font-size: 16px; line-height: 1.6; background-color: #1c3f60; color: #7ed957; } .footer { background-color: #ff6100; color: #000000; text-align: center; padding: 20px; } .cta { background-color: #8c52ff; padding: 10px 20px; border-radius: 5px; color: #ffffff; text-decoration: none; font-weight: bold; } @media screen and (max-width: 600px) { .container { width: 100% !important; padding: 10px !important; } } </style> </head> <body> <table width="100%" cellpadding="0" cellspacing="0"> <tr> <td align="center"> <table class="container" width="600" cellpadding="0" cellspacing="0"> <!-- Header --> <tr> <td class="header"> <h1>Your order is confirmed</h1> </td> </tr> <!-- Body --> <tr> <td class="body"> <p>The estimated delivery date is 22nd August 2024.</p> <p style="font-size: 16px; color: blue;">Styled paragraph.</p> <table width="100%" cellpadding="0" cellspacing="0" style="border: 1px solid #1c3f60; padding: 20px;"> <tr> <td align="center"> <h1 style="color: #7ed957;">Hi, Jon!</h1> <p style="font-size: 16px; color: #ffde59;">Thank you for being our valuable customer!</p> </td> </tr> </table> <table cellpadding="0" cellspacing="0" style="margin: auto;"> <tr> <td align="center" style="background-color: #8c52ff; padding: 10px 20px; border-radius: 5px;"> <a href="https://www.mydomain.com" target="_blank" rel="noopener noreferrer" style="color: #ffffff; text-decoration: none; font-weight: bold;">Get a 30-day free trial</a> </td> </tr> </table> </td> </tr> <!-- Footer --> <tr> <td style="background-color: #ff6100; color: #000000; text-align: center; padding: 20px;"> <p>For additional help, contact us at support@domain.com</p> </td> </tr> </table> </td> </tr> </table> </body> </html>Explanation:
- .mailcontainer: This is a class that you can use to style your email content's main section. It's given a set width, margin, border, and color.
- .header, .footer, .body: These are classes used to style your email's header, footer, and body, respectively.
- .cta: This class allows you to style your buttons, such as CTA buttons, with a specified color, border design, padding, etc.
Having created our HTML template, it's now time to bring everything together using the Jinja2 templating engine.
Import Project ModulesYou've already set up your template directory - html_emailtemp. Now you can find and render templates using code. But before you do that, import the relevant project modules using the code below:
from jinja2 import Environment, PackageLoader, select_autoescape env = Environment(loader=PackageLoader('email_project', 'html_emailtemp'), autoescape=select_autoescape(['html', 'xml']))Explanation:
-
Environment: Jinja2 utilizes a central object, the template Environment. Its instances store global objects and configurations, and load your email templates from a file.
-
PackageLoader: This configures Jinja2 to load email templates.
-
autoescape: To mitigate security threats such as cross-site scripting (XSS) attacks and protect your code, you can escape values (that are passed to the email template) while rendering HTML using the command autoescape. Or, you can validate user inputs to reject malicious code.
For security, autoescape is set to True to enable escaping values. If you turn it to False, Jinja2 won't be able to escape values, and XSS attacks may occur. To enable autoescape, set autoescape to True:
env = Environment(loader=PackageLoader("myapp"), autoescape=True)
Once done, a template environment will be created with a template loader to find email templates created inside your project module's template folder.
Next, load your HTML email template using the method - get_template(). This function will return your loaded template. It also offers several benefits such as enabling email template inheritance, so you can reuse the template in multiple scenarios.
template1 = env.get_template("myemailtemplate.html")
Render the TemplateTo render your email template, use the method - render()
html1 = template1.render()
As these HTML email templates are dynamic, you can pass keyworded arguments (kwargs) with Jinja2 to the render function. The kwargs will then be passed to your email template. Here's how you can render your templates using the destined user's name - "Jon Doe" - in your email.
html1 = template1.render(name="Jon Doe")
Let's look at the complete code for this section:
from jinja2 import Environment, PackageLoader, select_autoescape env = Environment(loader=PackageLoader("email_project", "html_emailtemp"), autoescape=select_autoescape(["html", "xml"])) template1 = env.get_template("myemailtemplate.html") html1 = template1.render() Sending the EmailTo send an email, you can use the application-level, straightforward protocol - Simple Mail Transfer Protocol (SMTP). This protocol streamlines the email sending process and determines how to format, send, and encrypt your emails between the source and destination mail servers.
In this instance, we'll send emails in Python via SMTP since Python offers a built-in module for email sending. To send emails, Python provides a library, 'smtplib', to facilitate effortless interaction with the SMTP protocol.
To get started:
Install 'smtplib': Ensure you have installed Python on your system. Now, import 'smtplib' to set up connectivity with the mail server.
import smtplib
Define your HTML parameter: Define your HTML parameter for the mail object where you'll keep your HTML template. It will instruct email clients to render the template.
Here's the full code for this section:
import smtplib from email.mime.text import MIMEText # MIMEText is a class from the email package from jinja2 import Template # Let's use Template class for our HTML template sender = "<a href='mailto:sender1@gmail.com' target='_blank' rel='noopener noreferrer'>sender1@gmail.com</a>" recipient = "<a href='mailto:recipient1@gmail.com' target='_blank' rel='noopener noreferrer'>recipient1@gmail.com</a>" subject = "Your order is confirmed!" with open('myemailtemplate.html', 'r') as f: template1 = Template(f.read()) # Enter the HTML template html_emailtemp = """ <!DOCTYPE html> <html lang='en'> <head> <meta charset='UTF-8'> <meta name='viewport' content='width=device-width, initial-scale=1'> <title>HTML Email Template</title> <style type='text/css'> # Adding the CSS body { margin: 0; padding: 0; background-color: #f4f4f4; font-family: Arial, sans-serif; } table { border-collapse: collapse; } .mailcontainer { width: 100%; max-width: 600px; margin: auto; background-color: #ffffff; } .header { background-color: #1c3f60; color: #ffffff; text-align: center; padding: 20px; } .body { padding: 20px; font-size: 16px; line-height: 1.6; background-color: #1c3f60; color: #7ed957; } .footer { background-color: #ff6100; color: #000000; text-align: center; padding: 20px; } .cta { background-color: #8c52ff; padding: 10px 20px; border-radius: 5px; color: #ffffff; text-decoration: none; font-weight: bold; } @media screen and (max-width: 600px) { .container { width: 100% !important; padding: 10px !important; } } </style> </head> <body> <table width='100%' cellpadding='0' cellspacing='0'> <tr> <td align='center'> <table class='container' width='600' cellpadding='0' cellspacing='0'> <!-- Header --> <tr> <td class='header'> <h1>Your order is confirmed</h1> </td> </tr> <!-- Body --> <tr> <td class='body'> <p>The estimated delivery date is 22nd August 2024.</p> <p style='font-size: 16px; color: blue;'>Styled paragraph.</p> <table width='100%' cellpadding='0' cellspacing='0' style='border: 1px solid #1c3f60; padding: 20px;'> <tr> <td align='center'> <h1 style='color: #7ed957;'>Hi, Jane!</h1> <p style='font-size: 16px; color: #ffde59;'> Thank you for being our valuable customer! </p> </td> </tr> </table> <table cellpadding='0' cellspacing='0' style='margin: auto;'> <tr> <td align='center' style='background-color: #8c52ff; padding: 10px 20px; border-radius: 5px;'> <a href='https://www.mydomain.com' target='_blank' rel='noopener noreferrer' style='color: #ffffff; text-decoration: none; font-weight: bold;'>Get a 30-day free trial</a> </td> </tr> </table> </td> </tr> <!-- Footer --> <tr> <td style='background-color: #ff6100; color: #000000; text-align: center; padding: 20px;'> <p>For additional help, contact us at support@domain.com</p> </td> </tr> </table> </td> </tr> </table> </body> </html> """ template1 = Template(html_emailtemp) html1 = template1.render(name="Jon Doe") # Attach your MIMEText objects for HTML message = MIMEText(html1, 'html') message['Subject'] = subject message['From'] = sender message['To'] = recipient # Send the HTML email with smtplib.SMTP_SSL('smtp.gmail.com', 465) as server: server.login(username, password) server.sendmail(sender, recipient, message.as_string())Explanation:
- sender: The sender's email address
- recipient: The recipient's email address
- from email.mime.text import MIMEText: This is used to import the class MIMEText, enabling you to attach your HTML template in the email.
- smtplib.SMTP_SSL('smtp.gmail.com', 465) as server:: This establishes a connection with your email provider's (Gmail's) SMTP server using port 465. If you are using another SMTP provider, use their domain name, such as smtp.domain.com, with an appropriate port number. The connection is secured with SSL.
- server.login(username, password): This function allows you to log in to the email server using your username and password.
- server.sendemail(sender, recipient, message.as_string()): This command sends the HTML email.
Before sending your HTML email, test it to understand how different email clients render CSS and HTML. Testing tools like Email on Acid, Litmus, etc. can assist you.
ConclusionTo build custom email templates with HTML and CSS in Python, follow the above instructions. First, begin structuring your HTML email template, style emails with CSS, and then send them to your recipients. Always check your email template's compatibility with different email clients and ensure to keep your HTML simple using tables. Adding an email link in HTML will also allow you to compose an email automatically in your email client and send it to a specific email address.
Real Python: Exploring Astrophysics in Python With pandas and Matplotlib
This course uses three problems often covered in introductory astro-physics courses to play in Python. Along the way you’ll learn some astronomy, and how to use a variety of datascience libraries like NumPy, Matplotlib, pandas, and pint.
In this video course you’ll learn about:
- Introductory astrophysics topics
- Working with dataframes in pandas
- Writing code that uses scientific units
- Visualizing information with Matplotlib
[ Improve Your Python With 🐍 Python Tricks 💌 – Get a short & sweet Python Trick delivered to your inbox every couple of days. >> Click here to learn more and see examples ]
Python Bytes: #397 So many PyCon videos
TestDriven.io: Limiting Content Types in a Django Model
Real Python: Python Classes: The Power of Object-Oriented Programming
Python supports the object-oriented programming paradigm through classes. They provide an elegant way to define reusable pieces of code that encapsulate data and behavior in a single entity. With classes, you can quickly and intuitively model real-world objects and solve complex problems.
If you’re new to classes, need to refresh your knowledge, or want to dive deeper into them, then this tutorial is for you!
In this tutorial, you’ll learn how to:
- Define Python classes with the class keyword
- Add state to your classes with class and instance attributes
- Provide behavior to your classes with methods
- Use inheritance to build hierarchies of classes
- Provide interfaces with abstract classes
To get the most out of this tutorial, you should know about Python variables, data types, and functions. Some experience with object-oriented programming (OOP) is also a plus. Don’t worry if you’re not an OOP expert yet. In this tutorial, you’ll learn the key concepts that you need to get started and more. You’ll also write several practical examples to help reinforce your knowledge of Python classes.
Get Your Code: Click here to download your free sample code that shows you how to build powerful object blueprints with classes in Python.
Take the Quiz: Test your knowledge with our interactive “Python Classes - The Power of Object-Oriented Programming” quiz. You’ll receive a score upon completion to help you track your learning progress:
Interactive Quiz
Python Classes - The Power of Object-Oriented ProgrammingIn this quiz, you'll test your understanding of Python classes. With this knowledge, you'll be able to define reusable pieces of code that encapsulate data and behavior in a single entity, model real-world objects, and solve complex problems.
Getting Started With Python ClassesPython is a multiparadigm programming language that supports object-oriented programming (OOP) through classes that you can define with the class keyword. You can think of a class as a piece of code that specifies the data and behavior that represent and model a particular type of object.
What is a class in Python? A common analogy is that a class is like the blueprint for a house. You can use the blueprint to create several houses and even a complete neighborhood. Each concrete house is an object or instance that’s derived from the blueprint.
Each instance can have its own properties, such as color, owner, and interior design. These properties carry what’s commonly known as the object’s state. Instances can also have different behaviors, such as locking the doors and windows, opening the garage door, turning the lights on and off, watering the garden, and more.
In OOP, you commonly use the term attributes to refer to the properties or data associated with a specific object of a given class. In Python, attributes are variables defined inside a class with the purpose of storing all the required data for the class to work.
Similarly, you’ll use the term methods to refer to the different behaviors that objects will show. Methods are functions that you define within a class. These functions typically operate on or with the attributes of the underlying instance or class. Attributes and methods are collectively referred to as members of a class or object.
You can write classes to model the real world. These classes will help you better organize your code and solve complex programming problems.
For example, you can use classes to create objects that emulate people, animals, vehicles, books, buildings, cars, or other objects. You can also model virtual objects, such as a web server, directory tree, chatbot, file manager, and more.
Finally, you can use classes to build class hierarchies. This way, you’ll promote code reuse and remove repetition throughout your codebase.
In this tutorial, you’ll learn a lot about classes and all the cool things that you can do with them. To kick things off, you’ll start by defining your first class in Python. Then you’ll dive into other topics related to instances, attributes, and methods.
Defining a Class in PythonTo define a class, you need to use the class keyword followed by the class name and a colon, just like you’d do for other compound statements in Python. Then you must define the class body, which will start at the next indentation level:
Python Syntax class ClassName: <body> Copied!In a class’s body, you can define attributes and methods as needed. As you already learned, attributes are variables that hold the class data, while methods are functions that provide behavior and typically act on the class data.
Note: In Python, the body of a given class works as a namespace where attributes and methods live. You can only access those attributes and methods through the class or its objects.
As an example of how to define attributes and methods, say that you need a Circle class to model different circles in a drawing application. Initially, your class will have a single attribute to hold the radius. It’ll also have a method to calculate the circle’s area:
Python circle.py import math class Circle: def __init__(self, radius): self.radius = radius def calculate_area(self): return math.pi * self.radius ** 2 Copied!In this code snippet, you define Circle using the class keyword. Inside the class, you write two methods. The .__init__() method has a special meaning in Python classes. This method is known as the object initializer because it defines and sets the initial values for the object’s attributes. You’ll learn more about this method in the Instance Attributes section.
Read the full article at https://realpython.com/python-classes/ »[ Improve Your Python With 🐍 Python Tricks 💌 – Get a short & sweet Python Trick delivered to your inbox every couple of days. >> Click here to learn more and see examples ]
Mike Driscoll: How to Plot in the Terminal with Python and Textualize
Have you ever wanted to create a plot or graph in your terminal? Okay, maybe you haven’t, but now that you know you can, you want to! Python has the plotext package for plotting in your terminal. However, while that package is amazing all on its own, there is another package called textual-plotext that wraps the plotext package so you can use it in Textual!
In this tutorial, you will learn the basics of creating a plot in your terminal using the textual-plotext package!
InstallationYour first step in your plotting adventure is to install textual-plotext. You can install the package using pip. Open up your terminal and run the following command:
python -m pip install textual-plotextPip will install textual-plotext and any dependencies it needs. Once that’s done, you’re ready to start plotting!
UsageTo kick things off, you’ll create a simple Textual application with a scatter chart in it. This example comes from the textual-plotext GitHub repo. You can create a Python file and name it something like scatterplot.py and then add the following code:
from textual.app import App, ComposeResult from textual_plotext import PlotextPlot class ScatterApp(App[None]): def compose(self) -> ComposeResult: yield PlotextPlot() def on_mount(self) -> None: plt = self.query_one(PlotextPlot).plt y = plt.sin() # sinusoidal test signal plt.scatter(y) plt.title("Scatter Plot") # to apply a title if __name__ == "__main__": ScatterApp().run()When you run this code, you will see the following in your terminal:
Plotext does more than scatterplots though. You can create any of the following:
- Scatter Plot
- Line Plot
- Log Plot
- Stem Plot
- Bar Plots
- Datetime Plots
- Special Plots
- Decorator Plots
- Image Plots
- and more
Let’s look at a bar plot example:
from textual.app import App, ComposeResult from textual_plotext import PlotextPlot class BarChartApp(App[None]): def compose(self) -> ComposeResult: yield PlotextPlot() def on_mount(self) -> None: languages = ["Python", "C++", "PHP", "Ruby", "Julia", "COBOL"] percentages = [14, 36, 11, 8, 7, 4] plt = self.query_one(PlotextPlot).plt y = plt.bar(languages, percentages) plt.scatter(y) plt.title("Programming Languages") # to apply a title if __name__ == "__main__": BarChartApp().run()The main difference here is that you’ll be calling plt.bar() with some parameters, whereas, in the previous example, you called plt.sin()with no parameters at all. Of course, you also need some data to plot for this second example. The provided data is all made up.
When you run this example, you will see something like the following:
Isn’t that neat?
Wrapping UpYou can create many other plots with Plotext. Check out their documentation and give some of the other plots a whirl. Have fun and make cool things in your terminal today!
The post How to Plot in the Terminal with Python and Textualize appeared first on Mouse Vs Python.
PyCharm: Introducing the PyCharm Databricks Integration
We’re introducing the Databricks integration with PyCharm Professional to make it easier for you to process, store, and analyze your data!
The integration allows you to build your data and AI apps on the Databricks Data Intelligence Platform directly within PyCharm Professional, enhancing the data analytics platform with the powerful Python IDE by JetBrains. It enables you to write code quickly and easily and run it in the cloud without extra configurations, and it offers additional benefits for working with data.
Read this blog post to learn more about the integration, who it will be useful for, and what benefits it offers.
Install the Databricks plugin Watch the plugin in action What is Databricks?The Databricks Data Intelligence Platform allows your entire organization to use data and AI. It’s built on a lakehouse to provide an open, unified foundation for all data and governance, and is powered by a Data Intelligence Engine that understands the uniqueness of your data.
What is PyCharm Professional?PyCharm Professional is a leading IDE for Python and other programming languages. It allows you to write high-quality and efficient code using superior code completion, refactoring capabilities, code inspections, seamless code and project navigation, a debugger, and a wide range of integrations, including Jupyter notebooks, testing frameworks, Git, CI/CD solutions, and more – all available in one place right out of the box.
Who will the integration be useful for?Organizations and data professionals using data lakehouses, data lakes, and data warehouses via Databricks will benefit from this integration.
What benefits does the integration bring?The integration combines the most powerful capabilities of each platform, allowing you to easily build all of your data and AI applications at scale within PyCharm:
- Use PyCharm to implement software development best practices, which are essential for large codebases, such as source code control, modular code layouts, testing, and more.
- Databricks enables the use of powerful clusters, allowing you to work on projects too large for a local machine and helping you orchestrate data processing efficiently.
You can write the code for your pipelines and jobs in PyCharm, then deploy, test, and run it in real time on your Databricks cluster without any additional configurations.
Let’s dive into more details about what the PyCharm Databricks integration provides.
Connect to your cluster via PyCharmYou can connect directly to the Databricks cluster via PyCharm and monitor the process within the IDE. This allows you to check if the cluster is running, see the results of the current session’s runs, and view process outcomes along with additional details.
Run Python scripts on a remote clusterIn addition, you can run Python scripts on a remote cluster, which is particularly useful for working with big data, and view the results in the IDE.
Run Jupyter notebooks or Python scripts as workflowsAdditionally, you can run your notebook or Python scripts as a Databricks workflow and see the output in the console.
You can see the results of the runs on the Databricks platform, including the runs initiated from PyCharm.
Synchronize project files to the Databricks workspaceThe synchronization of project files with the Databricks workspace allows you to access and work with the same files in both PyCharm and Databricks workspaces. You can also schedule your notebooks and scripts and utilize other platform features for projects completed in PyCharm.
How to get startedMake sure you have the following ready to go:
- PyCharm Professional 2024.2 and further editions
- Big Data Tools Core plugin
- Databricks account
You can install the Databricks plugin either from JetBrains Marketplace or directly from within the PyCharm IDE.
Install the Databricks pluginHead over to the documentation to get step-by-step instructions on how to get started and use the plugin.
What do you think about this integration? Share your thoughts in the comments below.
Pages
Recent Publications
- Managing Hidden Dependencies in OO Software: a Study Based on Open Source Projects
- Open Source Communities as Liminal Ecosystems
- Investigating developers' email discussions during decision-making in Python language evolution
- Developers, Quality Control and Download Volume in Open Source Software (OSS) Projects
FLOSS Project Planets
- Django Weblog: Django security releases issued: 5.1.4, 5.0.10, and 4.2.17
- Real Python: Expression vs Statement in Python: What's the Difference?
- Ned Batchelder: Testing some tidbits
- Django Weblog: Help us make it happen ❤️
- The Licensing and Compliance Team is fighting for freedom and we need your help
FLOSS Research
- Driving Open Source forward: make your impact in 2025
- Improving Open Source security with the new GitHub Secure Open Source Fund
- Celebrating 5 years at the Open Source Initiative: a journey of growth, challenges, and community engagement
- Highlights from the Digital Public Goods Alliance Annual Members Meeting 2024
- Give Your Input on the State of Open Source Survey