
Feeds
Python Software Foundation: PSF Grants: Program & Charter Updates (Part 3)
The PSF Board has approved a new Grants Work Group Charter, effective March 1, 2025. To implement the changes across our documentation, application form, and grant report form, we will be pausing incoming Grants requests for the entire month of February 2025. Any applications already in the system will be processed normally.
As described in Part 1 and Part 2 of this blog post series, these updates are being made to ensure the sustainability of the PSF and our Grants Program. They are informed by the program's newly established Guiding Principles, which have also been added to the charter. If you want to get a better understanding of why and how these changes have been made, please read the preceding parts of this series.
The last update we made to the Grants Work Group Charter focused on process improvements based on grantee feedback, such as increasing the process time frame, clarifying the purpose and expectations around schedule review, and establishing participation requirements for the Work Group members. Due to the increasing popularity of the PSF Grants Program, the current update is focused on moderating spending. While we wish we could support every Python-related initiative for exactly what they need to be a smashing success, we need to ensure that the program continues supporting Python and Pythonistas for years to come and is balanced with all of the other initiatives and programs the PSF supports.
As of March 1, 2025, we are pausing certain categories of grant types, listed below. We want to share that the number of grants we award in these categories is significantly smaller than the number of conference requests we award (e.g. 3 development grants versus the 50+ conferences grants in 2024). Even still, based on the Guiding Principles we outline in Part 2 of this blog post series, we want to:
- Ensure that we evaluate and fund in our areas of expertise, and
- Prioritize high returns on investment in terms of community impact.
This means prioritizing grant categories that fall squarely within our expertise and which we know have a high community impact.
The grant types that will be paused are:
- Development work
- Kids Coding Camps
- Sprints
- Training Programs
- Workshop with equipment
- Other
You might be thinking, “wait, why pause development work grants? Aren't those squarely in the PSF Grants Program scope?” The PSF already directs both earmarked and general funds to five wonderful full-time Developers-in-Residence to work on things we can confidently say are making a significant impact on the Python programming language in critical areas. While we would love to fund many small Python-related development projects, we feel that we aren’t positioned to adequately measure the impact of these grants. The same applies to sprint-related grants, which are often co-located at Python-related conferences that we fund separately.
Evaluating kids' coding camps and training programs poses different challenges, and we also have a similar issue around understanding the impact of these initiatives. We also feel that our current grants process is not well suited to these requests, and would fit better in a quarterly or yearly review process overseen by educational experts.
The hope long term is to “unpause” these categories with the proper amount of funding and expertise available to the Grants Program and Work Group.
As of March 1, 2025, each category of eligible grant type has a maximum amount, or “cap” that can be awarded. The caps were developed by running scenarios on 2024's grant data to attain a sustainable budget that fits the PSF’s financial guidelines. This approach, instead of limiting awards based on types of spending like travel assistance or catering, reinforces trust in our applicants and community to use grant funds to best serve their respective needs.
The per-event caps are as follows:
- Conferences: $8,000 USD
- Workshop Without Equipment: $1,500 USD
- PyLadies Workshop: $1,500 USD
- DjangoGirls Workshop: $1,500 USD
- Consolidated grant requests will be capped according to the figures above.
- Example: Python Neptune is organizing one PyCon Conference and 3 workshops in 2025. They would be eligible to receive up to $12,500 USD.
- Any organization, event, or individual organizing multiple activities will be granted a maximum of $15,000 USD per year.
- This does not include individuals who participate and submit applications on behalf of multiple organizing committees.
We understand that for some applicants, this won’t make a big difference and for others, this could make a big difference. The thought process for this change is that larger more mature conferences and organizations that take on ambitious efforts should put a significant effort towards fundraising from multiple sources. As mentioned in Part 1 of this series, we intend to aggregate a library of resources for event organizers to help develop skills such as fundraising and negotiating with vendors.
As of March 1, 2025, we will only consider funding for a maximum of 4 days of conferences and 2 days for workshops. For context, the Grants Work Group uses a “per person/day” guideline to help determine how much funding to award. Those amounts are $15 per person/day for conferences, and $25 USD per person/day for workshops. Here’s what that looks like in practice:
- Python Neptune is organizing a 5-day event with conference, tutorial, and sprint days, and they anticipate 125 attendees.
- Under the current guidelines, the Grants Work Group would consider awarding a maximum of $9,375 USD.
- Moving forward, with the 4-day funding limit, the figure the Grants Work Group could consider awarding a maximum of $7,500 USD.
The idea here echoes the reasoning for the grant caps– larger and more ambitious events are typically more mature and should have multiple sources of sponsorship. Additionally, attendance typically isn’t steady across events that include more than just conference days (most people show up for talks, only some stay to sprint). Instead of analyzing attendance forecasts for each day of an event (more work for applicants, administration, and the Grants Work Group), we are establishing caps by number of days.
If you’ve applied for multiple grants through the PSF Grants Program, you are aware that we require reports for prior awards before we consider any subsequent requests, which is stated in the Grants Program documentation. Previously, this was not stated in the Grants Work Group Charter and has now been added to the ‘Grant Application Guideline’ section of the charter.
Under the last update to the Grants Work Group Charter, the threshold for PSF Board review increased to $15K. Now that we have capped our grant awards to $15K, this no longer applies. After rethinking this aspect of our Grants Program, the Board will now review consolidated grant requests, as these are usually comprehensive applications that have region-wide implications.
We want to recognize and note a few things:
- These are not small changes
- They will have a varying degree of impact on Python initiatives and events across the globe
- For those who are not familiar with the ins and outs of how we award grants, parts of these updates may be confusing
- We believe some folks will want to discuss these changes, ask questions, and point out where we can continue to improve
- We plan to monitor the impact these changes have on the Grants Program and will consider additional updates if required
To help the community understand the changes and ensure we keep our
two-way communication strong, we are going to hold two supplementary PSF Grants Program Office Hours on the PSF Discord. The office hours will be at varying times through January and February on top of our regularly scheduled office hours:
- January 7th, 4PM Eastern, 9PM UTC (supplementary)
- January 21st, 9AM Eastern, 1PM UTC (regular)
- February 4th, 4PM Eastern, 9PM UTC (supplementary)
- February 18th, 9AM Eastern, 1PM UTC (regular)
Python Software Foundation: PSF Grants: Program & Charter Updates (Part 2)
The PSF Board, with the support of PSF Staff, has outlined a set of Guiding Principles for the PSF Grants Program, as mentioned in Part 1 of this series of blog posts on updates to the program. The Board has a duty to promote, protect, and advance the Python programming language, and to support and facilitate the growth of a diverse and international community of Python programmers. The Board is comprised of Python-related founders, developers, organizers, and contributors of all stripes, from all over the globe. Not only does the PSF Board have a duty to uphold the mission of the PSF, but any updates made to the PSF Grants Program (or any PSF program) are founded on their diverse, real-life experiences.
As the Grants Program has continued to grow in popularity and we went past the ceiling of its budget, it became clear that it needed strategic guidance. The PSF Board discussed the program and its priorities at their recent retreat. The notes from that discussion were passed to PSF Staff, who translated the priorities into Guiding Principles for the Grants Program. From there, the PSF Board and PSF Staff collaborated on refining the principles, which the Board approved with a vote. The outcome of these exercises that now reside in the Grants Work Group Charter is copied directly below.
The PSF Grants Program supports hundreds of Python-related projects, events, and initiatives globally. To facilitate a sustainable grant program, the PSF Board established guiding principles for the program and funding.
The guiding principles of the PSF Grants Program are:
- Impactful
- Reliable
- Equitable
- Transparent
- Sustainable
The guiding principles behind the PSF Grants Program funding are:
- Strive for geographic equity
- Prioritize underserved communities
- Prioritize high returns on investment in terms of community impact
- Invest in both new and existing communities
- Evaluate and fund in our areas of expertise
- Ensure Python and Pythonistas are supported
These Guiding Principles give the program a well-defined direction and a grounding in where we can commit to being accountable, in a plainly stated manner. This does a couple of things:
- Inform updates to the Grants Work Group Charter
- Serves as a point of reference for the Grants Work Group and PSF Board to consistently make decisions regarding grant requests and the program overall
- Helps the Grants Work Group Chair (currently Marie Nordin, PSF Staff), steward the program and guide the Work Group
- Provides transparency to applicants about why their request may or may not be funded
- Directly answers the community's call for transparency about how decisions are made
- Informs the PSF and its Staff about future improvements to the program
We hope that establishing these Guiding Principles will bring a better understanding to the community about the PSF Grants Program. We welcome you to join either the PSF Board or PSF Grants Program Office Hours on the PSF Discord to discuss these updates, ask questions, and point out where we can continue to improve. Additionally, we have kicked off a thread on Discuss.python.org for those who prefer asynchronous discussion. You are also welcome to email psf@python.org to contact the PSF Board, or grants@pyfound.org to reach the Staff who administer the PSF Grants program.
Python Software Foundation: PSF Grants: Program & Charter Updates (Part 1)
The PSF Board and Staff have continued to work over the past couple of months to improve and steward the PSF Grants Program to fit the changing needs of the Python community. As we mentioned in our November 2024 updates (part 1, part 2), our Grants Program is more popular than ever as grant requests arrive in record numbers. The PSF is thrilled that the program positively impacts so many Pythonistas across the globe (approximately 30,000 in 2024 so far!). That’s what our work at the PSF is all about.
Unfortunately, this puts us in one of those “great problems to have” situations. In 2022, the Grants Program awarded $215K USD and increased to about $400K USD in 2023. In 2024, we estimate grants spending to be around $600K USD. While we were delighted to provide that level of support to the Python community in 2024 and that our community is so active, the PSF has to return grants funding to a more sustainable level that fits with all of the other Foundation programs. The PSF maintains critical community infrastructure, hosts PyPI, produces PyCon US, administers the fiscal sponsoree program, manages several Developers-in-Residence, and much more. Balancing the Grants Program with everything else the Foundation does is critical to both the sustainability of the PSF and the community.
Grants funding requests increased dramatically in 2024, which led the PSF to take a step back and re-evaluate the grants program’s goals and priorities. With this in mind, the PSF Board took time at their recent retreat to outline priorities for the PSF Grants Program. PSF Staff translated the outcome of that discussion into guiding principles for the program, which you can read more about in Part 2 of this series of posts.
The guiding principles for the program informed the most recent updates to the Grants Work Group Charter, which we go into further in Part 3 of this update. PSF Staff devoted many hours running different scenarios based on grant data to understand what impact different changes will have on our community and on our financial sustainability. The PSF Board worked with Staff over the past couple of months weighing the pros and cons of each change, taking extra meetings, reviewing documents, figures, and more. PSF Staff translated the outcome of all this work into proposed changes to the Grants Work Group Charter.
The PSF Board approved updates to the Grants Work Group Charter during the December 11, 2024, PSF Board meeting. Our newly established Grants Program guiding principles commit to transparency and communication. Along those lines, the changes to the Grants Program will take effect on March 1, 2025. To implement the corresponding updates across our documentation, application form, and grant report form, we will be pausing incoming Grants requests for the entire month of February 2025. Any applications already in the system will be processed normally. Make sure to read Part 3 in this series to understand if the changes impact any events or initiatives you organize.
After February, we will regularly monitor how Program changes impact spending, the program overall, and the community, including formal quarterly reviews.
We understand that changes to the PSF Grants Program will have an impact on the Python community, and we do not make these or any workgroup charter updates lightly. We are also experiencing the tech budget crunch alongside you– and we are working to ensure sustainability across all of our work. For example, we are making significant adjustments to how we are producing PyCon US to help cut costs. We are a relatively small Foundation and rely on our members, donors, and sponsors (opportunities can be found in our sponsorship application form!)
Ultimately, the updates are meant to continue to provide support to the area where we see the most impact: conferences and workshops. Bringing all levels of Python folks together to connect, learn, and grow together. Providing Pythonistas the opportunity to have those life-changing experiences and strengthen lifelong friendships at PyCons all over the world. Sparking the love for tech, programming, and Python at workshops where folks code their first website, or meet the mentor that changes the trajectory of their life. The changes are also meant to provide support to new or smaller events- those that need financial support more than mature conferences that can attract sponsorships.
To support the Python community and help work to fill gaps, the PSF Board & Staff intend to aggregate a library of event resources to support our grant applicants and community. Fundraising, negotiating, and organizing are learned skills we can all continue developing together.
To help the community understand the changes and ensure we keep our two-way communication strong, we are going to hold two supplementary PSF Grants Program Office Hours on the PSF Discord. The office hours will be at varying times through January and February on top of our regularly scheduled office hours:
- January 7th, 4PM Eastern, 9PM UTC (supplementary)
- January 21st, 9AM Eastern, 1PM UTC (regular)
- February 4th, 4PM Eastern, 9PM UTC (supplementary)
- February 18th, 9AM Eastern, 1PM UTC (regular)
Additionally, we have kicked off a thread on Discuss.python.org for those who prefer asynchronous discussion. Last but not least, you are welcome to email psf@python.org to contact the PSF Board, or grants@pyfound.org to reach the Staff who administer the PSF Grants program.
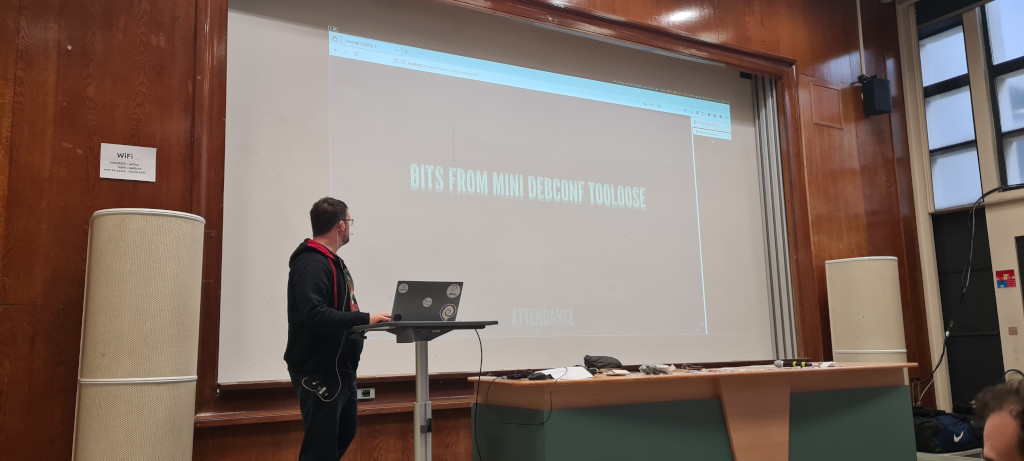
Gregory Colpart: MiniDebConf Toulouse 2024
After the MiniDebConf Marseille 2019, COVID-19 made it impossible or difficult to organize new MiniDebConfs for a few years. With the gradual resumption of in-person events (like FOSDEM, DebConf, etc.), the idea emerged to host another MiniDebConf in France, but with a lighter organizational load. In 2023, we decided to reach out to the organizers of Capitole du Libre to repeat the experience of 2017: hosting a MiniDebConf alongside their annual event in Toulouse in November. However, our request came too late for 2023. After discussions with Capitole du Libre in November 2023 in Toulouse and again in February 2024 in Brussels, we confirmed that a MiniDebConf Toulouse would take place in November 2024!
We then assembled a small organizing team and got to work: a Call for Papers in May 2024, adding a two-day MiniDebCamp, coordinating with the DebConf video team, securing sponsors, creating a logo, ordering T-shirts and stickers, planning the schedule, and managing registrations. Even with lighter logistics (conference rooms, badges, and catering during the weekend were handled by Capitole du Libre), there was still quite a bit of preparation to do.
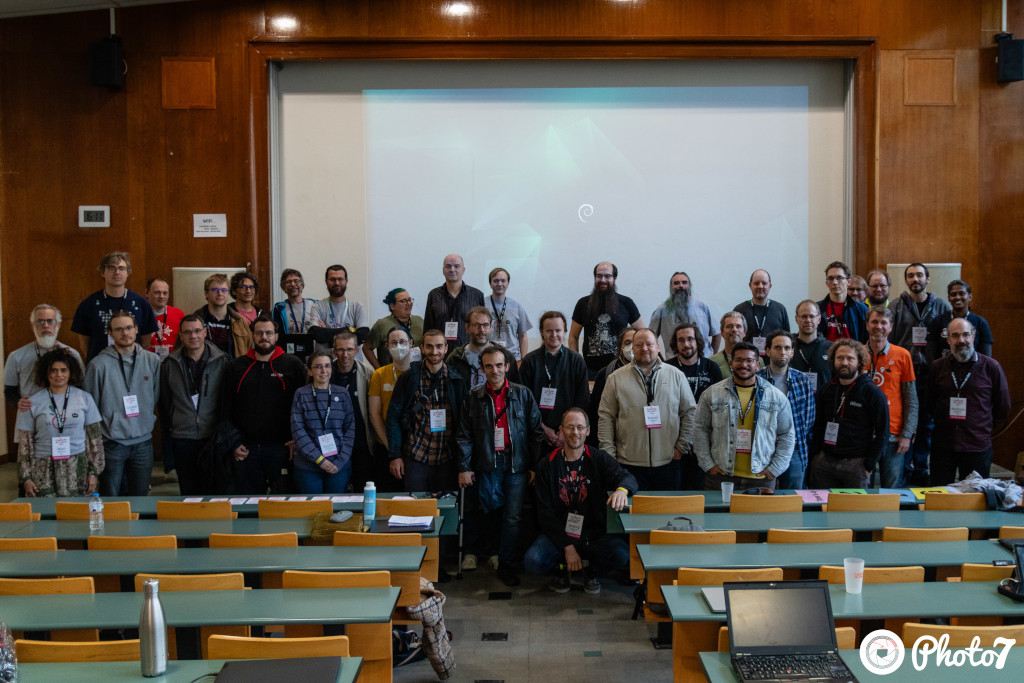
On Thursday, November 14, and Friday, November 15, 2024, about forty developers arrived from around the world (France, Spain, Italy, Switzerland, Germany, England, Brazil, Uruguay, India, Brest, Marseille…) to spend two days at the MiniDebCamp in the beautiful collaborative spaces of Artilect in Toulouse city center.
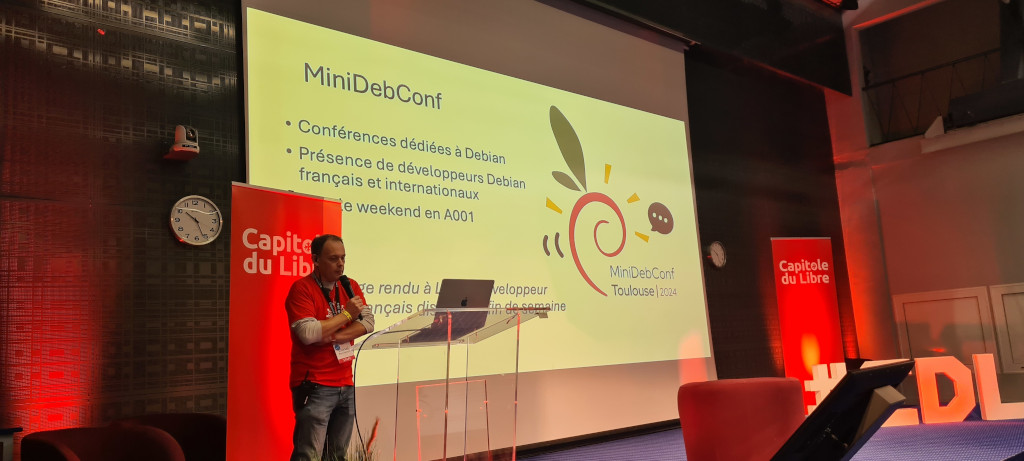
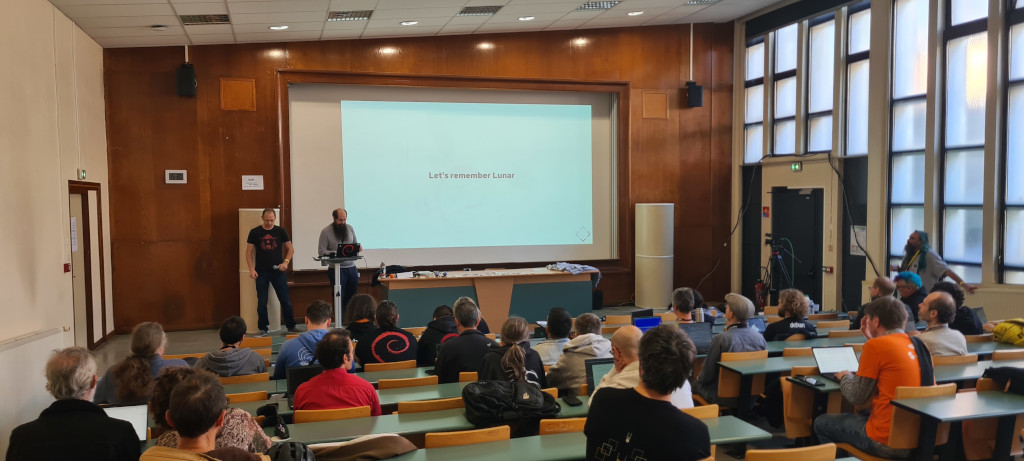
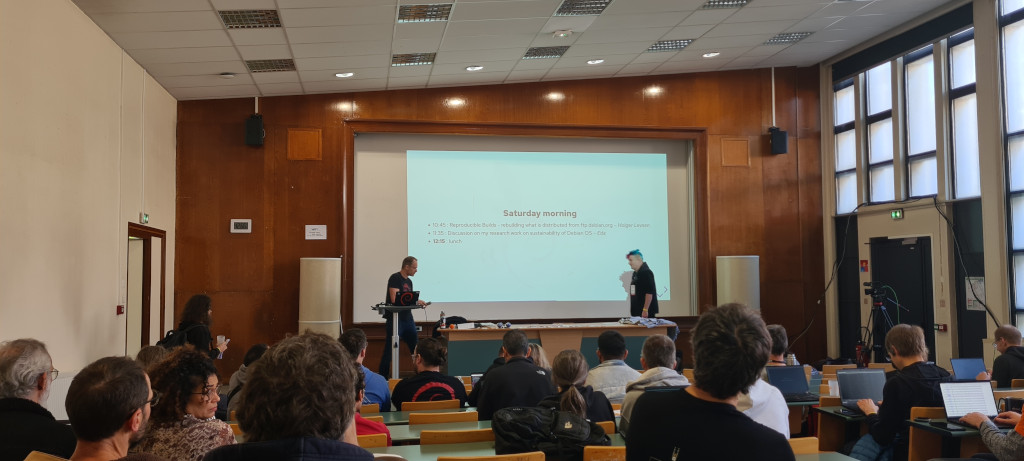
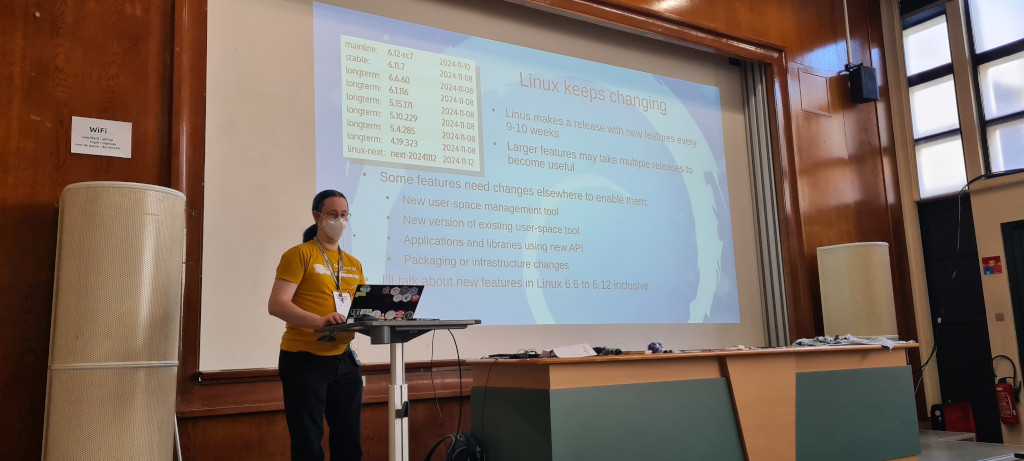
Then, on Saturday, November 16, and Sunday, November 17, 2024, the MiniDebConf took place at ENSEEIHT as part of the Capitole du Libre event. The conference kicked off on Saturday morning with an opening session by Jérémy Lecour, which included a tribute to Lunar (Nicolas Dandrimont). This was followed by Reproducible Builds – Rebuilding What is Distributed from ftp.debian.org (Holger Levsen) and Discussion on My Research Work on Sustainability of Debian OS (Eda). After lunch at the Capitole du Libre food trucks, the intense afternoon schedule began: What’s New in the Linux Kernel (and What’s Missing in Debian) (Ben Hutchings), Linux Live Patching in Debian (Santiago Ruano Rincón), Trixie on Mobile: Are We There Yet? (Arnaud Ferraris), PostgreSQL Container Groups, aka cgroups Down the Road (Cédric Villemain), Upgrading a Thousand Debian Hosts in Less Than an Hour (Jérémy Lecour and myself), and Using Debusine to Automate Your QA (Stefano Rivera & co).
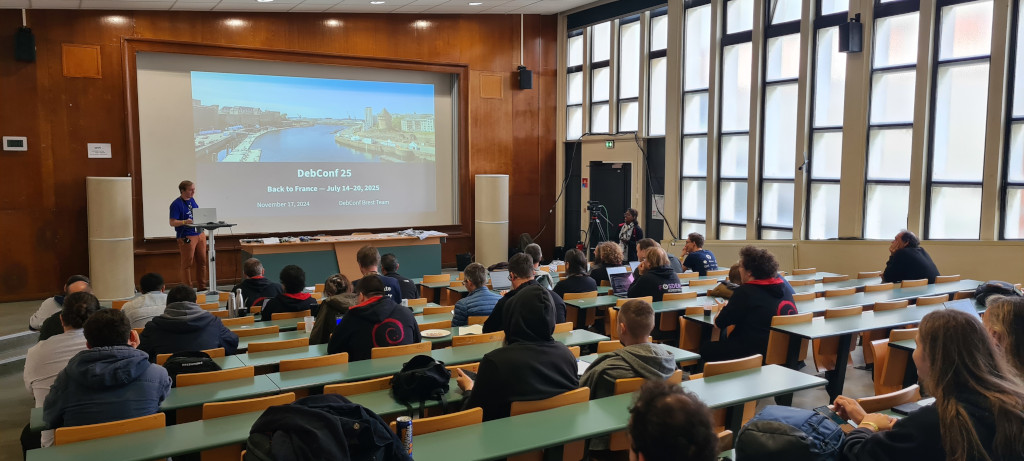
Sunday marked the second day, starting with a presentation on DebConf 25 (Benjamin Somers), which will be held in Brest in July 2025. The morning continued with talks: How LTS Goes Beyond LTS (Santiago Ruano Rincón & Roberto C. Sánchez), Cross-Building (Helmut Grohne), and State of JavaScript (Bastien Roucariès). In the afternoon, there were Lightning Talks, PyPI Security: Past, Present & Future (Salvo “LtWorf” Tomaselli), and the classic Bits from DPL (Andreas Tille), before closing with the final session led by Pierre-Elliott Bécue.
All talks are available on video (a huge thanks to the amazing DebConf video team), and many thanks to our sponsors (Viridien, Freexian, Evolix, Collabora, and Data Bene). A big thank-you as well to the entire Capitole du Libre team for hosting and supporting us… see you in Brest in July 2025!
Articles about (or mentioning) MiniDebConf Toulouse:
- A Mini Adventure at MiniDebConf Toulouse
- Bits from MiniDebConf Toulouse 2024
- Reproducible Builds: November 2024 Updates
- Bits from the DPL: December 2024
- Chris Watson’s Blog: November 2024 Activity
- Freexian Blog: Debian Contributions November 2024
LostCarPark Drupal Blog: Drupal Advent Calendar day 19 - Marketing Track
Welcome back for day 19 of the Drupal Advent Calendar, and today we are welcoming Suzanne Dergacheva and Will Huggins to tell us about the marketing of Drupal CMS.
The Starshot marketing track has been focused on designing the website content and journeys that will promote Drupal CMS, attracting new audiences of marketers, designers and content creators that may never have previously considered Drupal. You can see the first wave of this content.
As we move towards the launch on 15th January 2025, we will be adding to this content to build a compelling narrative that positions Drupal CMS as the…
TagsBenjamin Mako Hill: Being a bread torus
A concerned nutritional epidemiologist in Tokyo realizes that if you are what you eat, that means…
It’s a similar situation in Seoul, albeit with less oil and more confidence.
New: the Fast Sketch Plugin for Krita
Together with Intel, we have been working a new plugin for Krita: the fast sketch plugin, or maybe, better, a fast inking plugin. This is an experimental plugin that makes it (sometimes) possible to automatically ink a sketch, using neural networks.
This plugin uses models to figure out how to ink a sketch: the included models were trained on openly available data: there was no scraping or stealing involved! The plugin comes with a manual that explains how to get the scripts you can use to create a model trained on your own data: what you need are before and after images of your sketch and your uncolored inked drawing, and the training software can run on your own hardware (it will take a lot of time, though).
Throughout the development process we've been discussing this plugin with artists on the Krita Artists forum.
Artwork by @BeARToys (CC BY-SA)
The plugin can be downloaded and extracted in a Windows Krita 5.2.6 folder and should then be enabled in the plugin manager in Krita's settings dialog.
There is also a download of Krita 5.3.0 pre-alpha available that includes the plugin for Windows and Linux. Currently, we don't have a working MacOS version ready, and since the plugin is implemented in Python, there will be no Android packages.
Download Windows- Plugin: Fast Sketch Plugin 1.0.2 FastSketchPlugin1.0.2.zip
- Portable zip file: Krita 5.3.0 pre-alpha krita-x64-5.3.0-prealpha-cdac9c31.zip
- 64 bits Linux: krita-x64-5.3.0-prealpha-cdac9c31.zip
Drupal Association blog: DrupalCon Atlanta 2025 - How to Convince Your Boss (Sample Letter Enclosed)
DrupalCon Atlanta 2025 is coming up, and you’re excited to attend. But there’s one small challenge—convincing your boss to approve the trip. Don’t worry, this guide will help you build a solid case. Let’s get started!
Why You Should Attend DrupalCon Atlanta 2025Your boss may ask if sending you to DrupalCon is a smart investment. But first, ask yourself: are you convinced? Here’s why attending DrupalCon Atlanta 2025 is an excellent idea for both you and your organization:
Learn New Skills- Training Sessions: Find out all you wanted to know about Drupal CMS, Drupal 11, headless architecture, and sharpen your skills with hands-on learning.
- Keynotes: Hear directly from leaders like Dries Buytaert (DriesNote) and others about the future of Drupal and the web.
- Sessions: Learn practical tips and solutions from experts.
- Networking: Connect with thousands of Drupal professionals who share your passion.
- Industry Summits: Join focused discussions in Higher Ed, Nonprofit, Government, Healthcare, and Community to find solutions to your challenges.
- Contribution Sprints: Learn how to contribute to Drupal even if you’re not a coder. This is a great way to give back to the community.
- Calling all event organizers! Receive one free ticket for every five attendees who register from your local association, camp, or community. When registering, be sure to identify which local Drupal camp, community, or association you are a member of.
Here’s a ready-made letter to help you seal the deal:
Dear [Boss’s Name],
I am writing to express my strong interest in attending DrupalCon 2025 from 24 to 27th March in Atlanta, Georgia. This is the premier event for Drupal professionals, and attending will significantly benefit my professional growth and our organization’s goals.
Here’s why my attendance at DrupalCon is a valuable investment:
- Skill Enhancement: Targeted training aligns with our projects, enhancing my expertise.
- Industry Insights: Networking at Industry Summits will keep us updated on best practices and innovative solutions.
- Strategic Vision: Keynotes, especially DriesNote, offer strategic insights vital for our long-term planning.
- Community Engagement: Networking with thousands of community members ensures immediate answers and collaborations.
- Role-Specific Learning: Connecting with peers in our specific roles provides insights into the latest in Drupal.
- Contribution Sprint: Active participation contributes to Drupal's strength, enhancing our company's reputation.
I am seeking approval for the associated expenditures, which include:
EXPENSE
AMOUNT
Airfare
Visa Fees (if required)
Ground Transportation
Hotel
Meals
Conference Ticket (and/or Summit/Training)
TOTAL EXPENSE
[Add this line if you’re traveling from overseas] The Drupal Association can issue an official letter of invitation to obtain a visa for my travel to the United States.
The Drupal Association can also issue a Certificate of Attendance for the conference if required for our records.
Please accept this proposal to attend, as I'm confident in the significant return we will receive for the small investment. For more information on the event, please visit the conference website: https://events.drupal.org/atlanta2025
I'm available to discuss this further at your earliest convenience.
Sincerely,
[Your Full Name]
[Your Position]
[Your Contact Information]
Django Weblog: Django 6.x Steering Council Election Results
The Steering Council for the Django 6.x release cycle will be:
- Carlton Gibson
- Emma Delescolle
- Frank Wiles
- Lily Foote
- Tim Schilling
Voting breakdown:
- 400 eligible voters
- 215 votes received (54%)
We had 400 eligible voters, and received 215 votes (54%). See the full voting breakdown on RankedVote.
Congratulations to the new council members! And thank you to all 12 candidates who stood for election, and everyone who took part in the voting.
—
For anyone looking for further opportunities to have their say on the future of Django, consider submitting our 2024 Django Developers survey, closing in 3 days.
Simon Josefsson: Guix Container Images for GitLab CI/CD
I am using GitLab CI/CD pipelines for several upstream projects (libidn, libidn2, gsasl, inetutils, libtasn1, libntlm, …) and a long-time concern for these have been that there is too little testing on GNU Guix. Several attempts have been made, and earlier this year Ludo’ came really close to finish this. My earlier effort to idempotently rebuild Debian recently led me to think about re-bootstrapping Debian. Since Debian is a binary distribution, it re-use earlier binary packages when building new packages. The prospect of re-bootstrapping Debian in a reproducible way by rebuilding all of those packages going back to the beginning of time does not appeal to me. Instead, wouldn’t it be easier to build Debian trixie (or some future release of Debian) from Guix, by creating a small bootstrap sandbox that can start to build Debian packages, and then make sure that the particular Debian release can idempotently rebuild itself in a reproducible way? Then you will eventually end up with a reproducible and re-bootstrapped Debian, which pave the way for a trustworthy release of Trisquel. Fortunately, such an endeavour appears to offer many rabbit holes. Preparing Guix container images for use in GitLab pipelines is one that I jumped into in the last few days, and just came out of.
Let’s go directly to the point of this article: here is a GitLab pipeline job that runs in a native Guix container image that builds libksba after installing the libgpg-error dependency from Guix using the pre-built substitutes.
test-amd64-latest-wget-configure-make-libksba: image: registry.gitlab.com/debdistutils/guix/container:latest before_script: - lndir /gnu/store/*profile/etc/ /etc - rm -f /etc/group - groupadd --system guixbuild - for i in $(seq -w 1 10); do useradd -g guixbuild -G guixbuild -d /var/empty -s $(command -v nologin) -c "Guix build user $i" --system guixbuilder$i; done - export HOME=/ - export LANG=C.UTF-8 - guix-daemon --disable-chroot --build-users-group=guixbuild & - guix archive --authorize < /share/guix/ci.guix.gnu.org.pub - guix archive --authorize < /share/guix/bordeaux.guix.gnu.org.pub - guix describe - guix package -i libgpg-error - GUIX_PROFILE="//.guix-profile" - . "$GUIX_PROFILE/etc/profile" script: - wget https://www.gnupg.org/ftp/gcrypt/libksba/libksba-1.6.7.tar.bz2 - tar xfa libksba-1.6.7.tar.bz2 - cd libksba-1.6.7 - ./configure - make V=1 - make check VERBOSE=t V=1You can put that in a .gitlab-ci.yml and push it to GitLab and you will end up with a nice pipeline job output.
As you may imagine, there are several things that are sub-optimal in the before_script above that ought to be taken care of by the Guix container image, and I hope to be able to remove as much of the ugliness as possible. However that doesn’t change that these images are useful now, and I wanted to announce this work to allow others to start testing them and possibly offer help. I have started to make use of these images in some projects, see for example the libntlm commit for that.
You are welcome to join me in the Guix container images for GitLab CI/CD project! Issues and merge requests are welcome – happy hacking folks!
MidCamp - Midwest Drupal Camp: Just 25 days to go until the call for speakers closed for MidCamp 2025
As the holiday season approaches, we’re excited to include you—our future speakers! You may have heard we have a guest speaker this year, so submit your session and be on the lineup with Drupal founder, Dries Buytaert 🤩
Call for SpeakersSince 2014, MidCamp has hosted over 300 amazing sessions, and we’re ready to add your talk to that legacy. We’re seeking presentations for all skill levels—from Drupal beginners to advanced users, as well as end users and business professionals. Check out our session tracks for full details on the types of talks we’re looking for.
Missed the last Session Proposal Workshop? Don't worry, we have another one in January right before the submission deadline!
- January 7, 2025: Last Change Session Proposal Workshop - Crafting an Outstanding Proposal
- Session Proposals Open: November 25, 2024
- Proposal Deadline: January 12, 2025
- Speakers Notified: Week of February 17, 2025
- MidCamp Sessions: May 20-21, 2025
Looking to connect with the Drupal community? Sponsoring MidCamp is the way to do it! With packages starting at $600, there are opportunities to suit any budget. Whether you’re recruiting talent, growing your brand, or simply supporting the Drupal ecosystem, MidCamp sponsorship offers great value.
Act early to maximize your exposure!
Learn more about sponsorship opportunities
Stay in the LoopDon’t miss a beat!
- Join us on MidCamp Slack to chat and get updates.
- Follow us on socials, including Bluesky and Mastodon, for announcements and news.
Keep an eye on our news page and subscribe to our newsletter for updates on the venue, travel options, social events, and speaker announcements.
Ready to submit your session? Let’s make MidCamp 2025 unforgettable!
Maui Release Briefing #7
Today, we bring you a report on the brand-new release of the Maui Project.
CommunityTo follow the Maui Project’s development or to just say hi, you can join us on our Telegram group @mauiproject
We are present on X and Mastodon:
Thanks to the KDE contributors who have helped to translate the Maui Apps and Frameworks!
Downloads & SourcesYou can get the stable release packages [APKs, AppImage, TARs] directly from the KDE downloads server at https://download.kde.org/stable/maui/
All of the Maui repositories have the newly released branches and tags. You can get the sources right from the Maui group: https://invent.kde.org/maui
MauiKit 4 Frameworks & AppsWith the previous version released, MauiKit Frameworks and Maui Apps were ported over to Qt6, however, some regressions were introduced and those bugs have now been fixed with this new revision version.
Currently, there are over 10 frameworks, with two new ones recently introduced. They all, for the most part, have been fully documented, and although, the KDE doxygen agent has some minor issues when publishing some parts, you can find the documentation online at https://api.kde.org/mauikit/ (and if you find missing parts, confusing bits, or overall sections to improve – you can open a ticket at any of the framework repos and it shall be fixed shortly after)
A brief list of changes and fixes introduced to the frameworks are the following:
For MauiKit Controls
- MauiKit is now no longer dependent on MauiKit-Style, so any other QQC2 style can be used with Maui Apps (other styles are not supported).
- MauiKit documentation has been updated with notes on the new attached controls properties – https://api.kde.org/mauikit/mauikit/html/classControls.html
- MauiKit fixes the toast area notifications. The toast notifications can now take multiple contextual actions.
- MauiKit Demo app has been updated to showcase all the new control properties
- New controls: TextField, Popup, DropDownIndicator,
- MauiKit fixes the template delegates and the IconItem control
- MauiKit fixes to the Page autohide toolbars
- Update style and custom controls to use MauiKit Controls’ attached properties for level, status, title, etc.
- Display keyboard shortcut info in the MenuItems
- Update MauiKit Handy properties for isMobile, isTouch, and hasTransientTouchInput and fixes to the lasso selection on touch displays
- Added more resize areas to the BaseWindow type
- Check for system color scheme style changes and update accordingly. This works on other systems besides Plasma or Maui, such as Gnome or Android
- The type AppsView has been renamed to SwipeView, and AppViewLoader to SwipeViewLoader
- Update MauiKit-Style to support MauiKit Controls attached properties and respect the flat properties in buttons
- Fixes to the MauiKit bug in the GridBrowser scrollbars policy
- Fixes to the action buttons layout in Dialog and PopupPage controls
- Refresh the icon when a system icon-theme change is detected – a workaround for Plasma is used and for other systems the default Qt API
For the MauiKit Frameworks
- FileBrowsing fixes bugs with the Tagging components
- Fixes to the models using dates. Due to a bug in Qt getting a file date time is too slow unless the UTC timezone is specified
- Update FileBrowsing controls to use the latest Mauikit changes
- Added a new control: FavButton, to mark files as favorites using the Tagging component quickly
- Update and fixes to the regressions in the other frameworks
- ImageTools fixes the OCR page
- TextEditor fixes the line numbers implementation.
All of the frameworks are now at version 4.0.1
All of the apps have been reviewed for the regressions previously introduced in the porting to Qt6; those issues have been solved and a few new features have been added, such as:
- Station, now allows opening selected links externally
- Index fixes to the file previewer and support for quickly tagging files from the previewer
- Vvave fixes to the minimode window closing
- Update the apps to remove usage of the Qt5Compat effects module
- Fix issues in Fiery, Strike, and Agenda
- Fix the issue of selecting multiple items in the apps not working
- Clip fixes to the video thumbnail previews and the opening file dialog
- Implement the floating viewer for Pix, Vvave, Shelf, and Clip for consistency
- Correctly open the Station terminal at the current working directory when invoked externally
- Among many few other details
** Index, Vvave, Pix, Nota, Buho, Station, Shelf, Clip, and Communicator versions have been bumped to 4.0.1
*** Strike and Fiery browser versions have been bumped to 2.0.1
**** Agenda and Arca versions have been bumped to 1.0.1
And as for Bonsai, Era, and other applications still under development, there is still not a ported version to Qt6 as of now
Maui Shell
Although Maui Shell has been ported over to Qt6 and is working with the latest MauiKit4, a lot of pending issues are still present and being worked on. The next release will be dedicated fully on Maui Shell and all of its subprojects, such as Maui Settings, Maui Core, CaskServer, etc.
That’s it for now. Until the next blog post, that will be a bit closer to the 4.0.1 stable release.
Release scheduleThe post Maui Release Briefing #7 appeared first on MauiKit — #UIFramework.
Freelock Blog: Make integrations with other services more resilient using a Queue
One downside of automating things is dealing with outages. Sometimes services go down, and are not available for some period of time. When this happens, how does it impact your automation?
If you don't design your automation carefully, you might lose the data entirely. Or get spammed by hundreds of submissions when it comes back up. Handling this correctly does end up needing some understanding of how the automation works, as well as any quirks of the remote system.
Real Python: Get Started With Django User Management
Django user management allows you to integrate user authentication and management into your web applications. By using Django, you can leverage the framework’s built-in authentication system to manage user registration, login, and logout. With just a few additional templates, you can enable users to reset and change their passwords independently.
This tutorial guides you through setting up a basic user management system with Django that you can extend later. You’ll learn how to create a dashboard, implement user registration, and connect authentication URLs, as well as customize templates for login, logout, and password management.
By the end of this tutorial, you’ll understand that:
- Django’s user authentication is a built-in authentication system that comes with pre-configured URLs and views.
- Authentication verifies user identity, while authorization determines user permissions within Django.
- Registering as a user in Django requires setting up views, templates, and URLs.
- Creating a login system in Django involves built-in authentication views and creating custom templates.
- Resetting passwords in Django involves configuring email backends for sending reset links.
This tutorial focuses on user authentication and user management. If you want to learn more about permissions and groups, then you can check out the tutorial about managing users in Django’s admin site.
Get Your Code: Click here to download the free sample code you’ll use to set up a basic user management system with Django .
Start With the BasicsFor bigger projects, you may consider creating a custom user model. In this tutorial, you’ll be using Django’s built-in user model. This is a great place to start to familiarize yourself with user authentication in general.
In this section of the tutorial, you’ll first create a small Django project with a users app. Then, you’ll make some adjustments to Django’s password validator to make your development more convenient. Finally, you’ll create an admin user to verify your setup.
Set Up the Django ProjectIt’s a good idea to use a virtual environment when working with Python projects. That way, you can always be sure that the python command points to the right version of Python and that the modules required by your project have the correct versions. To read more about creating virtual environments, check out Python Virtual Environments: A Primer.
Select your operating system below and use your platform-specific command to set up a virtual environment:
Windows PowerShell PS> python -m venv venv\ PS> .\venv\Scripts\activate (venv) PS> Copied! Shell $ python -m venv venv/ $ source venv/bin/activate (venv) $ Copied!With the above commands, you create and activate a virtual environment named venv by using Python’s built-in venv module. The parenthesized (venv) in front of the prompt indicate that you’ve successfully activated the virtual environment.
Now that the environment is ready, you can install Django, start a new project, and create an application to store all your user management code:
Shell (venv) $ python -m pip install Django (venv) $ django-admin startproject user_auth_intro (venv) $ cd user_auth_intro (venv) $ python manage.py startapp users Copied!In this example, you name your project user_auth_intro and your application users. To include the users app in your Django project, you need to add a reference to the app’s configuration class at the beginning of the INSTALLED_APPS list in settings.py:
Python user_auth_intro/settings.py 1# ... 2 3INSTALLED_APPS = [ 4 "users.apps.UsersConfig", 5 "django.contrib.admin", 6 "django.contrib.auth", 7 "django.contrib.contenttypes", 8 "django.contrib.sessions", 9 "django.contrib.messages", 10 "django.contrib.staticfiles", 11] 12 13# ... Copied!By adding users.apps.UsersConfig, you let Django know that the users app you just created exists. If you have a look at the INSTALLED_APPS list, then you’ll spot Django’s default authentication system on line 6. In django.contrib.auth, Django stores the core of its authentication framework and the default models that you’ll build on later.
Next, apply the migrations and run the Django development server:
Shell (venv) $ python manage.py migrate (venv) $ python manage.py runserver Copied!These commands create all default models in the database and start the Django development server.
Deactivate the Password ValidatorBy default, Django enforces strong passwords to make user accounts less prone to attacks. Since you’ll need to change passwords often throughout this tutorial, figuring out a strong password each time would be inconvenient.
Read the full article at https://realpython.com/django-user-management/ »[ Improve Your Python With 🐍 Python Tricks 💌 – Get a short & sweet Python Trick delivered to your inbox every couple of days. >> Click here to learn more and see examples ]
Web Wash: Build Layouts with Bootstrap and Layout Builder in Drupal
The above video will explore how to effectively utilize Bootstrap and Layout Builder to create powerful, responsive layouts in Drupal. Whether you’re a novice or looking to enhance your skills, this guide will walk you through the necessary steps to set up your Bootstrap theme and leverage the full potential of Layout Builder.
Layout Builder in Drupal lets users create custom layouts visually. Combined with Bootstrap’s grid system and components, it makes building responsive, attractive designs easy.
Bootstrap Layout Builder module lets you quickly access Bootstrap classes via Layout Builder to customize containers, spacing, and animations.
Real Python: Quiz: How to Remove Items From Lists in Python
In this quiz, you’ll test your understanding of How to Remove Items From Lists in Python.
By working through this quiz, you’ll revisit the different approaches to removing items from a list in Python, including .pop(), .remove(), the del statement, and more.
[ Improve Your Python With 🐍 Python Tricks 💌 – Get a short & sweet Python Trick delivered to your inbox every couple of days. >> Click here to learn more and see examples ]
LostCarPark Drupal Blog: Drupal Advent Calendar day 18 - Content Publishing Workflows
Welcome back for day 18, as we enter the last week to the big day - I mean the arrival of Father Christmas, not the launch of Drupal CMS!
Today we are looking at publishing workflows in Drupal CMS.
Something that many content management systems have offered out-of-the-box is the ability to specify a date and time when a piece of content will be published. This has also been available in Drupal for a very long time, but has always required installation of extra modules - until now.
With Drupal CMS, every content type created by the base install, and any recipes within Drupal CMS, automatically…
TagsEuroPython: EuroPython 2025 is Staying in Prague 🎉 - Join as a Contributor!
After an amazing year in Prague, we’re thrilled to announce that EuroPython 2025 is heading back to this beautiful city! 🎉 Mark your calendars for another epic week of learning, collaboration, and community vibes.
- 🗓️ Monday & Tuesday (14th-15th): Tutorials & Workshops
- 🎤 Wednesday to Friday (16th-18th): Main Conference Talks
- 👨💻 Saturday & Sunday (19th-20th): Community Sprints
We’d love to hear your thoughts! We’ve put together a short form with just three quick questions—it’ll take less than a few minutes to complete. Your input will help us make EuroPython 2025 an amazing experience for everyone!
👉 Form: https://forms.gle/Ne2FFd26MVqHKNa16
🤝 Join Us as a Contributor!EuroPython thrives on the energy of passionate volunteers. 💪 Whether you’re experienced or joining for the first time, we’d love to have you on board!
🗓️ Deadline to Apply: Sunday, 22nd
📝 Fill out the form: https://forms.gle/kY7jqSJTjEhFccWJ6
EuroPython is one of Europe’s largest Python community conferences, and we couldn’t do it without our amazing sponsors! 🤝 Interested? Reach out to us at sponsoring@europython.eu.
📣 Stay Updated!🔗 Visit our website: https://ep2025.europython.eu/
📬 Subscribe to our newsletter for the latest updates
We can’t wait to see you in Prague next year! 🇨🇿✨
Mia, on behalf of the EuroPython Organizing Team
Tag1 Consulting: Tag1 D7ES Adds Full Support for CKEditor 5 in Drupal 7
CKEditor 4.x reached end-of-life (EOL) in June 2023, creating a significant challenge for Drupal 7 users: their trusted WYSIWYG editor now has known vulnerabilities that are no longer patched in the open-source community version. Upgrading to v5 is essential for maintaining security, but the only option has been paid support from CKSource. All Tag1's Drupal 7 Extended Support Service plans now include free CKEditor v5 support, providing significantly more value at a much lower cost! Planning to run D7 beyond its January 2025 end-of-life? Sign up for Tag1 D7ES to keep your site secure with ongoing core and module updates, including critical compatibility updates for CKEditor and jQuery. Learn more at D7ES.Tag1.com. Do your sites run on Pantheon.io? Tag1 is the exclusive provider of D7ES for Pantheon.io. All Pantheon users get the self-service version of Tag1 D7ES at no additional cost. Pantheon users looking to upgrade to the premium or enterprise Tag1 D7ES service can do so online at https://d7es.tag1.com/plans. ## Enter CKEditor 5 for Drupal 7 Through the Tag1 D7ES Service, which enables Drupal 7 sites to continue operating securely after D7 goes end-of-life in January 2025, Tag1 developed a new module that brings CKEditor 5 support to Drupal...
michaelemeyers Wed, 12/18/2024 - 10:26Pages
Recent Publications
- Managing Hidden Dependencies in OO Software: a Study Based on Open Source Projects
- Open Source Communities as Liminal Ecosystems
- Investigating developers' email discussions during decision-making in Python language evolution
- Developers, Quality Control and Download Volume in Open Source Software (OSS) Projects