
Planet Python
Test and Code: 215: Staying Technical as a Manager
Software engineers that move into leadership roles have a struggle between learning leadership skills, maintaining technical skills, and learning new leadership and technical skills.
Matt Makai went from individual contributor to developer relations to leadership in devrel.
We discuss how to stay technical, as well as dive into some results of his studies in how companies use developer relationship channels.
Sponsored by PyCharm Pro
- Use code PYTEST for 20% off PyCharm Professional at jetbrains.com/pycharm
- First 10 to sign up this month get a free month of AI Assistant
- See how easy it is to run pytest from PyCharm at pythontest.com/pycharm
The Complete pytest Course
- For the fastest way to learn pytest, go to courses.pythontest.com
- Whether your new to testing or pytest, or just want to maximize your efficiency and effectiveness when testing.
Kushal Das: django-ca, HSM and PoC
django-ca is a feature rich certificate authority written in Python, using the django framework. The project exists for long, have great documentation and code comments all around. As I was looking around for possible CAs which can be used in multiple projects at work, django-ca seems to be a good base fit. Though it has still a few missing parts (which are important for us), for example HSM support and Certificate Management over CMS.
I started looking into the codebase of django-ca more and meanwhile also started cleaning up (along with Magnus Svensson) another library written at work for HSM support. I also started having conversion with Mathias (who is the author of django-ca) about this feature.
Thanks to the amazing design of the Python Cryptography team, I could just add several Private key implementations in our library, which in turn can be used as a normal private key.
I worked on a proof of concept branch (PoC), while getting a lot of tests also working.
===== 107 failed, 1654 passed, 32 skipped, 274 errors in 286.03s (0:04:46) =====Meanwhile Mathias also started writing a separate feature branch where he is moving the key operations encapsulated inside of backends, and different backends can be implemented to deal with HSM or normal file based storage. He then chatted with me on Signal over 2 hours explaining the code and design of the branch he is working on. He also taught me many other django/typing things which I never knew before in the same call. His backend based approach makes my original intention of adding HSM support very easy. But, it also means at first he has to modify the codebase (and the thousands of test cases) first.
I am writing this blog post also to remind folks that not every piece of code needs to go to production (or even merged). I worked on a PoC, that validates the idea. And then we have a better and completely different design. It is perfectly okay to work hard for a PoC and later use a different approach.
As some friends asked on Mastodon, I will do a separate post about the cleanup of the other library.
Real Python: The Real Python Podcast – Episode #193: Wes McKinney on Improving the Data Stack & Composable Systems
How do you avoid the bottlenecks of data processing systems? Is it possible to build tools that decouple storage and computation? This week on the show, creator of the pandas library Wes McKinney is here to discuss Apache Arrow, composable data systems, and community collaboration.
[ Improve Your Python With 🐍 Python Tricks 💌 – Get a short & sweet Python Trick delivered to your inbox every couple of days. >> Click here to learn more and see examples ]
Wingware: Wing Python IDE Version 10.0.2 - February 23, 2024
Wing 10.0.2 adds AI chat and other improvements to Wing Pro's AI assisted development capabilities, quick toggling between debug stack frames for project and test files, better UI for auto-imports in the auto-completer, and other improvements for the debugger, Diff/Merge tool, editor, & other features.
See the change log for details.
Download Wing 10 Now: Wing Pro | Wing Personal | Wing 101 | Compare Products
What's New in Wing 10
AI Assisted Development
Wing Pro 10 takes advantage of recent advances in the capabilities of generative AI to provide powerful AI assisted development, including AI code suggestion, AI driven code refactoring, description-driven development, and AI chat. You can ask Wing to use AI to (1) implement missing code at the current input position, (2) refactor, enhance, or extend existing code by describing the changes that you want to make, (3) write new code from a description of its functionality and design, or (4) chat in order to work through understanding and making changes to code.
Examples of requests you can make include:
"Add a docstring to this method" "Create unit tests for class SearchEngine" "Add a phone number field to the Person class" "Clean up this code" "Convert this into a Python generator" "Create an RPC server that exposes all the public methods in class BuildingManager" "Change this method to wait asynchronously for data and return the result with a callback" "Rewrite this threaded code to instead run asynchronously"Yes, really!
Your role changes to one of directing an intelligent assistant capable of completing a wide range of programming tasks in relatively short periods of time. Instead of typing out code by hand every step of the way, you are essentially directing someone else to work through the details of manageable steps in the software development process.
Support for Python 3.12Wing 10 adds support for Python 3.12, including (1) faster debugging with PEP 669 low impact monitoring API, (2) PEP 695 parameterized classes, functions and methods, (3) PEP 695 type statements, and (4) PEP 701 style f-strings. Wing 9 added support for Python 3.11.
Poetry Package ManagementWing Pro 10 adds support for Poetry package management in the New Project dialog and the Packages tool in the Tools menu. Poetry is an easy-to-use cross-platform dependency and package manager for Python, similar to pipenv.
Ruff Code Warnings & ReformattingWing Pro 10 adds support for Ruff as an external code checker in the Code Warnings tool, accessed from the Tools menu. Ruff can also be used as a code reformatter in the Source > Reformatting menu group. Ruff is an incredibly fast Python code checker that can replace or supplement flake8, pylint, pep8, and mypy.
Try Wing 10 Now!
Wing 10 is a ground-breaking new release in Wingware's Python IDE product line. Find out how Wing 10 can turbocharge your Python development by trying it today.
Downloads: Wing Pro | Wing Personal | Wing 101 | Compare Products
See Upgrading for details on upgrading from Wing 9 and earlier, and Migrating from Older Versions for a list of compatibility notes.
PyBites: Stuck in import hell? Walk your way out.
Cue the theme song from The Fresh Prince of Bel Air.
This is a story that turns out well.
But my code got stuck in import hell.
I tried to teach my students all about pytest.
Instead, for two days, I was sent on a debugging quest.
I teach middle school students how to code in python. I reckoned it was time to talk about the datetime module. Students generally love projects that they can connect back to themselves. So I thought a great way to introduce datetime was to have python calculate how many days the user has been alive, what day of the week they were born, and, of course, calculate their age.
As our script grew in complexity, I figured it was time to start testing. We had begun looking at pytest on our last project. I thought to myself, “how hard could it be?” Refactor into a couple of functions, run a couple tests, and have students submit a nice little project! Famous last words…
It’s all fun and games until you have room full of people watching you code live. Oh yeah, and I’m supposed to the be expert in the room who is responsible for their education. Is it hot in here, or is it just me?
The Original ScriptLet us begin by looking at the original script.
import datetime birthday = datetime.datetime(1986, 5, 19) today = datetime.datetime.today() days = (today - birthday).days age = days // 365 print(f"You were born on {birthday:%B %d, %Y}. It was a {birthday:%A}. You have been alive for {days:,} days and are {age} years old.")RESULTS:
You were born on May 19, 1986. It was a Monday. You have been alive for 13,791 days and are 37 years old.We were off to a good start. Students had a great time playing around with this. Most of them are somewhere around 4,000 days old, so I definitely took some heat for having an entire extra decimal place for my days, followed by comments like, “Wow, you’re older than my dad and he’s old.” Thanks kids.
Then, one student had a great question, “Can we make it calculate the days until our next birthday?” Why, yes we can! But I had not accounted for this level of complexity. We needed a compound conditional, something they had never seen before.
import datetime birthday = datetime.datetime(1986, 5, 19) today = datetime.datetime.today() # Determine if the birthday has already happened this year. if (today.month == birthday.month and today.day > birthday.day or today.month > birthday.month): next_birthday = datetime.datetime( today.year + 1, birthday.month, birthday.day, ) else: next_birthday = datetime.datetime( today.year, birthday.month, birthday.day, ) days = (today - birthday).days age = days // 365 days_till_next_bd = (next_birthday - today).days print(f"You were born on {birthday:%B %d, %Y}. It was a {birthday:%A}. You have been alive for {days:,} days and are {age} years old. There are {days_till_next_bd} days until your next birthday.")RESULTS:
You were born on May 19, 1986. It was a Monday. You have been alive for 13,790 days and are 37 years old. There are 89 days until your next birthday.At this point, it was already starting to get a little complex. Keep in mind, I was teaching a room full of 41 students who are 11–12 years old.
But we pushed on. So we asked how else can we make this better? Well, at the moment, it only works for a single birthday. It would be nice to ask the user what their birthday is.
It was pretty much the end of the class period, so we pushed off refactoring for the next day.
Refactoring Into FunctionsThe second day, we decided that we start moving chunks of code into functions. We identified three major components of our code.
- It should build a datetime.datetime object for the birthday.
- It should calculate the days until the next birthday.
- It should compile all that information into the paragraph.
After figuring out the main thought for each function we started asking ourselves, “How can we make this better?” Oh, make it interactive with input. We could do some data validation to ensure if the user makes a mistake, they can try again. We ended up with the following birthday.py module.
import datetime def build_birthday() -> datetime.datetime: """Build a datetime object for the user's birthday.""" while True: try: year = int(input("What year were you born? ")) month = int(input("What month were you born? ")) day = int(input("What day were you born? ")) except ValueError: print("Please enter numbers only") continue try: return datetime.datetime(year, month, day) except ValueError: print("Invalid date, please try again.") continue def calc_days_till_next_bd( today: datetime.datetime, birthday: datetime.datetime, ) -> int: """Calculate the number of days between today and birthday.""" if (today.month == birthday.month and today.day > birthday.day or today.month > birthday.month): next_birthday = datetime.datetime( today.year + 1, birthday.month, birthday.day, ) else: next_birthday = datetime.datetime( today.year, birthday.month, birthday.day, ) return (next_birthday - today).days def create_bd_paragraph(birthday: datetime.datetime) -> str: """Create a paragraph about the user's birthday that includes days, age, and days until their next birthday.""" today = datetime.datetime.today() days = (today - birthday).days age = days // 365 days_till_next_bd = calc_days_till_next_bd(today, birthday) return f"You were born on {birthday:%B %d, %Y}. It was a {birthday:%A}. You have been alive for {days:,} days and are {age} years old. There are {days_till_next_bd} days until your next birthday." birthday = build_birthday() paragraph = create_bd_paragraph(birthday) print(paragraph)Then, we called the functions we just created at the end of the program to get the same output we had at the beginning of all this.
Time to TestIt is worth mentioning that all of my students have a school issued Chromebook. That means we have to code using web–based platforms. My favorite is replit and that is what were using for this project. This will become import in a minute.
At this point, I thought it would useful to start testing. Students have been exposed to pytest already, but still very new. Since the first function returned a datetime.datetime object, it would be a great way to introduce the isinstance function. Here is where the problems started.
Since we are using input, I had to talk about mocking and patching. I gave a short lecture on the idea of mocking and how we are going provide a values in our test so the “wait for the user to input data” part is skipped. So we headed back to our code in replit, installed pytest, and created the test_birthday.py module. I always forget the exact syntax, so I did a quick google search for testing multiple inputs And we started coding.
import datetime from unittest.mock import patch from birthday import build_birthday def test_build_bd(): with patch("builtins.input", side_effect=["2000", "01", "02"]): actual = build_birthday() assert isinstance(actual, datetime.datetime) assert actual == datetime.datetime(2000, 1, 2)Beautiful right? I’m showing 12 year olds how to mock input in pytest. I. Am. Awesome. Full of confidence, I tell the students, “Alright everyone, head over to the shell and run pytest”.
The ProblemInstead of that dopamine hit I get from seeing 1 passed written in green, we got hit with this.
======================================= ERRORS ======================================== __________________________ ERROR collecting test_birthday.py __________________________ test_birthday.py:4: in <module> from birthday import build_birthday, calc_days_till_next_bd birthday.py:46: in <module> birthday = build_birthday() birthday.py:8: in build_birthday year = int(input("What year were you born? ")) .pythonlibs/lib/python3.12/site-packages/_pytest/capture.py:205: in read raise OSError( E OSError: pytest: reading from stdin while output is captured! Consider using `-s`. ----------------------------------- Captured stdout ----------------------------------- What year were you born? =============================== short test summary info =============================== ERROR test_birthday.py - OSError: pytest: reading from stdin while output is captured! Consider using `-s`. !!!!!!!!!!!!!!!!!!!!!!! Interrupted: 1 error during collection !!!!!!!!!!!!!!!!!!!!!!!! ================================== 1 error in 0.70s ===================================An OSError? Ok, that is interesting. Perhaps I spelled something wrong? So I went back and checked. Nope, everything looks good. Maybe, it’s an import issue since we are using replit. So I tried quickly refactoring to import birthday instead of from birthday import build_birthday. Nope didn’t work. Maybe, we can’t mock in replit from some reason? So I copy the code, and the tests to my work computer (windows). Nope, and I get the same OSError.
Now, if I followed the advice in the error message and ran pytest with the -s flag, I could provide input in the shell, and then the test would pass. I was so confused. Clearly (I thought) it had to be an issue with the way I was mocking the input.
At this point I had 41 adolescents getting bored as I floundered and had no idea how to fix the issue. So I turned to the students, “Alright everyone, I’m not sure how to fix this problem I have a couple of ideas, but it might take awhile. Go ahead an work on one of our ongoing activities.” 10 years of teaching has taught me to always have something students could work on at any time. Go solve some PyBites, work on brilliant.org, do some typing practice.
Now, feeling embarrassed, frustrated, and still in charge of all the students I continued trying to debug. I tried use a patch as a decorator like I had down in previous projects. Nope, didn’t work. Everything I tried manipulating in the testing module didn’t work. I was stuck for the rest of the period and the day for that matter.
Once I got home, I figured I would try again on my home machine (macos). So I copied the code and tests, and ran it again. I continued to get the same error. I’m frantically scouring the internet looking for clues for dealing with OSError. The only information I could find was on errors when trying to open and read files. Nothing really helpful with the context of testing and input. I finally gave up and took the dog for a walk.
EurekaWe had started the project on a Friday. The problem happened on a Monday. Because we are on a block schedule, I didn’t see the same group of students again until Wednesday. Tuesday I didn’t work directly on the problem. I was scared busy and didn’t have time in the evening to work on in. Coming into the class on Wednesday, my plan was to skip over the testing the build_birthday function, and jump to the testing the calc_days_till_next_bd function with isinstance.
We began class with a review of the code we had already written the previous class period. This led to this exchange (I’m paraphrasing and, possibly, projecting):
Student: I’ll stump him with this one. “Do we have to do this? This code is longer and more confusing than what we had at first.”
Me: Thinking I had the perfect response. “Well for one thing, it allows us give a name to a chunk of code. Instead of holding all the steps in our head at once, we give it a name, and then call that function.”
Student: “So we don’t have to do all the work, right?”
Me: “Technically, yes. We do not have to refactor everything into functions. But it helps to organize the code. It allows us to test the code to make sure it is doing what we think it is doing.”
Student: Stares skeptically. “You mean the part that isn’t working and you don’t know how to fix?”
Me: “Uh yeah…”
Student: “So why are we doing this?”
Me: “Ok let me try this again. So you see, as Monty reads your code he goes line by line. (Note for the reader: we use Stephen Gruppetta’s analogy of Monty and The White Room.) At the top of the code, we start by defining the functions. Once he has finished reading the through function definitions, he has read everything, built the function rooms, but hasn’t actually used the code in the functions. Our entire program can reduced down to three chunks. Look at the last three lines of our code. It essentially describes what our program does: 1) build the birthday object. 2) build the paragraph based on the birthday object. 3) print the paragraph…”
And that’s when it hit me. I had solved the problem without directly working on it.
The SolutionYou may have noticed that in the test, I wrote from birthday import build_birthday. While it may be tempting to think that style of importing only looks at the one function, the entire birthday.py module is read and executed. So when I run pytest, my testing module reads and executes datetime, unittest, and birthday. And what do the final three lines of birthday do?
birthday = build_birthday() paragraph = create_bd_paragraph(birthday) print(paragraph)It calls the build_birthday function, including the input calls, as it is being imported. This is before I can actually mock it. So my tests get hung up waiting for user input that never comes.
The solution was to use the if __name__ == "__main__": idiom.
if __name__ == "__main__": birthday = build_birthday() paragraph = create_bd_paragraph(birthday) print(paragraph)Whenever a python module is run, there is something called a global symbol table. Essentially, this is a dictionary with information about the module. You can see this dictionary by calling the globals function and printing the return value. Let’s see an example. Below I created a little sample module and ran it directly.
print(globals()) print() from pprint import pprint pprint(globals())RESULTS:
{'__name__': '__main__', '__doc__': None, '__package__': None, '__loader__': <class '_frozen_importlib.BuiltinImporter'>, '__spec__': None, '__annotations__': {}, '__builtins__': <module 'builtins' (built-in)>, '__file__': '<stdin>', '__cached__': None} {'__annotations__': {}, '__builtins__': <module 'builtins' (built-in)>, '__cached__': None, '__doc__': None, '__file__': '<stdin>', '__loader__': <class '_frozen_importlib.BuiltinImporter'>, '__name__': '__main__', '__package__': None, '__spec__': None, 'pprint': <function pprint at 0x1045b8d60>}First I called the globals function and printed a blank line. Then, I imported pprint so that it prints each item in the dictionary on its own line and called globals again. If you compare the first dictionary to at the second dictionary, you can see pprint is now in the global symbol table. So the global symbol table is dynamic and changes throughout the life of the program.
Next, look at the key '__name__' . The value is '__main__' . Whenever a module is run directly, for example by typing python3 module_name or by clicking the run button in your editor of choice, the '__name__' attribute is assigned the value '__main__' .
To get the dictionary below, I have placed a globals function call in the birthday.py module and printed the return value. Now, instead of running the module directly, I ran the testing module python test_birthday.py. When the birthday module is imported, the global symbol table still gets printed. Note, I edited a couple things in the dictionary like the specific locations on my hard drive, and I replaced the long "__builtins__" value with {...} .
{'__builtins__': {...}, '__cached__': ..., '__doc__': None, '__file__': '/path/to/birthday.py', '__loader__': <_frozen_importlib_external.SourceFileLoader object at 0x101117590>, '__name__': 'birthday', '__package__': '', '__spec__': ModuleSpec(name='birthday', loader=<_frozen_importlib_external.SourceFileLoader object at 0x101117590>, origin='/path/to/birthday.py'), 'build_birthday': <function build_birthday at 0x1011189a0>, 'calc_days_till_next_bd': <function calc_days_till_next_bd at 0x101cb96c0>, 'create_bd_paragraph': <function create_bd_paragraph at 0x101cb9760>, 'datetime': <module 'datetime' from '/path/to/python3.12/datetime.py'>, 'pprint': <function pprint at 0x100e585e0>}Notice anything? Now the "__name__" key is set to "birthday" instead of "__main__". So when the birthday.py module is imported the __name__ attribute matches the name of the module. So the idiom allows us to only run certain blocks of code if we are running a module directly as opposed to importing it. By moving the last three lines of bithday.py inside the if block, the function calls to build_bithday and create_bd_paragraph will only be execute if we are running the module directly.
What I LearnedWell I’m not sure. Everything I am about to share I already knew.
First, despite being hilarious, rubber ducky debugging is real. There is power in going line by line through the code and saying out loud—or on paper—what the code is doing. Returning to the code a couple days later, the act of reviewing the code and explaining what was happening allowed the solution to present itself. It is just in this case, my rubber ducky was a room full of adolescent students.
Second, if you believe things on the internet, it is a superpower to walk away from the problem. Einstein, Hemingway, Thoreau, and Jefferson all proclaim the virtues of walking as a way to clear the mind as they puzzled something out. Barbara Oakley describes two types of thinking: Focused and Diffused. Focused thinking is when you are intently focused on something. Diffused thinking occurs when your mind is relaxed and you aren’t thinking about anything in particular. When trying to solve a problem, becoming hyper-focused can actually be counter productive. We can often get lost in what Boser describes as shallow features instead of taking a step back and reviewing the deep details (for a deep dive on this see Becoming A More Effective Learner). Deep details are those that contain the essence of the problem. While shallow details maybe nothing more than distractions. The act of walking—and this is important—while not actively thinking about the problem can over lead to the solution.
Whenever educators draw conclusions from neuroscience research based on brain scans, I generally apply healthy dose of skepticism. That being said, in my little N=1 experiment this does seem be the case. I became hyper focused on the shallow detail of the OSError instead of taking a step back and thinking about the problem overall. I should have outlined the problem and walked away a lot sooner. This is a hard lesson to learn. I hope this article serves as a reminder for myself and everyone reading. Sometimes you just have to outline the problem and go walk the dog.
Talk Python to Me: #450: Versioning Web APIs in Python
Matt Layman: Finish Stripe Integration - Building SaaS with Python and Django #183
Python⇒Speed: What can you do about climate change?
Climate change is impacting the whole planet, and getting worse every year. So you want to do something—but you’re not sure what. If you do some research you might encounter an essay by Bret Victor—What can a technologist do about climate change? There’s a whole pile of good ideas in there, and it’s worth reading, but the short version is that you can use technology to “create options for policy-makers.” And working on clean energy or efficiency is definitely a great way to spend your time.
Thing is, policy-makers are doing far less than they should. As a result, this essay isn’t about technology, even though that’s what I mostly write about on this site, because I’m not so certain that technology is the bottleneck right now.
Instead, I’m writing about policy and politics, and what you can do about it. Keep in mind that my perspective is heavily influenced by living in the US, but the big picture issues are likely universal.
Read more...Seth Michael Larson: Windows SBOM work and Alpha-Omega 2023 annual report
Published 2024-02-22 by Seth Larson
Reading time: minutes
Windows artifacts for CPython get built using Azure Pipelines so the generation of the final SBOM for Windows artifacts should also be added to these workflows.
Part of the workflows is to download source code for dependencies like OpenSSL, libffi, and more. These dependencies and their versions are tracked in a file named get_externals.bat in a unintentionally parseable format that the CPython SBOM tooling can extract and generate an SBOM file for. This works in a similar way to the "checked-in" source dependencies where any changes require the partial SBOM to be regenerated and acknowledged by core developers during PR review.
The plan is to find this SBOM during the Windows release build and then depending on which libraries have been pulled locally by get_externals.bat an SBOM will be generated for the Windows artifact.
After chatting with Steve Dower it seems that the Windows build happens once and then is repackaged into all the different distribution methods (python.org, Windows store, Nuget, etc) so we'll only need to generate the Windows-specific SBOM once and then reuse it for each distribution method.
I also removed regen-sbom makefile target from regen-all to avoid breaking downstream distributors.
Alpha-Omega published 2023 Annual ReportAlpha-Omega published its 2023 annual report this week and there's a ton of goodness inside, including lots of mentions of the Python Software Foundation and my own work. I contributed content to this report last year, so I'm excited to see it published.
One quote regarding my current role:
Alpha-Omega has helped fund security champion roles at the Python Software Foundation, the Eclipse Foundation, and the Rust Foundation. In all cases, we are seeing significant impact as these individuals are incubating a security culture in their respective communities.
Both Deb Nicholson, the executive director of the PSF and I were quoted in the report, take a look if you're interested in what Alpha-Omega has next in 2024.
Other items- Working on grant renewal with Alpha-Omega for the Python Software Foundation.
- CPython 3.13.0a4 was released which also included SBOM documents.
- Draft and submit talk for Alpha-Omega at PyCon US 2024.
- Reviewed the OpenSSF announcement blog post for Linux becoming a CNA
- Reviewed the lock file with sdists proposal from Brett Cannon
That's all for this week! 👋 If you're interested in more you can read last week's report.
Thanks for reading! ♡ Did you find this article helpful and want more content like it? Get notified of new posts by subscribing to the RSS feed or the email newsletter.
This work is licensed under CC BY-SA 4.0
PyCharm: PyCharm 2024.1 EAP 6: In-editor Code Review
Our new EAP build for PyCharm 2024.1 is now available for you to download!
This new build is packed with a bunch of updates to the integration with version control systems.
You can download the new version from our website, update directly from the IDE or via the free Toolbox App, or use snaps for Ubuntu.
Version control systems In-editor code reviewPyCharm 2024.1 EAP 6 introduces a more streamlined and agile code review workflow for both GitHub and GitLab users. Authors and reviewers can now seamlessly interact directly within the editor, thanks to the implementation of the Review Mode.
Once the pull/merge request branch is checked out, the review mode is automatically enabled. When you open a source file related to the pull/merge request, either from a diff or from the Project tool window, you’ll notice purple controls on the gutter, indicating changes made to the lines of code and available for the code review workflow. For both authors and reviewers, clicking on these markers reveals a popup showing the original code, making it easier to understand the change. Use the icons in the gutter to discuss changes: click the + icon appearing on hover to start a new discussion or the Message icon to open or hide existing comments where you can reply, react, and resolve threads.
You can use the widget in the editor’s upper right corner to see only unresolved discussions or turn off the review mode completely. You can also toggle review mode from VCS widget.
Preventing large file commits to repositoriesTo prevent instances where the version control system rejects pushes due to files exceeding size limits, we’ve introduced a mechanism that prohibits the committing of such files. The IDE will now perform a pre-commit check and notify you about the restriction hence saving time on reverting your rejected commits and enhancing the repository management.
Allow unrelated histories merge optionWe’ve enhanced the Merge into dialog with the addition of the Allow unrelated histories option. When selected from the dropdown menu, this option enables the merge operation to proceed even if the two branches being merged have no common history.
Support for reactions on code review commentsPyCharm 2024.1 EAP 6 brings support for reactions on review comments for GitHub Pull Requests and GitLab Merge Requests. You can now select from a set of emojis to use as a reaction to your code review comments, enhancing your collaboration process.
CI checks suite statuses in the Git tool windowWe’ve introduced a new column in the Log tab of the Git tool window, allowing you to easily review the results of GitHub commit checks performed by your CI system. Simply click on it to view the full details of the CI checks.
Create pull/merge requests from push notificationsAfter successfully pushing your changes to the version control system, the IDE will now prompt a single notification to inform you about the successful push and suggest an action to create a pull/merge request.
Branch filter for the History tab of the Git tool windowWe’ve revamped the user experience for file history in the Git tool window. First, the Show all branches button has been replaced with a branch filter, enabling you to review changes made to a file within a designated branch. Additionally, we’ve adjusted the toolbar orientation, positioning it horizontally for improved usability.
Stash tab in the Commit tool windowFor users who rely on stashes to store temporary uncommitted changes, we’ve introduced a dedicated tab within the Commit tool window for convenient access. If you utilize both stashes and shelves, you have the option to enable a combined Stashes and Shelves tab via a corresponding checkbox in Settings/Preferences | Version Control | Git.
Visual indicators for pending updatesWe’ve introduced visual indicators to hint about pending updates within your code review workflow. When there are changes requiring your attention, a dot badge will appear on the tool window icon. Additionally, unseen pull requests will be marked with a blue dot, ensuring you don’t miss updates in your code review process.
These are the most notable updates for this week. For the full list of implemented changes, refer to the release notes.
Take the new features for a test drive, share your feedback with us via X (formerly Twitter) or in the comments below, and stay tuned for more updates! If you spot a bug, report it to our issue tracker.
Real Python: How to Read User Input From the Keyboard in Python
You may often want to make your Python programs more interactive by responding dynamically to input from the user. Learning how to read user input from the keyboard unlocks exciting possibilities and can make your code far more useful.
The ability to gather input from the keyboard with Python allows you to build programs that can respond uniquely based on the preferences, decisions, or data provided by different users. By fetching input and assigning it to variables, your code can react to adjustable conditions rather than just executing static logic flows. This personalizes programs to individual users.
The input() function is the simplest way to get keyboard data from the user in Python. When called, it asks the user for input with a prompt that you specify, and it waits for the user to type a response and press the Enter key before continuing. This response string is returned by input() so you can save it to a variable or use it directly.
Using only Python, you can start building interactive programs that accept customizable data from the user right within the terminal. Taking user input is an essential skill that unlocks more dynamic Python coding and allows you to elevate simple scripts into personalized applications.
Get Your Code: Click here to download the free sample code that shows you how to get user input from the keyboard with Python.
How to Read Keyboard Input in Python With input()You can create robust and interactive programs by taking advantage of input(). It opens up possibilities for creating scripts that respond dynamically based on adjustable conditions, personalized data, and real-time decision-making from the user. It is an ideal option when you want to read keyboard input with Python.
Getting started is straightforward. Just launch the Python interpreter shell, and you can immediately utilize input() for basic interactivity.
To try it, first open your terminal and launch the Python REPL by typing python and hitting Enter. This will display the familiar >>> Python prompt indicating the REPL is ready. Use input(), passing any string in the parentheses:
Python >>> input("What is your name? ") What is your name? Vincent 'Vincent' Copied!Once you execute the code, the string that you specified in input() will be rendered on screen, and you’ll be able to type in any response. Your response will also print to the screen once you press Enter. This is because the REPL automatically prints return values—in this case, the value returned by input().
The best practice when using input() is to assign it to a variable that you can use later in your code. For example, you can ask the user to type in their name. Assign input() to the name variable:
Python >>> name = input("What is your name? ") What is your name? Vincent Copied!This prints the prompt What is your name? and pauses, waiting for keyboard input. After the user types a name and presses Enter, the text string is stored in the name variable. This time, your input won’t automatically print in the REPL, because a variable stores the value instead.
You can now use the variable in any part of your code in the same session, like printing a personalized greeting:
Python >>> print(f"Hello there, {name}!") Hello there, Vincent! Copied!Your program reacted based on the custom name that you provided. It used the name that you gave in the input() request.
This is the essential pattern when working with Python keyboard input:
- Call input() with a prompt explaining what to enter.
- Assign the result to a descriptively named variable.
- Use that variable later in your code.
By following this template, you can start building all types of interactive scripts tailored to custom data from different users. Your programs can gather input of all types, such as names, numbers, and lists, making it quite handy in processing data from your users.
NOTE: Using input() processes all inputs as string literals, the users’ input isn’t executed as code. However, you should be wary of users’ inputs and assess them before executing them in your program, using them in database queries, or otherwise trusting them.
This is just the initial step that you can take in using input() in your interactive program. There are other modifications that you can make to ensure that the function takes in all manner of data types.
Reading Specific Data Types With the Input FunctionThe general rule for input() is that it collects textual input and delivers strings. Your code often needs numbers, Booleans or other data types instead. For example, maybe you need to get integers for math operations, floats for calculations with decimals, or Booleans for logical conditions.
As input() returns strings, you need to convert all the input into the targeted desired data type before using it in your code. If you ask for numerical input, the outcome will still be returned as a string:
Read the full article at https://realpython.com/python-keyboard-input/ »[ Improve Your Python With 🐍 Python Tricks 💌 – Get a short & sweet Python Trick delivered to your inbox every couple of days. >> Click here to learn more and see examples ]
Robin Wilson: How to fix GeoPandas drop_duplicates on geometry column not getting rid of all duplicates?
I use GeoPandas for a lot of my vector GIS data manipulation in Python.
I had a situation the other day where I ended up with duplicates of some geometries in my GeoDataFrame, and I wanted to remove them. The simple way to do this is to use the underlying pandas method drop_duplicates on the geometry column, like:
gdf.drop_duplicates('geometry')However, even after running this I still had some duplicate geometries present. I couldn’t quite believe this, so checked multiple times and then started examining the geometries themselves.
What I found was that my duplicates were technically different geometries, but they looked the same when viewing them on a map. That’s because my geometries were LineStrings and I had two copies of the geometry: one with co-ordinates listed in the order left-to-right, and one in the order right-to-left.
This is illustrated in the image below: both lines look the same, but one line has the individual vertex co-ordinates in order from left-to-right and one has the same co-ordinates in order from right-to-left.
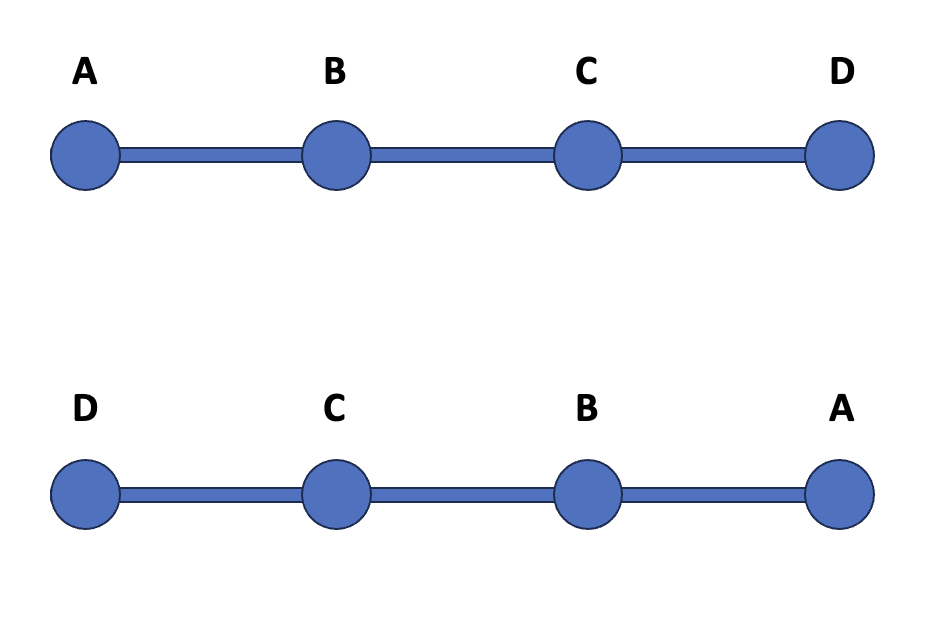
These two geometries will show as the same when using the geometry.equals() method, but won’t be picked up by drop_duplicates. That’s because drop_duplicates just serialises the geometry to Well-Known Binary and compares those to check for equality.
I started implementing various complex (and computationally-intensive) ways to deal with this, and then posted an issue on the GeoPandas Github page. Someone there gave me a simple solution which I want to share with you.
All you need to do is run gdf.normalize() first. So, the full code would be:
gdf.normalize() gdf.drop_duplicates('geometry')The normalize() method puts the vertices into a standard order so that they can be compared easily. This works for vertex order in lines and polygons, and ring orders in complex polygons.
TechBeamers Python: 10 Python Tricky Coding Exercises
Hello dear Python coding buddies. It’s time to get your brain in action and solve some challenging problems. We have worked out 10 Python tricky coding exercises to be done using loops. These would require you to brainstorm, think at multiple levels, and test your coding grit to solve. However, a coding solution is provided […]
The post 10 Python Tricky Coding Exercises appeared first on TechBeamers.
PyCoder’s Weekly: Issue #617 (Feb. 20, 2024)
#617 – FEBRUARY 20, 2024
View in Browser »
uv is an extremely fast Python package installer and resolver, designed as a drop-in alternative to pip and pip-tools. This post introduces you to uv and shows some of its performance numbers. Associated HN discussion.
CHARLIE MARSH
In this video course, you’ll use Python to build Conway’s Game of Life. You’ll implement a user-friendly command-line interface (CLI) with several options that will allow you to run the game using different life patterns and configurations.
REAL PYTHON course
CodeRabbit is an AI-first pull request reviewer with context-aware feedback, line-by-line code suggestions, and real-time chat. Its automated reviews elevate the code quality while significantly reducing the time and effort tied to extensive manual code reviews →
CODERABBIT sponsor
A large refactor on the string data type is underway in Polars. This deep dive explains why and what is changing.
POLARS
This Python Enhancement Proposal (PEP) “proposes a new special form, TypeIs, to allow annotating functions that can be used to narrow the type of a value, similar to the builtin isinstance(). Unlike the existing typing.TypeGuard special form, TypeIs can narrow the type in both the if and else branches of a conditional.”
PYTHON
How do you manage the dependencies of a large-scale data science project? How do you migrate that project from a laptop to cloud infrastructure or utilize GPUs and multiple instances in parallel? This week on the show, Savin Goyal returns to discuss the updates to the open-source framework Metaflow.
REAL PYTHON podcast
Want a byte-sized version of Hacker News? Try TLDR’s free daily newsletter. TLDR covers the most interesting tech, science, and coding news in just 5 minutes. No sports, politics, or weather. Subscribe for free!
TLDR sponsor
In this Python Basics Exercises video course, you’ll practice defining and manipulating Python lists and tuples in your code. By reinforcing your skills, you’ll gain confidence in using lists and tuples in your programming projects.
REAL PYTHON course
The go-to library for adding CLI functionality in Python is the built in argparse library. This works really well, but there is a relatively new 3rd party library called typer that boasts a number of improvements.
RAHUL PAI • Shared by Rahul Pai
This article is a quick reference covering the major changes introduced with each new version of Python. Can’t remember when the walrus operator was introduced? This is the place to look that up.
NICHOLAS HAIRS
Splitting tests across multiple workers may produce a +50% performance improvement, reducing test time. This approach is essential for efficient PR merges and overall development workflow.
GUILHERME LATROVA • Shared by Gui Latrova
The typing.Protocol allows you to define and enforce interface contracts in your code. This article delves into the potential of typing.Protocol through the lens of refactoring.
BOB BELDERBOS • Shared by Bob Belderbos
The main objection to using a database as your queue is the extra load on your database, but often it is good enough. Read this post to learn more about using Postrgres as a queue.
OLIVER RUSSELL
In this post Alex explains how he built a micro-search engine from scratch using Python. The resulting search engine is used to search in the posts of the blogs he follows.
ALEX MOLAS
This detailed article introduces you to unit testing Django applications. It starts out with the built-in test command and then shows you how to use pytest as well.
ŠPELA GIACOMELLI • Shared by Ana Malinovic, AppSignal
Richard has been coding with GitHub Copilot over the past six months, and he’s steadily seen it improve his productivity. Learn how it has changed his coding process.
RICHARD LI
After four years running infrastructure at a startup, Jack has made a lot of choices. Some he thinks were right, and some he regrets. This is his list.
JACK LINDAMOOD
This guide shows you how to deploy a scalable API using FastAPI on AWS App Runner with Neon Postgres as the serverless database.
STEPHEN SIEGERT • Shared by Stephen
Learn how to create a modal dialog for your text-based user interface using Python and the amazing Textual package.
MIKE DRISCOLL
February 21, 2024
REALPYTHON.COM
February 24 to February 25, 2024
PYTHON.PIZZA
February 24 to February 25, 2024
DJANGOGIRLS.ORG
February 24, 2024
MEETUP.COM
February 24, 2024
PYTHON.ORG.BR
February 25 to February 27, 2024
PYTHON.PH
Happy Pythoning!
This was PyCoder’s Weekly Issue #617.
View in Browser »
[ Subscribe to 🐍 PyCoder’s Weekly 💌 – Get the best Python news, articles, and tutorials delivered to your inbox once a week >> Click here to learn more ]
Mike Driscoll: NEW COURSE: Automating Excel with Python on Udemy
In Automating Excel with Python: Processing Spreadsheets with OpenPyXL, you will learn how to use Python to create, edit, or read Microsoft Excel documents using OpenPyXL. This course is based on the book, Automating Excel with Python by Michael Driscoll.
Python is a versatile programming language. You can use Python to read, write and edit Microsoft Excel documents. You can use several Python packages, but this course will focus on OpenPyXL.
The OpenPyXL package allows you to work with Microsoft Excel files on Windows, Mac, and Linux, even if Excel isn’t installed.
In this course, you will learn about the following:
- Opening and Saving Workbooks
- Reading Cells and Sheets
- Creating a Spreadsheet (adding / deleting rows and sheets, merging cells, folding, freeze panes)
- Cell Styling (font, alignment, side, border, images)
- Conditional Formatting
- Charts
- Comments
- and more!
After completing this course, you will be proficient in using the Python programming language to automate Microsoft Excel. This will make you more productive and valuable at your job. You can use the knowledge in this course to speed up your work day!
Python is a great language that you can use to enhance your daily work, whether you are an experienced developer or a beginner!
Where to PurchaseYou can get Automating Excel with Python, the video course, for 25% off for the next 30 days on Udemy by using the following coupon: FC79F40B55FC861DECAE
Automating Excel with Python is also available on Teach Me Python or Gumroad where it also includes the book in addition to the video course.
The post NEW COURSE: Automating Excel with Python on Udemy appeared first on Mouse Vs Python.
Real Python: Unleashing the Power of the Console With Rich
Python’s Rich package is a versatile tool kit that enables you to generate beautifully formatted and highlighted text in the console. It extends beyond this to help you build captivating text-based user interfaces (TUIs).
But why opt for a TUI instead of a graphical user interface (GUI)? There are instances where a text interface feels more fitting. Why employ a complex GUI for a simple application when an elegant text interface suffices? Working with plain text can be refreshing. It functions effortlessly across various hardware environments, including SSH terminals and single-board computer displays.
In this video course, you’ll discover how Rich can benefit you by:
- Enhancing the user interface of command-line tools
- Improving the legibility of console output
- Creating appealing dashboard displays for real-time tabular data
- Generating well-formatted reports
[ Improve Your Python With 🐍 Python Tricks 💌 – Get a short & sweet Python Trick delivered to your inbox every couple of days. >> Click here to learn more and see examples ]
Python Bytes: #372 uv - an impressive pip alternative
Zato Blog: Airport integrations in Python
Did you know you can use Python as an integration platform for your airport systems? It's Open Source too.
From AODB, transportation, business operations and partner networks, to IoT, cloud and hybrid deployments, you can now use Python to build flexible, scalable and future-proof architectures that integrate your airport systems and support your master plan.
➤ Read here about what is possible and learn more why Python and Open Source are the right choice.
More blog posts➤Real Python: Dependency Management With Python Poetry
When your Python project relies on external packages, you need to make sure you’re using the right version of each package. After an update, a package might not work as it did before. A dependency manager like Python Poetry helps you specify, install, and resolve external packages in your projects. This way, you can be sure that you always work with the correct dependency version on every machine.
In this tutorial, you’ll learn how to:
- Create a new project using Poetry
- Add Poetry to an existing project
- Configure your project through pyproject.toml
- Pin your project’s dependency versions
- Install dependencies from a poetry.lock file
- Run basic Poetry commands using the Poetry CLI
Poetry helps you create new projects or maintain existing projects while taking care of dependency management for you. It uses the pyproject.toml file, which has become the standard for defining build requirements in modern Python projects.
To complete this tutorial and get the most out of it, you should have a basic understanding of virtual environments, modules and packages, and pip.
While you’ll focus on dependency management in this tutorial, Poetry can also help you build a distribution package for your project. If you want to share your work, then you can use Poetry to publish your project on the Python Packaging Index (PyPI).
Free Bonus: Click here to get access to a free 5-day class that shows you how to avoid common dependency management issues with tools like Pip, PyPI, Virtualenv, and requirements files.
Take Care of PrerequisitesBefore diving into the nitty-gritty of Python Poetry, you’ll take care of some prerequisites. First, you’ll read a short overview of the terminology that you’ll encounter in this tutorial. Next, you’ll install Poetry itself.
Learn the Relevant TerminologyIf you’ve ever used an import statement in one of your Python scripts, then you’ve worked with modules and packages. Some of them might have been Python files you wrote on your own. Others could’ve been standard library modules that ship with Python, like datetime. However, sometimes, what Python provides isn’t enough. That’s when you might turn to external modules and packages maintained by third parties.
When your Python code relies on such external modules and packages, they become the requirements or dependencies of your project.
To find packages contributed by the Python community that aren’t part of the Python standard library, you can browse PyPI. Once you’ve found a package you’re interested in, you can use Poetry to manage and install that package in your project. Before seeing how this works, you need to install Poetry on your system.
Install Poetry on Your ComputerPoetry is distributed as a Python package itself, which means that you can install it into a virtual environment using pip, just like any other external package:
Windows PowerShell (venv) PS> python -m pip install poetry Copied! Shell (venv) $ python3 -m pip install poetry Copied!This is fine if you just want to quickly try it out. However, the official documentation strongly advises against installing Poetry into your project’s virtual environment, which the tool must manage. Because Poetry depends on several external packages itself, you’d run the risk of a dependency conflict between one of your project’s dependencies and those required by Poetry. In turn, this could cause Poetry or your code to malfunction.
In practice, you always want to keep Poetry separate from any virtual environment that you create for your Python projects. You also want to install Poetry system-wide to access it as a stand-alone application regardless of the specific virtual environment or Python version that you’re currently working in.
There are several ways to get Poetry running on your computer, including:
- A tool called pipx
- The official installer
- Manual installation
- Pre-built system packages
In most cases, the recommended way to install Poetry is with the help of pipx, which takes care of creating and maintaining isolated virtual environments for command-line Python applications. After installing pipx, you can install Poetry by issuing the following command in your terminal window:
Windows PowerShell PS> pipx install poetry Copied! Shell $ pipx install poetry Copied!While this command looks very similar to the one you saw previously, it’ll install Poetry into a dedicated virtual environment that won’t be shared with other Python packages.
Read the full article at https://realpython.com/dependency-management-python-poetry/ »[ Improve Your Python With 🐍 Python Tricks 💌 – Get a short & sweet Python Trick delivered to your inbox every couple of days. >> Click here to learn more and see examples ]
Python GUIs: Plotting With PyQtGraph — Create Custom Plots in PyQt6 With PyQtGraph
One of the major fields where Python shines is in data science. For data exploration and cleaning, Python has many powerful tools, such as pandas and polar. For visualization, Python has Matplotlib.
When you're building GUI applications with PyQt, you can have access to all those tools directly from within your app. While it is possible to embed matplotlib plots in PyQt, the experience doesn't feel entirely native. So, for highly integrated plots, you may want to consider using the PyQtGraph library instead.
PyQtGraph is built on top of Qt's native QGraphicsScene, so it gives better drawing performance, particularly for live data. It also provides interactivity and the ability to customize plots according to your needs.
In this tutorial, you'll learn the basics of creating plots with PyQtGraph. You'll also explore the different plot customization options, including background color, line colors, line type, axis labels, and more.
Table of Contents- Installing PyQtGraph
- Creating a PlotWidget Instance
- Customizing PyQtGraph Plots
- Multiple Plot Lines
- Creating Dynamic Plots
- Conclusion
To use PyQtGraph with PyQt6, you first need to install the library in your Python environment. You can do this using pip as follows:
sh $ python -m pip install pyqtgraphOnce the installation is complete, you will be able to import the module into your Python code. So, now you are ready to start creating plots.
Creating a PlotWidget InstanceIn PyQtGraph, all plots use the PlotWidget class. This widget provides a canvas on which we can add and configure many types of plots. Under the hood, PlotWidget uses Qt's QGraphicsScene class, meaning that it's fast, efficient, and well-integrated with the rest of your app.
The code below shows a basic GUI app with a single PlotWidget in a QMainWindow:
python import pyqtgraph as pg from PyQt6 import QtWidgets class MainWindow(QtWidgets.QMainWindow): def __init__(self): super().__init__() # Temperature vs time plot self.plot_graph = pg.PlotWidget() self.setCentralWidget(self.plot_graph) minutes = [1, 2, 3, 4, 5, 6, 7, 8, 9, 10] temperature = [30, 32, 34, 32, 33, 31, 29, 32, 35, 30] self.plot_graph.plot(minutes, temperature) app = QtWidgets.QApplication([]) main = MainWindow() main.show() app.exec()In this short example, you create a PyQt app with a PlotWidget as its central widget. Then you create two lists of sample data for time and temperature. The final step to create the plot is to call the plot() methods with the data you want to visualize.
The first argument to plot() will be your x coordinate, while the second argument will be the y coordinate.
In all the examples in this tutorial, we import PyQtGraph using import pyqtgraph as pg. This is a common practice in PyQtGraph examples to keep things tidy and reduce typing.
If you run the above application, then you'll get the following window on your screen:
Basic PyQtGraph plot: Temperature vs time.
PyQtGraph's default plot style is quite basic — a black background with a thin (barely visible) white line. Fortunately, the library provides several options that will allow us to deeply customize our plots.
In the examples in this tutorial, we'll create the PyQtGraph widget in code. To learn how to embed PyQtGraph plots when using Qt Designer, check out Embedding custom widgets from Qt Designer.
In the following section, we'll learn about the options we have available in PyQtGraph to improve the appearance and usability of our plots.
Customizing PyQtGraph PlotsBecause PyQtGraph uses Qt's QGraphicsScene to render the graphs, we have access to all the standard Qt line and shape styling options for use in plots. PyQtGraph provides an API for using these options to draw plots and manage the plot canvas.
Below, we'll explore the most common styling features that you'll need to create and customize your own plots with PyQtGraph.
Background ColorBeginning with the app skeleton above, we can change the background color by calling setBackground() on our PlotWidget instance, self.graphWidget. The code below sets the background to white by passing in the string "w":
python from PyQt6 import QtWidgets import pyqtgraph as pg class MainWindow(QtWidgets.QMainWindow): def __init__(self): super().__init__() # Temperature vs time plot self.plot_graph = pg.PlotWidget() self.setCentralWidget(self.plot_graph) self.plot_graph.setBackground("w") minutes = [1, 2, 3, 4, 5, 6, 7, 8, 9, 10] temperature = [30, 32, 34, 32, 33, 31, 29, 32, 35, 30] self.plot_graph.plot(minutes, temperature) app = QtWidgets.QApplication([]) main = MainWindow() main.show() app.exec()Calling setBackground() with "w" as an argument changes the background of your plot to white, as you can see in the following window:
PyQtGraph plot with a white background.
There are a number of colors available using single letters, as we did in the example above. They're based on the standard colors used in Matplotlib. Here are the most common codes:
Letter Code Color "b" Blue "c" Cian "d" Grey "g" Green "k" Black "m" Magenta "r" Red "w" White "y" YellowIn addition to these single-letter codes, we can create custom colors using the hexadecimal notation as a string:
python self.plot_graph.setBackground("#bbccaa") # HexWe can also use RGB and RGBA values passed in as 3-value and 4-value tuples, respectively. We must use values in the range from 0 to 255:
python self.plot_graph.setBackground((100, 50, 255)) # RGB each 0-255 self.plot_graph.setBackground((100, 50, 255, 25)) # RGBA (A = alpha opacity)The first call to setBackground() takes a tuple representing an RGB color, while the second call takes a tuple representing an RGBA color.
We can also specify colors using Qt's QColor class if we prefer it:
python from PyQt6 import QtGui # ... self.plot_graph.setBackground(QtGui.QColor(100, 50, 254, 25))Using QColor can be useful when you're using specific QColor objects elsewhere in your application and want to reuse them in your plots. For example, say that your app has a custom window background color, and you want to use it in the plots as well. Then you can do something like the following:
python color = self.palette().color(QtGui.QPalette.Window) # ... self.plot_graph.setBackground(color)In the first line, you get the GUI's background color, while in the second line, you use that color for your plots.
Line Color, Width, and StylePlot lines in PyQtGraph are drawn using the Qt QPen class. This gives us full control over line drawing, as we would have in any other QGraphicsScene drawing. To use a custom pen, you need to create a new QPen instance and pass it into the plot() method.
In the app below, we use a custom QPen object to change the line color to red:
python from PyQt6 import QtWidgets import pyqtgraph as pg class MainWindow(QtWidgets.QMainWindow): def __init__(self): super().__init__() # Temperature vs time plot self.plot_graph = pg.PlotWidget() self.setCentralWidget(self.plot_graph) self.plot_graph.setBackground("w") pen = pg.mkPen(color=(255, 0, 0)) time = [1, 2, 3, 4, 5, 6, 7, 8, 9, 10] temperature = [30, 32, 34, 32, 33, 31, 29, 32, 35, 45] self.plot_graph.plot(time, temperature, pen=pen) app = QtWidgets.QApplication([]) main = MainWindow() main.show() app.exec()Here, we create a QPen object, passing in a 3-value tuple that defines an RGB red color. We could also define this color with the "r" code or with a QColor object. Then, we pass the pen to plot() with the pen argument.
PyQtGraph plot with a red plot line.
By tweaking the QPen object, we can change the appearance of the line. For example, you can change the line width in pixels and the style (dashed, dotted, etc.), using Qt's line styles.
Update the following lines of code in your app to create a red, dashed line with 5 pixels of width:
python from PyQt6 import QtCore, QtWidgets # ... pen = pg.mkPen(color=(255, 0, 0), width=5, style=QtCore.Qt.DashLine)The result of this code is shown below, giving a 5-pixel, dashed, red line:
PyQtGraph plot with a red, dashed, and 5-pixel line
You can use all other Qt's line styles, including Qt.SolidLine, Qt.DotLine, Qt.DashDotLine, and Qt.DashDotDotLine. Examples of each of these lines are shown in the image below:
Qt's line styles.
To learn more about Qt's line styles, check the documentation about pen styles. There, you'll all you need to deeply customize the lines in your PyQtGraph plots.
Line MarkersFor many plots, it can be helpful to use point markers in addition or instead of lines on the plot. To draw a marker on your plot, pass the symbol you want to use as a marker when calling plot(). The following example uses the plus sign as a marker:
python self.plot_graph.plot(hour, temperature, symbol="+")In this line of code, you pass a plus sign to the symbol argument. This tells PyQtGraph to use that symbol as a marker for the points in your plot.
If you use a custom symbol, then you can also use the symbolSize, symbolBrush, and symbolPen arguments to further customize the marker.
The value passed as symbolBrush can be any color, or QBrush instance, while symbolPen can be any color or a QPen instance. The pen is used to draw the shape, while the brush is used for the fill.
Go ahead and update your app's code to use a blue marker of size 15, on a red line:
python pen = pg.mkPen(color=(255, 0, 0)) self.plot_graph.plot( time, temperature, pen=pen, symbol="+", symbolSize=20, symbolBrush="b", )In this code, you pass a plus sign to the symbol argument. You also customize the marker size and color. The resulting plot looks something like this:
PyQtGraph plot with a plus sign as a point marker.
In addition to the + plot marker, PyQtGraph supports the markers shown in the table below:
Character Marker Shape "o" Circle "s" Square "t" Triangle "d" Diamond "+" Plus "t1" Triangle pointing upwards "t2" Triangle pointing right side "t3" Triangle pointing left side "p" Pentagon "h" Hexagon "star" Star "x" Cross "arrow_up" Arrow Up "arrow_right" Arrow Right "arrow_down" Arrow Down "arrow_left" Arrow Left "crosshair" CrosshairYou can use any of these symbols as markers for your data points. If you have more specific marker requirements, then you can also use a QPainterPath object, which allows you to draw completely custom marker shapes.
Plot TitlesPlot titles are important to provide context around what is shown on a given chart. In PyQtGraph, you can add a main plot title using the setTitle() method on the PlotWidget object. Your title can be a regular Python string:
python self.plot_graph.setTitle("Temperature vs Time")You can style your titles and change their font color and size by passing additional arguments to setTitle(). The code below sets the color to blue and the font size to 20 points:
python self.plot_graph.setTitle("Temperature vs Time", color="b", size="20pt")In this line of code, you set the title's font color to blue and the size to 20 points using the color and size arguments of setTitle().
You could've even used CSS style and basic HTML tag syntax if you prefer, although it's less readable:
python self.plot_graph.setTitle( '<span style="color: blue; font-size: 20pt">Temperature vs Time</span>' )In this case, you use a span HTML tag to wrap the title and apply some CSS styles on to of it. The final result is the same as suing the color and size arguments. Your plot will look like this:
PyQtGraph plot with title.
Your plot looks way better now. You can continue customizing it by adding informative lables to both axis.
Axis LabelsWhen it comes to axis labels, we can use the setLabel() method to create them. This method requires two arguments, position and text.
python self.plot_graph.setLabel("left", "Temperature (°C)") self.plot_graph.setLabel("bottom", "Time (min)")The position argument can be any one of "left", "right", "top", or "bottom". They define the position of the axis on which the text is placed. The second argument, text is the text you want to use for the label.
You can pass an optional style argument into the setLabel() method. In this case, you need to use valid CSS name-value pairs. To provide these CSS pairs, you can use a dictionary:
python styles = {"color": "red", "font-size": "18px"} self.plot_graph.setLabel("left", "Temperature (°C)", **styles) self.plot_graph.setLabel("bottom", "Time (min)", **styles)Here, you first create a dictionary containing CSS pairs. Then you pass this dictionary as an argument to the setLabel() method. Note that you need to use the dictionary unpacking operator to unpack the styles in the method call.
Again, you can use basic HTML syntax and CSS for the labels if you prefer:
python self.plot_graph.setLabel( "left", '<span style="color: red; font-size: 18px">Temperature (°C)</span>' ) self.plot_graph.setLabel( "bottom", '<span style="color: red; font-size: 18px">Time (min)</span>' )This time, you've passed the styles in a span HTML tag with appropriate CSS styles. In either case, your plot will look something like this:
PyQtGraph plot with axis labels.
Having axis labels highly improves the readability of your plots as you can see in the above example. So, it's a good practice that you should keep in mind when creating your plots.
Plot LegendsIn addition to the axis labels and the plot title, you will often want to show a legend identifying what a given line represents. This feature is particularly important when you start adding multiple lines to a plot.
You can add a legend to a plot by calling the addLegend() method on the PlotWidget object. However, for this method to work, you need to provide a name for each line when calling plot().
The example below assigns the name "Temperature Sensor" to the plot() method. This name will be used to identify the line in the legend:
python self.plot_graph.addLegend() # ... self.plot_graph.plot( time, temperature, name="Temperature Sensor", pen=pen, symbol="+", symbolSize=15, symbolBrush="b", )Note that you must call addLegend() before you call plot() for the legend to show up. Otherwise, the plot won't show the legend at all. Now your plot will look like the following:
PyQtGraph plot with legend.
The legend appears in the top left by default. If you would like to move it, you can drag and drop the legend elsewhere. You can also specify a default offset by passing a 2-value tuple to the offset parameter when calling the addLegend() method. This will allow you to specify a custom position for the legend.
Background GridAdding a background grid can make your plots easier to read, particularly when you're trying to compare relative values against each other. You can turn on the background grid for your plot by calling the showGrid() method on your PlotWidget instance. The method takes two Boolean arguments, x and y:
python self.plot_graph.showGrid(x=True, y=True)In this call to the showGrid() method, you enable the grid lines in both dimensions x and y. Here's how the plot looks now:
PyQtGraph plot with grid.
You can toggle the x and y arguments independently, according to the dimension on which you want to enable the grid lines.
Axis RangeSometimes, it can be useful to predefine the range of values that is visible on the plot or to lock the axis to a consistent range regardless of the data input. In PyQtGraph, you can do this using the setXRange() and setYRange() methods. They force the plot to only show data within the specified ranges.
Below, we set two ranges, one on each axis. The first argument is the minimum value, and the second is the maximum:
python self.plot_graph.setXRange(1, 10) self.plot_graph.setYRange(20, 40)The first line of code sets the x-axis to show values between 1 and 10. The second line sets the y-axis to display values between 20 and 40. Here's how this changes the plot:
PyQtGraph plot with axis ranges
Now your plot looks more consistent. The axis show fix scales that are specifically set for the possible range of input data.
Multiple Plot LinesIt is common to have plots that involve more than one dependent variable. In PyQtGraph, you can plot multiple variables in a single chart by calling .plot() multiple times on the same PlotWidget instance.
In the following example, we plot temperatures values from two different sensors. We use the same line style but change the line color. To avoid code repetition, we define a new plot_line() method on our window:
python from PyQt6 import QtWidgets import pyqtgraph as pg class MainWindow(QtWidgets.QMainWindow): def __init__(self): super().__init__() # Temperature vs time plot self.plot_graph = pg.PlotWidget() self.setCentralWidget(self.plot_graph) self.plot_graph.setBackground("w") self.plot_graph.setTitle("Temperature vs Time", color="b", size="20pt") styles = {"color": "red", "font-size": "18px"} self.plot_graph.setLabel("left", "Temperature (°C)", **styles) self.plot_graph.setLabel("bottom", "Time (min)", **styles) self.plot_graph.addLegend() self.plot_graph.showGrid(x=True, y=True) self.plot_graph.setXRange(1, 10) self.plot_graph.setYRange(20, 40) minutes = [1, 2, 3, 4, 5, 6, 7, 8, 9, 10] temperature_1 = [30, 32, 34, 32, 33, 31, 29, 32, 35, 30] temperature_2 = [32, 35, 40, 22, 38, 32, 27, 38, 32, 38] pen = pg.mkPen(color=(255, 0, 0)) self.plot_line("Temperature Sensor 1", minutes, temperature_1, pen, "b") pen = pg.mkPen(color=(0, 0, 255)) self.plot_line("Temperature Sensor 2", minutes, temperature_2, pen, "r") def plot_line(self, name, minutes, temperature, pen, brush): self.plot_graph.plot( minutes, temperature, name=name, pen=pen, symbol="+", symbolSize=15, symbolBrush=brush, ) app = QtWidgets.QApplication([]) main = MainWindow() main.show() app.exec()The custom plot_line() method on the main window does the hard work. It accepts a name to set the line name for the plot legend. Then it takes the time and temperature arguments. The pen and brush arguments allow you to tweak other features of the lines.
To plot separate temperature values, we'll create a new list called temperature_2 and populate it with random numbers similar to our old temperature, which now is temperature_1. Here's the plot looks now:
PyQtGrap plot with two lines.
You can play around with the plot_line() method, customizing the markers, line widths, colors, and other parameters.
Creating Dynamic PlotsYou can also create dynamic plots with PyQtGraph. The PlotWidget can take new data and update the plot in real time without affecting other elements. To update a plot dynamically, we need a reference to the line object that the plot() method returns.
Once we have the reference to the plot line, we can call the setData() method on the line object to apply the new data. In the example below, we've adapted our temperature vs time plot to accept new temperature measures every minute. Note that we've set the timer to 300 milliseconds so that we don't have to wait an entire minute to see the updates:
python from random import randint from PyQt6 import QtCore, QtWidgets import pyqtgraph as pg class MainWindow(QtWidgets.QMainWindow): def __init__(self): super().__init__() # Temperature vs time dynamic plot self.plot_graph = pg.PlotWidget() self.setCentralWidget(self.plot_graph) self.plot_graph.setBackground("w") pen = pg.mkPen(color=(255, 0, 0)) self.plot_graph.setTitle("Temperature vs Time", color="b", size="20pt") styles = {"color": "red", "font-size": "18px"} self.plot_graph.setLabel("left", "Temperature (°C)", **styles) self.plot_graph.setLabel("bottom", "Time (min)", **styles) self.plot_graph.addLegend() self.plot_graph.showGrid(x=True, y=True) self.plot_graph.setYRange(20, 40) self.time = list(range(10)) self.temperature = [randint(20, 40) for _ in range(10)] # Get a line reference self.line = self.plot_graph.plot( self.time, self.temperature, name="Temperature Sensor", pen=pen, symbol="+", symbolSize=15, symbolBrush="b", ) # Add a timer to simulate new temperature measurements self.timer = QtCore.QTimer() self.timer.setInterval(300) self.timer.timeout.connect(self.update_plot) self.timer.start() def update_plot(self): self.time = self.time[1:] self.time.append(self.time[-1] + 1) self.temperature = self.temperature[1:] self.temperature.append(randint(20, 40)) self.line.setData(self.time, self.temperature) app = QtWidgets.QApplication([]) main = MainWindow() main.show() app.exec()The first step to creating a dynamic plot is to get a reference to the plot line. In this example, we've used a QTimer object to set the measuring interval. We've connected the update_plot() method with the timer's timeout signal.
Theupdate_plot() method does the work of updating the data in every interval. If you run the app, then you will see a plot with random data scrolling to the left:
The time scale in the x-axis changes as the stream of data provides new values. You can replace the random data with your own real data. You can take the data from a live sensor readout, API, or from any other stream of data. PyQtGraph is performant enough to support multiple simultaneous dynamic plots using this technique.
ConclusionIn this tutorial, you've learned how to draw basic plots with PyQtGraph and customize plot components, such as lines, markers, titles, axis labels, and more. For a complete overview of PyQtGraph methods and capabilities, see the PyQtGraph documentation. The PyQtGraph repository on Github also has a complete set of plot examples.
Pages
Recent Publications
- Managing Hidden Dependencies in OO Software: a Study Based on Open Source Projects
- Open Source Communities as Liminal Ecosystems
- Investigating developers' email discussions during decision-making in Python language evolution
- Developers, Quality Control and Download Volume in Open Source Software (OSS) Projects
FLOSS Project Planets
- Petter Reinholdtsen: The 2024 LinuxCNC Norwegian developer gathering
- Spinning Code: Writing for Developers and Consultants: Know your Documents Types
- Reproducible Builds (diffoscope): diffoscope 269 released
- Four Kitchens: Managing configuration in Drupal upstreams
- Bounteous.com: A Breakdown of Drupal Innovations
FLOSS Research
- OSI at PyCon US: engaging with AI practitioners and developers as we reach OSAID’s first release candidate
- Open Source AI Definition – Weekly update May 27
- Exploring openness in AI: Insights from the Columbia Convening
- Open Source AI Definition – Weekly update May 20
- Unveiling ClearlyDefined: this free SBOM service gets cleared for takeoff