
Planet Python
ListenData: 4 Ways to Use ChatGPT API in Python
In this tutorial, we will explain how to use ChatGPT API in Python, along with examples.
Steps to Access ChatGPT APIPlease follow the steps below to access the ChatGPT API.
- Visit the OpenAI Platform and sign up using your Google, Microsoft or Apple account.
- After creating your account, the next step is to generate a secret API key to access the API. The API key looks like this -sk-xxxxxxxxxxxxxxxxxxxx
- If your phone number has not been associated with any other OpenAI account previously, you may get free credits to test the API. Otherwise you have to add atleast 5 dollars into your account and charges will be based on the usage and the type of model you use. Check out the pricing details in the OpenAI website.
- Now you can call the API using the code below.
ListenData: How to Build ChatGPT Clone in Python
In this article, we will see the steps involved in building a chat application and an answering bot in Python using the ChatGPT API and gradio.
Developing a chat application in Python provides more control and flexibility over the ChatGPT website. You can customize and extend the chat application as per your needs. It also help you to integrate with your existing systems and other APIs.
To read this article in full, please click hereThis post appeared first on ListenData
Python Morsels: Multiline comments in Python
Python does not have multiline comments. But you can use alternatives like docstrings, editor shortcuts, and conventional commenting methods, depending on your requirements.
Table of contents
- Does Python have multi-line comments?
- What about triple quotes?
- Docstrings versus comments
- What if I want to comment-out a whole block of code?
- How to comment multiple lines
- Use docstrings, your code editor, or version control
For single-line comments, Python uses the octothorpe character (#), also known as pound, number sign, crunch, and of course, the hashtag character:
# This is a comment this = "is not a comment"But what if you want to comment out a whole block of code?
Unlike some programming languages, Python does not have multi-line comments.
What about triple quotes?You might be thinking, wait, …
Read the full article: https://www.pythonmorsels.com/multiline-comments/Real Python: Python's unittest: Writing Unit Tests for Your Code
In this quiz, you’ll test your understanding of testing your Python code with the unittest framework.
Testing in Python is a huge topic and can come with a lot of complexity, but it doesn’t need to be hard. You can create simple tests for your application in a few easy steps and then build on them from there.
With this quiz, you can check your understanding of testing with Python’s unittest framework. Good luck!
[ Improve Your Python With 🐍 Python Tricks 💌 – Get a short & sweet Python Trick delivered to your inbox every couple of days. >> Click here to learn more and see examples ]
Real Python: The Real Python Podcast – Episode #201: Decoupling Systems to Get Closer to the Data
What are the benefits of using a decoupled data processing system? How do you write reusable queries for a variety of backend data platforms? This week on the show, Phillip Cloud, the lead maintainer of Ibis, will discuss this portable Python dataframe library.
[ Improve Your Python With 🐍 Python Tricks 💌 – Get a short & sweet Python Trick delivered to your inbox every couple of days. >> Click here to learn more and see examples ]
ListenData: Complete Guide to Visual ChatGPT
In this post, we will talk about how to run Visual ChatGPT in Python with Google Colab. ChatGPT has garnered huge popularity recently due to its capability of human style response. As of now, it only provides responses in text format, which means it cannot process, generate or edit images. Microsoft recently released a solution for the same to handle images. Now you can ask ChatGPT to generate or edit the image for you.
Demo of Visual ChatGPTIn the image below, you can see the final output of Visual ChatGPT - how it looks like.
To read this article in full, please click hereThis post appeared first on ListenDataListenData: AutoGPT : Everything You Need To Know
In this post we have covered AutoGPT in detail. By end of this tutorial, you will not only understand how it works but also will be able to run it on your system. Auto-GPT has gained a significant amount of popularity in the media. It has become one of the most talked-about topics across various social media platforms after ChatGPT. It has not only captured the attention of people in Artifical Intelligence community but also people from other background. Media outlets across countries covered it and reported how it can automate everything ranging from simple to complex tasks.
Table of Contents What is AutoGPT?AutoGPT is an experimental open-source project built on the latest ChatGPT model i.e GPT-4. It is not limited to ChatGPT as it can also do web search and try to find information from internet. When a client gives us a project with instructions on what to do. We, as analysts, perform tasks to fulfill the project requirements. In the same way, by assigning a project to AutoGPT, it will do on its own all the necessary tasks to meet the project's requirements.
Let's say you ask AutoGPT to do market research about different headphones in the market. It will do web search and try to find this information on internet and produce output for you in a cleaned and structured format. See the video below.
To read this article in full, please click hereThis post appeared first on ListenDataListenData: Complete Guide to Massively Multilingual Speech (MMS) Model
In this article we have covered everything about the latest multilingual speech model from the basics of how it works to the step-by-step implementation of the model in Python.
Meta, the company that owns Facebook, released a new AI model called Massively Multilingual Speech (MMS) that can convert text to speech and speech to text in over 1,100 languages. It is available for free. It will not only help academicians and researchers across the world but also language preservationists or activists to document and preserve endangered languages to prevent their extinction.
MMS is trained on a large dataset of text and audio in over 1,100 languages. Another best part about the model is that it generates audio which sounds very natural, like human speech. It is also able to identify more than 4,000 spoken languages.
To read this article in full, please click hereThis post appeared first on ListenDataListenData: Transformers Agent: AI Tool That Automates Everything
We have a new AI tool in the market called Transformers Agent which is so powerful that it can automate just about any task you can think of. It can generate and edit images, video, audio, answer questions about documents, convert speech to text and do a lot of other things.
Hugging Face, a well-known name in the open-source AI world, released Transformers Agent that provides a natural language API on top of transformers. The API is designed to be easy to use. With a single line code, it provides a variety of tools for performing natural language tasks, such as question answering, image generation, video generation, text to speech, text classification, and summarization.
To read this article in full, please click hereThis post appeared first on ListenData
Talk Python to Me: #457: Software Supply Chain Security with Phylum
Test and Code: 218: Balancing test coverage with test costs - Nicole Tietz-Sokolskaya
Nicole is a software engineer and writer, and recently wrote about the trade-offs we make when deciding which tests to write and how much testing is enough.
We talk about:
- Balancing schedule vs testing
- How much testing is the right about of testing
- Should code coverage be measured and tracked
- Good refactoring can reduce code coverage
- Is it worth testing error conditions?
- Are rare error codes ok to just monitor?
- API drift and autospec
- Mitigating risk
- Deciding what to test and what not to test
- Focus testing on key money-making features
- If there's a bug in this part of the code, how much business impact is there?
- Performance testing needs to approximately match real world workloads
- Cost of a service breaking vs the cost of creating, maintaining, and running tests
- Keeping test suites quick to minimize getting distracted
Links:
- Too much of a good thing: the trade-off we make with tests
- Load testing is hard, and the tools are... not great. But why?
- Yet Another Rust Resource (YARR!)
- Goodhart's law - "When a measure becomes a target, it ceases to be a good measure"
Sponsored by Mailtrap.io
- An Email Delivery Platform that developers love.
- An email-sending solution with industry-best analytics, SMTP, and email API, SDKs for major programming languages, and 24/7 human support.
- Try for Free at MAILTRAP.IO
Sponsored by PyCharm Pro
- Use code PYTEST for 20% off PyCharm Professional at jetbrains.com/pycharm
- Now with Full Line Code Completion
- See how easy it is to run pytest from PyCharm at pythontest.com/pycharm
The Complete pytest Course
- For the fastest way to learn pytest, go to courses.pythontest.com
- Whether your new to testing or pytest, or just want to maximize your efficiency and effectiveness when testing.
Matt Layman: Importing Content - Building SaaS with Python and Django #189
Matt Layman: Why Django and why not Flask?
Tryton News: Security Release for issue #13142
Cédric Krier has found that trytond accepts compressed content from unauthenticated requests which makes it vulnerable to zip bomb attacks.
Impact- Attack Vector: Network
- Attack Complexity: Low
- Privileges Required: None
- User Interaction: None
- Scope: Unchanged
- Confidentiality: None
- Integrity: None
- Availability: Low
A proxy can be deployed in front of the trytond server to forbid this kind of request.
ResolutionAll affected users should upgrade trytond to the latest version.
Affected versions per series:
- trytond:
- 7.0: <= 7.0.9
- 6.8: <= 6.8.14
- 6.0: <= 6.0.44
Non affected versions per series:
- trytond:
- 7.0: >= 7.0.10
- 6.8: >= 6.8.15
- 6.0: >= 6.0.45
Any security concerns should be reported on the bug-tracker at https://bugs.tryton.org/ with the confidential checkbox checked.
1 post - 1 participant
Mike Driscoll: Announcing The Python Logging Book & Course Kickstarter
What does every new developer do when they are first learning to program? They print out strings to their terminal. It’s how we learn! But printing out to the terminal isn’t what you do with most professional applications.
In those cases, you log into files. Sometimes, you log into multiple locations at once. These logs may serve as an audit trail for compliance purposes or help the engineers debug what went wrong.
Python Logging teaches you how to log in the Python programming language. Python is one of the most popular programming languages in the world. Python comes with a logging module that makes logging easy.
What You’ll LearnIn this book, you will learn how about the following:
- Logger objects
- Log levels
- Log handlers
- Formatting your logs
- Log configuration
- Logging decorators
- Rotating logs
- Logging and concurrency
- and more!
The finished book will be made available in the following formats:
- paperback (at the appropriate reward level)
- epub
The paperback is a 6″ x 9″ book and is approximately 150 pages long.
You can support the book by clicking the button below:
The post Announcing The Python Logging Book & Course Kickstarter appeared first on Mouse Vs Python.
Real Python: How to Format Floats Within F-Strings in Python
You’ll often need to format and round a Python float to display the results of your calculations neatly within strings. In earlier versions of Python, this was a messy thing to do because you needed to round your numbers first and then use either string concatenation or the old string formatting technique to do this for you.
Since Python 3.6, the literal string interpolation, more commonly known as a formatted string literal or f-string, allows you to customize the content of your strings in a more readable way.
An f-string is a literal string prefixed with a lowercase or uppercase letter f and contains zero or more replacement fields enclosed within a pair of curly braces {...}. Each field contains an expression that produces a value. You can calculate the field’s content, but you can also use function calls or even variables.
While most strings have a constant value, f-strings are evaluated at runtime. This makes it possible for you to pass different data into the replacement fields of the same f-string and produce different output. This extensibility of f-strings makes them a great way to embed dynamic content neatly inside strings. However, even though f-strings have largely replaced the earlier methods, they do have their short-comings.
For example, one of the most common attacks performed on a relational database is a SQL injection attack. Often, users provide parameters to SQL queries, and if the query is formed within an f-string, it may be possible to damage a database by passing in rogue commands. F-strings can also be used in a denial-of-service attack by attacking Python’s logging module code.
In older versions of Python, f-strings had a number of other limitations that were only fixed with Python version 3.12. This version is used throughout this tutorial.
Take a look at the example below. It shows you how to embed the result of a calculation within an f-string:
Python >>> f"One third, expressed as a float is: {1 / 3}" 'One third, expressed as a float is: 0.3333333333333333' Copied!Without any explicit rounding, once an expression has produced its value it’ll be inserted into the string using a default number of decimal places. Here, the result is shown to sixteen decimal places, which, in most cases, is more precision than you’ll ever need. So you’ll likely want to round your final answer to a more practical number of digits.
In this tutorial, you’ll learn how to use a Python f-string to format floats to meet your requirements.
Get Your Code: Click here to download the free sample code and exercise solutions you’ll use for learning how to format floats within f-strings in Python.
Take the Quiz: Test your knowledge with our interactive “Format Floats Within F-Strings” quiz. Upon completion you will receive a score so you can track your learning progress over time:
Interactive Quiz
Format Floats Within F-StringsIn this quiz, you'll test your understanding of how to format floats within f-strings in Python. This knowledge will let you control the precision and appearance of floating-point numbers when you incorporate them into formatted strings.
How to Format and Round a Float Within a Python F-StringTo format a float for neat display within a Python f-string, you can use a format specifier. In its most basic form, this allows you to define the precision, or number of decimal places, the float will be displayed with.
The code below displays the same calculation as before, only it’s displayed more neatly:
Python >>> f"One third, rounded to two decimal places is: {1 / 3:.2f}" 'One third, rounded to two decimal places is: 0.33' Copied!To use Python’s format specifiers in a replacement field, you separate them from the expression with a colon (:). As you can see, your float has been rounded to two decimal places. You achieved this by adding the format specifier .2f into the replacement field. The 2 is the precision, while the lowercase f is an example of a presentation type. You’ll see more of these later.
Note: When you use a format specifier, you don’t actually change the underlying number. You only improve its display.
Python’s f-strings also have their own mini-language that allows you to format your output in a variety of different ways. Although this tutorial will focus on rounding, this is certainly not the only thing you can use them for. As you’ll see later, their mini-language is also used in other string formatting techniques.
In addition to displaying the result of calculations, the precision part of a format specifier can also be applied directly to variables and the return values of function calls:
Python >>> def total_price(cost): ... return cost * 1.2 ... >>> cost_price = 1000 >>> tax = 0.2 >>> f"£{1000:,.2f} + £{cost_price * tax:,.2f} = £{total_price(cost_price):,.2f}" '£1,000.00 + £200.00 = £1,200.00' Copied!This time, you’ve used multiple replacement fields in the same string. The first one formats a literal number, the second formats the result of a calculation, while the third formats the return value from a function call. Also, by inserting a comma (,) before the decimal point (.) in the format specifier, you add a thousands separator to your final output.
In everyday use, you display numbers with a fixed amount of decimals, but when performing scientific or engineering calculations, you may prefer to format them using significant figures. Your results are then assumed to be accurate to the number of significant figures you display them with.
If you want to round numbers to significant figures, you use the lowercase letter g in the format specifier. You can also use an uppercase G, but this automatically switches the format to scientific notation for large numbers.
Suppose you have a circle with a radius of 10.203 meters. To work out the area, you could use this code:
Read the full article at https://realpython.com/how-to-python-f-string-format-float/ »[ Improve Your Python With 🐍 Python Tricks 💌 – Get a short & sweet Python Trick delivered to your inbox every couple of days. >> Click here to learn more and see examples ]
PyBites: OpenStreetMaps, Overpass API and Python
OpenStreetMaps (OSM) is known for being an open source project that allows people to browse the world map and to plan routes. However it is more than that. Among others it provides a read-only API that allows users to query for very diverse map data: Overpass API
Data structure of OSMTo understand the structure of the queries, we first need to understand how OSM saves its data. OSM uses basic data structures: node, way, and relation. Each element can have multiple tags, which consist of a key-value pair and they help specify the features of each element.
Nodes also save a latitude and longitude, indicating where the node is located on the world. Ways contain a list of the nodes contained in the way. Finally, relations are groups of nodes, ways and relations defining a logical relationship for this elements, for example being part of the same street, neighbourhood, city, postal code area, etc.
If we go to https://www.openstreetmap.org/, right-click on some point of the map and then click on Query Features, we get a list of the elements of the area. By clicking on one of them, we can explore it’s characteristics. As an example, we can explore the node 1918872432, which we can see on the left picture. Looking at the data we can see that it is located at longitude 52.5024783 and latitude 13.4155630. On the tags we can see it has the name Oranienplatz and among others it contains a bench and a bin. The key highway contains the value bus_stop, which tells us it is a bus stop.
If we explore the way 1228261444 (right picture) we can see a list of all the nodes it contains. In addition on the key highway we can see it’s of the type footway, telling us it’s a way intended for pedestrians. In addition we can see that it is a lit way.
Many keywords like highway are normalized. As an example, we can find a list of standardized values for highway here.
Overpass Queries Querying a single elementWe can query the previous information using Overpass QL. For the query to get the information about the way 1228261444 we use way(1228261444). The default output format is in xml, so if we want to have it in json, we need to add [out:json] in front of it. Other possible formats are csv, for which we need to define the list of columns for it to work. We mark the end of the query with an out, so the complete query is:
[out:json]; way(1228261444); out;To execute the query we need to run it against an instance, thus the complete URL looks like this:
https://overpass-api.de/api/interpreter?data=[out:json];way(1228261444);out;We can copy the URL directly on the browser, or we can use wget to see the result:
wget -O my_file_name.osm "https://overpass-api.de/api/interpreter?data=[out:json];way(1228261444);out;"To query a single node or relation works in a parallel way.
Output format { "version": 0.6, "generator": "Overpass API 0.7.61.5 4133829e", "osm3s": { "timestamp_osm_base": "2024-03-06T20:54:14Z", "copyright": "The data included in this document is from www.openstreetmap.org. The data is made available under ODbL." }, "elements": [ { "type": "way", "id": 1228261444, "nodes": [ 9010521154, 9010521155, 11390038869, 11390038870, 9394918823, 9394918824, 4613855449, 11390038871, 11390038872, 11390038873, 9394918822 ], "tags": { "footway": "sidewalk", "highway": "footway", "lit": "yes", "surface": "paving_stones" } } ] }Here we can see two main blocks: the first with metadata like the version or the timestamp, and the second one with a list of the elements found with the query. Even if we queried for one specific element of type way, we still get it as a set formatted as list with length 1.
Querying many elementsIf we don’t want the information of one singe way, but the information of all ways in an area, we need to change the query a little bit:
[out:json]; way(52.49505089381484,13.401961459729343,52.509912981033516,13.411502705004548); out;Here, instead of requesting one single way, we put 4 coordinates in the parenthesis: boundaries in the south, west, north and east.
This returns a set of all the ways contained in the bounding box defined by the given coordinates.
It is not always needed to know the coordinates to get information for an area. With the query
[out:json]; area[name="Zürich"]; out;we get all areas called Zürich. In this example we can see that we can use special characters without problem. Most interestingly are both square parentheses behind area [name=”Zürich”]. This is a filter where we only get the areas that contain a tag with key name and value Zürich.
We can use more than one filter, for example to get only the element representing the city Zürich, in contrast to the canton Zürich. In that case we can just place them one after another like this:
[out:json]; area[name=”Zürich”][place=”city”]; out;We can filter by elements containing a certain tag independently from it’s value.
[out:json]; area[name=”Zürich”][place]; out;This returns a set of all areas containing the tag place, which in this case contains the same element as above.
SubqueriesWe can use the area we got in the previous query to get a set of certain elements inside said area. For example, if we want to get all public toilets in Zürich, we can use the following query:
[out:json]; area[name="Zürich"][place="city"]; node[amenity="toilets"](area); out;First we get the area corresponding to the city Zürich, and then we get all nodes whose tag key amenity contains the value toilets. By passing the area between the round parenthesis we limit the set of nodes to the previous area.
The tag amenity describes a large number of important facilities from cafés, public bookcases, benches, vending machines, ATMs, etc.
Other useful tag names to find interesting places are tourism and historic.
TIL: there is also a value for public baking ovens, baking_oven. Apparently there are 2 of those which Zürich, which looks to me like a good reason to visit that city again. Seriously, how awesome is that?
Using overpass in PythonThere are two ways to execute overpass queries with python that we will explore. One possibility is using the library and the other the library overpass-api-python-wrapper.
RequestsExample:
import requests overpass_url = 'https://overpass-api.de/api/interpreter' overpass_query = ''' [out:json]; area[name="Zürich"][place="city"]; node[amenity="toilets"](area); out; ''' response = requests.get(overpass_url, params={'data': overpass_query})This way we send to the overpass interpreter the query in overpass_query and save the result in the variable response. If no error happened, response.text contains the data as string so we can decode it with:
decoded_data =json.loads(response.text)If we had requested the information in xml or csv format, we would decode it accordingly.
Overpass-api-python-wrapperThe overpass-api-python-wrapper allows us to execute queries in a more concise and elegant way. First we need to initialize an overpass object.
import overpass api = overpass.API(endpoint="https://overpass.myserver/interpreter", timeout=25)All parameters are optional and the default values are the ones shown here.
query = 'area[name="Zürich"][place="city"];node[amenity="toilets"](area);' response = api.get(query, responseformat='json')By default, response contains a dictionary representing the returned json object, however we can define the output format with the parameter responseformat. With this query, the response is
{ "features": [ { "geometry": { "coordinates": [ 8.534562, 47.350221 ], "type": "Point" }, "id": 75743585, "properties": { "amenity": "toilets", "capacity": "4", "check_date:wheelchair": "2022-06-06", "fee": "no", "name": "Landiwiese", "opening_hours": "24/7", "operator": "Z\u00fcriWC", "unisex": "yes", "wheelchair": "no" }, "type": "Feature" }, etc }If we use xml as format, response will be a string, and with csv it will be a list.
Other Useful tools:We can find a complete manual on Overpass QL here, where we can read about more awesome possibilities that Overpass has to offer to us.
You can also try out queries with overpass-turbo. However it will only display the returned nodes on the map, but you can also get the returned response as text in the tab Data.
Finally, you can find another cool tutorial for using overpass with python here. In this case, the author shows us new possibilities with overpass, including how to plot the queried data in plots.
I hope you could awake your curiosity about the potential that OpenStreetMaps and Overpass offers. For me in meant not only to learn about a powerful tool, but while exploring it and playing with it it allowed me to learn more about the possibilities our cities and towns have to offer to us. Did you know that there are public showers, including in some train stations? Or that there are public ovens?
What I finally have to say is: keep calm and keep building cool stuff!
Seth Michael Larson: Microsoft supports urllib3 with FOSS Fund 2024
Published 2024-04-17 by Seth Larson
Reading time: minutes
Back in January we announced that urllib3 would be fundraising to implement support for HTTP/2 in a backwards compatible way to urllib3 v2.x and to ensure the project's development remains sustainable in the long-term.
Microsoft has awarded urllib3 $5,000 USD as one of its FOSS Fund recipients for 2024 🥳 Thank you, Microsoft for supporting open source software!
Since announcing our fundraiser we have raised $7,275 USD in 3 months, many of the donations coming from individuals and long-time sponsors like Sourcegraph and Sentry.
Thanks Microsoft! ❤️ How to get started supporting your own dependencies?Contribute directly to projects you depend on. Many of them already have funding mechanisms documented like Open Collective, GitHub Sponsors, or similar.
Subscribe to an organization like Tidelift to handle discovery of dependencies and fundable projects and to get additional guarantees like security and long-term support.
Thanks.dev provides a lightweight option to throw money in open sources' direction.
Thanks for reading! ♡ Did you find this article helpful and want more content like it?
Get notified of new posts by subscribing to the RSS feed or the email newsletter.
This work is licensed under CC BY-SA 4.0
Python Engineering at Microsoft: Glow up! A new look for Python Reference documentation on Microsoft Learn
Today, we’re excited to announce a new, improved experience for Python library reference documentation on Microsoft Learn, formerly Microsoft Docs. The new experience is now available for all Microsoft Python libraries on Learn, such as the Azure SDK for Python. In this blog post, we take a closer look at the specific changes made and how they improve the overall experience and accessibility of Python reference documentation on Learn.
Change SummaryThe key changes made to Python reference documentation on Learn were improving the navigation experience with the table of contents (TOC), the organization of in-page content, and in-page navigation via the right rail. When combined, these three key changes greatly improve the experience of finding information in Python reference on Learn.
Table of Contents (TOC)If you’ve used reference documentation before, you’ll know that the TOC serves as a uniquely pivotal tool for navigation between pages. Reference documentation, unlike conceptual articles and tutorials, rarely links together in an easy-to-follow way. This means that the TOC is often the only way for cross-page navigation in reference documentation, making it a key priority for us to get right.
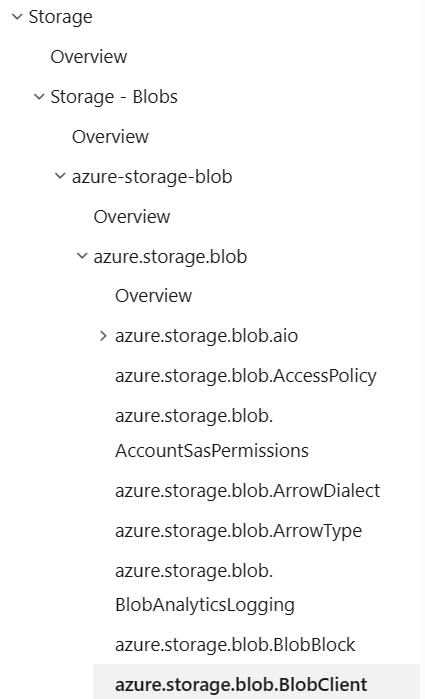
TOC – BeforePreviously, the table of contents for Python Reference documentation on Learn had a redundant layer of navigation for package names (in the screenshot below, the azure-storage-blob node), which added confusion for users looking to navigate deeper into the documentation. In addition, the table of contents had package prefixes attached to every item. This led to a cluttered experience, with some items in the TOC taking up two lines of space, further impacting readability and accessibility.
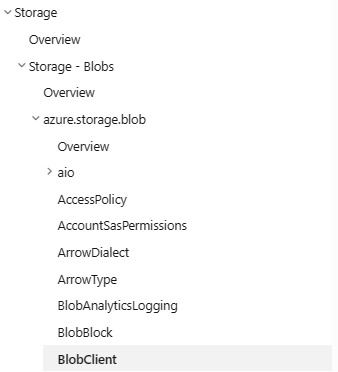
TOC – After
The new TOC design removes the package name overview page and trims the package prefix from TOC items, making it easier to scan and navigate. If you’ve bookmarked a package name overview page, don’t worry, as you’ll be redirected to the package overview page automatically.
In-Page Right Rail
The in-page right rail is a key part of reference documentation, allowing you to navigate in-page and quickly jump to different sections.
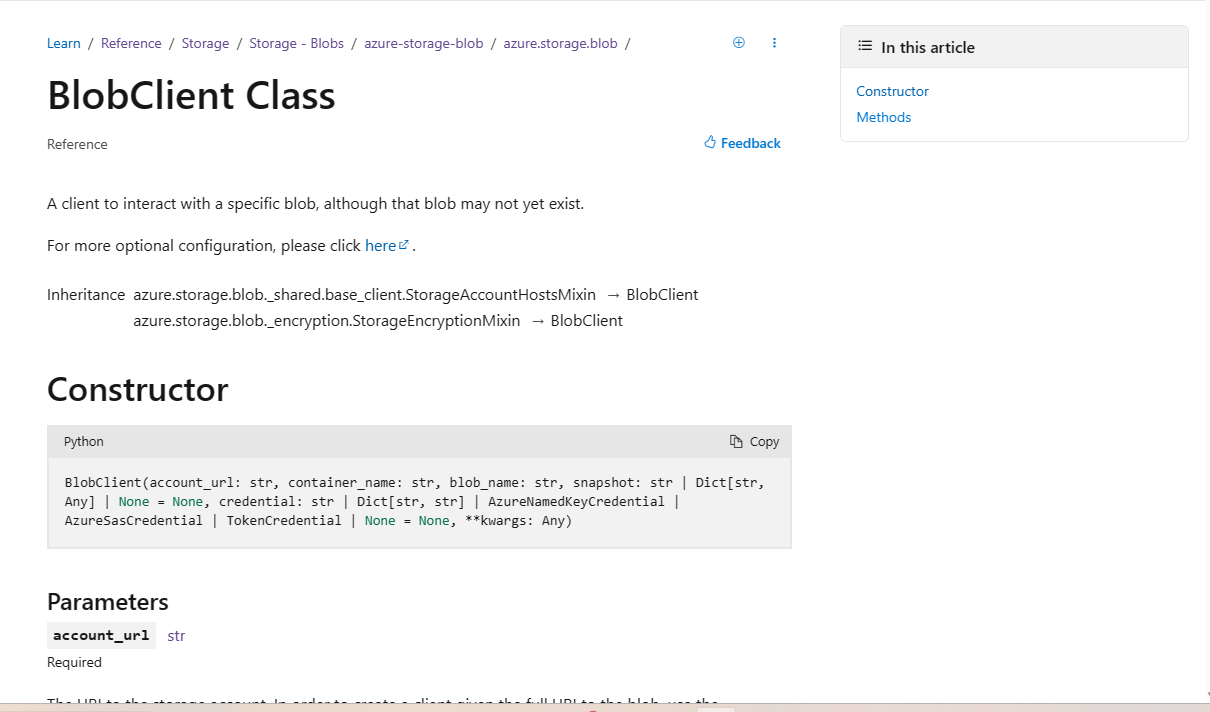
In-Page Right Rail – BeforeBefore, the right rail wasn’t “sticky”, meaning that once users scrolled on the page, the rail wouldn’t follow them, and the entire right side of the screen would be unused space. Additionally, the right rail links only covered H2 content on the page, resulting in a right rail that didn’t clarify any major details on the page. Finally, the right rail would be collapsed beyond four items, leading to extra effort from the user to see all of the H2 sections on the page. We recognize this design wasn’t consistent with the ways that other Python libraries design their documentation and made updates to better align with design patterns and expectations.
In-Page Right Rail – After
The enhanced experience adds an individually scrollable, sticky right rail with details down to H3s, giving much more detail into what content the page has. The right rail additionally has active highlighting for the current item on the screen, making it easier for you to understand your current position relative to other content.
Parameter, Return, and Exception Organization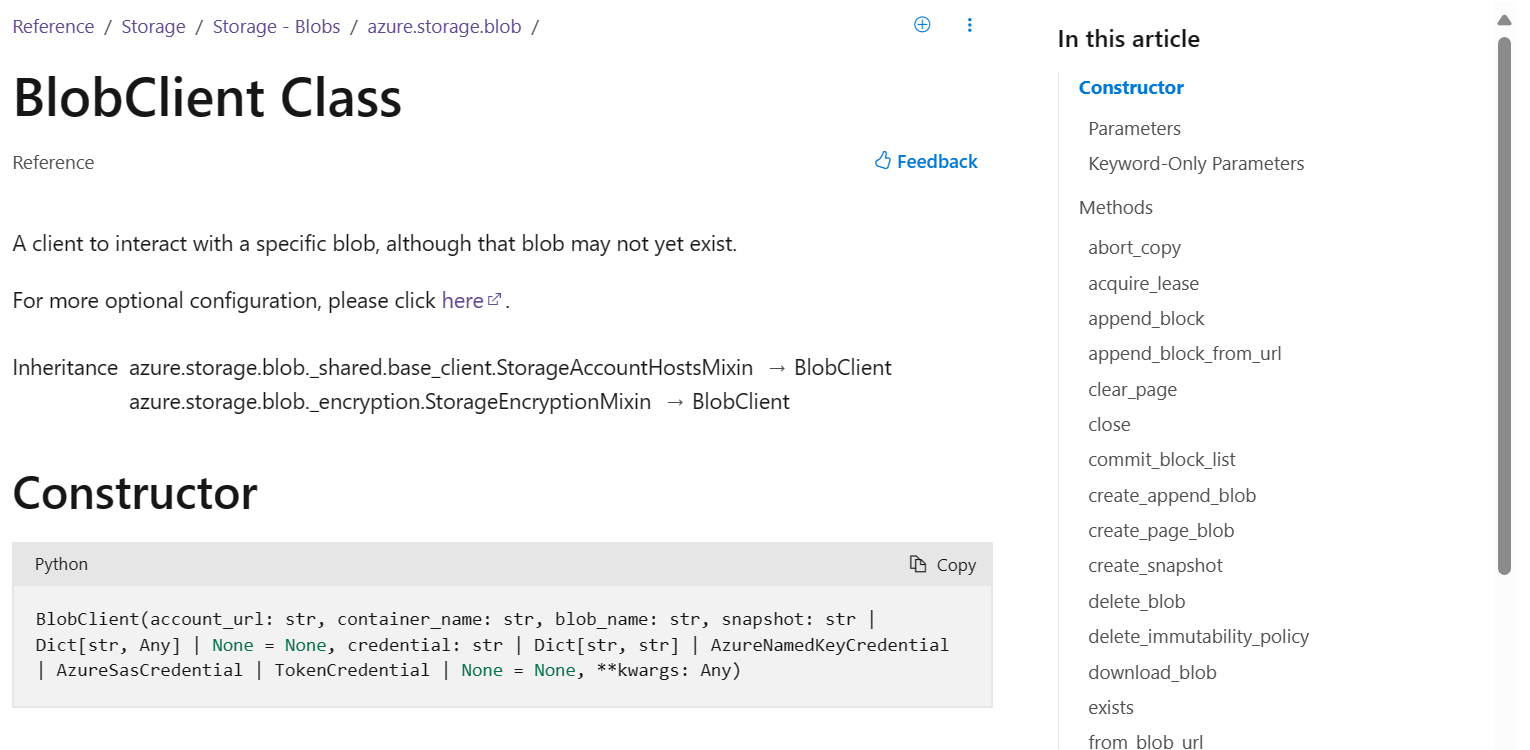
While the first two major feature changes focus on both overall and in-page navigation, we also identified an opportunity to improve in-page organization as well. When you’re looking at our reference documentation, being able to easily identify key information such as parameters, return values, and exceptions is crucial.
In-Page Organization – BeforeBefore the updates, these details were listed but not clearly separated between classes, leading to a confusing experience where it’s not clear where items started or ended. Additionally, as a result of the formatting of these values, a significant amount of vertical space was used, leading to a lot of scrolling to find the information needed. Lastly, required parameters, default values, and keyword-only parameters weren’t clearly highlighted to follow accessibility best practices, resulting in extra effort to find crucial information.
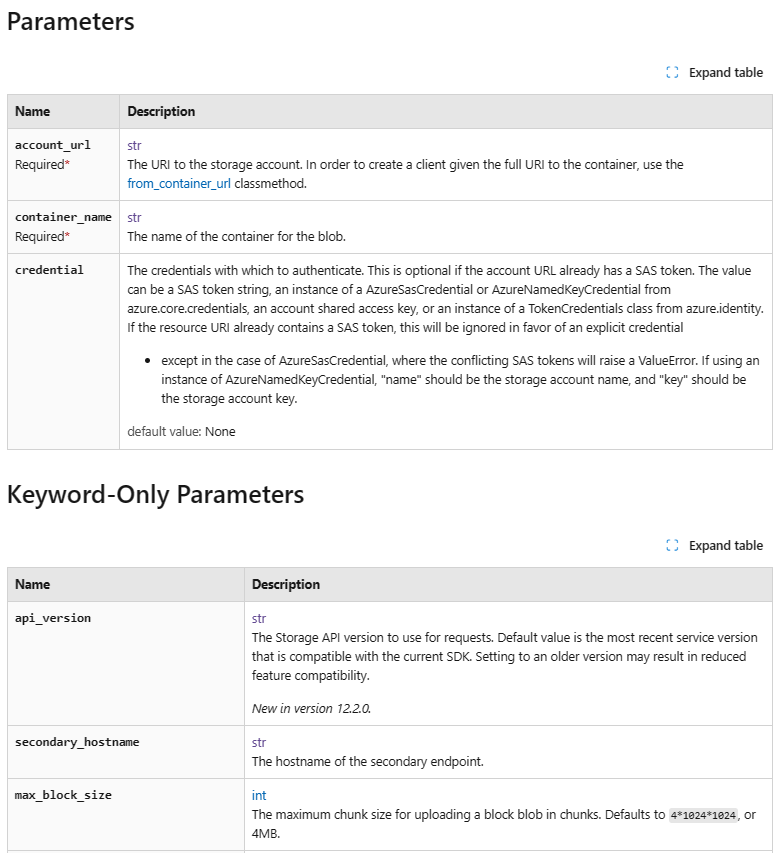
In-Page Organization – After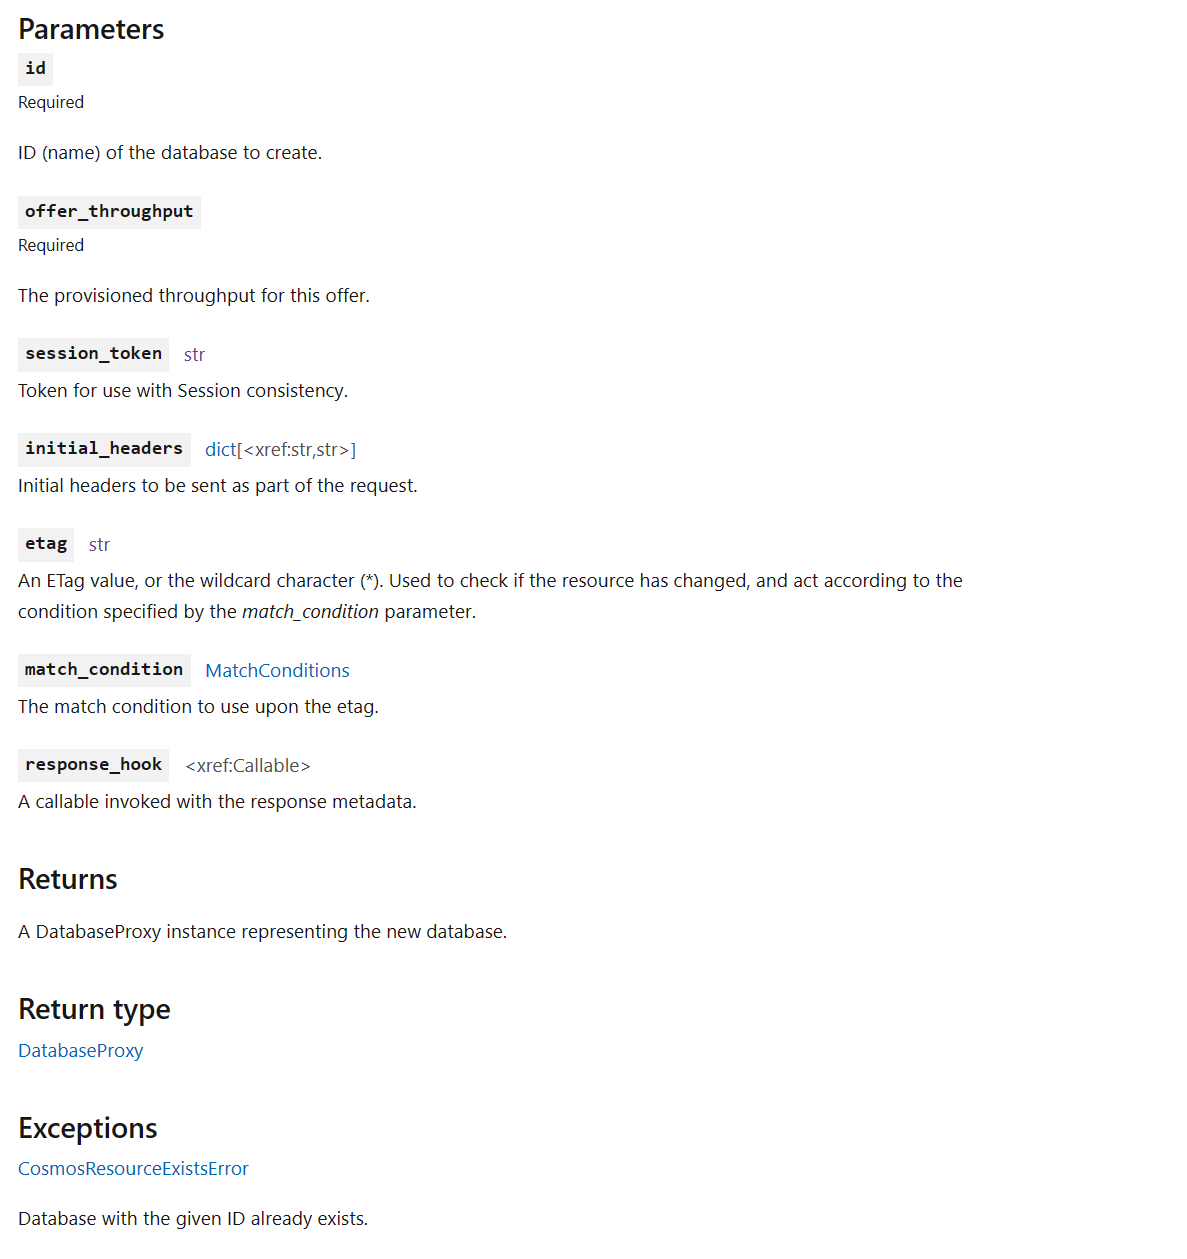
The new experience organizes parameters, return values, and exceptions into easy-to-scan tables. By using tables, default values, required tags, and types are clearly indicated. The end result is a cleaner and easier-to-use experience for all developers when scrolling through our documentation.
Conclusion
In short, the new Python reference documentation experience on Learn is a major improvement for any developer using Microsoft’s Python libraries. The new TOC, in-page right rail, and in-page organization changes make finding information easier, with an added visual upgrade. We’re excited to continue optimizing the Python developer experience across all of our libraries and tools.
We hope you enjoy the changes! If you have any thoughts, you can leave feedback in the Azure SDK for Python GitHub repo.
The post Glow up! A new look for Python Reference documentation on Microsoft Learn appeared first on Python.
Philippe Normand: From WebKit/GStreamer to rust-av, a journey on our stack’s layers
In this post I’ll try to document the journey starting from a WebKit issue and ending up improving third-party projects that WebKitGTK and WPEWebKit depend on.
I’ve been working on WebKit’s GStreamer backends for a while. Usually some new feature needed on WebKit side would trigger work …
Pages
Recent Publications
- Managing Hidden Dependencies in OO Software: a Study Based on Open Source Projects
- Open Source Communities as Liminal Ecosystems
- Investigating developers' email discussions during decision-making in Python language evolution
- Developers, Quality Control and Download Volume in Open Source Software (OSS) Projects
FLOSS Project Planets
- Balint Pekker: Simplifying Drupal Documentation
- Drupal Core News: Drupal 11.0.0-alpha 1 will be released on the week of April 29, 2024
- Real Python: The Real Python Podcast – Episode #202: Pydantic Data Validation & Python Web Security Practices
- Robert McQueen: Update from the GNOME board
- Web Review, Week 2024-17