
Feeds
Qt Creator 13 released
We are happy to announce the release of Qt Creator 13!
Dropsolid Experience Cloud: 10 things you probably didn’t know about Drupal
Dropsolid Experience Cloud: Mautic for Developers: connecting Drupal content to Mautic email marketing
Dropsolid Experience Cloud: Everything you need to know about headless Drupal
Dropsolid Experience Cloud: How to add metatags to your headless Drupal project
Dropsolid Experience Cloud: The road to fully headless Drupal
Dropsolid Experience Cloud: Dropsolid DXP, the most open Drupal powered DXP for enterprises with a low entry barrier
Dropsolid Experience Cloud: What is a Digital Experience Platform (DXP) and why do you need one?
The Drop Times: Navigating the Currents of Change: The Multidimensional Journey of Preston So
The Drop Times: TDT Named Official Media Partner of DrupalCon Barcelona
The Drop Times: TDT an Official Media Partner for Drupal Iberia 2024
Drupal Atlanta Medium Publication: How to Configure the SMTP Module in Drupal 10 with Gmail, Since Google Removed Less Secure Apps
To ensure your Drupal 10 website can send emails, like password reset links, you must configure the SMTP Module, especially after Google’s policy change on September 30, 2024, which prohibits the use of less secure apps. This guide will show you how to set up the SMTP Module in Drupal 10 for sending password reset emails and other form submissions via Gmail.
Before you begin, ensure you have the necessary tools. You will need Composer and Drush installed on your computer. Additionally, you must have access to a Gmail account and its password, which will be used to send the emails. Follow these steps to configure SMTP in Drupal 10, ensuring your site’s email functionality is uninterrupted by Google’s security updates.
Note: The instructions below are for a standard Gmail and have not been tested on a Google Workspace email address.
Download and Enable the Module- First, you must download and enable the module.
- We are going to use composer to download and then a drush command to enable it. Or you could just enable the module in the
drush en smtp -yConfigure the SMTP Module in Drupal
- Navigate to the configuration page admin/config/system/smtp
- Under Turn this module on or off select On.
- Under SMTP server enter the following smtp.gmail.com. Leave SMTP backup server blank
- Under SMTP port enter 587
- Under Use encrypted protocol select Use TLS
- Under E-MAIL OPTIONS use the same Gmail address as you did above and enter an E-mail from name
- Login to your Gmail account at https://myaccount.google.com/
- On the account homepage, click Sign-in & security or navigate to https://myaccount.google.com/security
- Turn on 2-factor authentication and enter your phone numbers
- Visit https://myaccount.google.com/apppasswords
- Name your app — XYZ Drupal Website
- Copy the password and enter this password into the SMTP Module password location.
How to Configure the SMTP Module in Drupal 10 with Gmail, Since Google Removed Less Secure Apps was originally published in Drupal Atlanta on Medium, where people are continuing the conversation by highlighting and responding to this story.
ComputerMinds.co.uk: Format Drush output for easy wins!
Drush, the brilliant command-line tool for Drupal, is capable of giving you its output in several ways. Its global --format parameter can be set to a type that you can use in useful ways. Most recently, I found this incredibly useful when I had made some configuration changes through Drupal's admin pages, and needed to then script those changes to automatically apply to hundreds of sites on a platform we manage.
I simply asked Drush for the value of the configuration I had set, formatted as the PHP code to set those values. Then I could drop that into our PHP automatic update script. Here are two examples - one getting just a single property of a block placement, and another for the whole settings object for a module.
# Get the visibility conditions of my block. drush config:get block.block.myblock visibility --format=var_export # Get the whole settings singleton for my module. drush config:get mymodule.settings --format=var_exportThe var_export format provides the output using PHP's traditional array syntax, instead of the default YAML (which matches the format of config export files). Here's an example of the output for another type of configuration, an action:
array ( 'uuid' => 'faaaea7f-d377-4b9c-bbfb-bd1b9c562050', 'langcode' => 'en', 'status' => true, 'dependencies' => array ( 'module' => array ( 0 => 'mymodule', ), ), '_core' => array ( 'default_config_hash' => 'vvt7bzrXEwxrTfY--axzCfSRPzggH0o4hahUY9Kh0z0', ), 'id' => 'mymodule_foo_action', 'label' => 'An example action', 'type' => 'webform', 'plugin' => 'mymodule_foo_action', 'configuration' => array ( ), )Then I could just copy the output and paste it into a post-update hook. My IDE makes it easier to prettify the code to match Drupal's coding standards and switch to PHP's newer short array syntax. I also removed all the bits that I could leave to be dynamic; like the uuid, _core, and empty configuration properties in the action example above. I can then either use the entity storage for my type of entity to save the configuration, or just use the Configuration Factory service more directly:
$data = // (Paste & adapt the output from drush for this variable.) // Example of using the config factory. $config = \Drupal::configFactory()->getEditable('block.block.myblock'); // Using `setData()` will replace the entire config array. We could instead // use `set()` for individual properties. $config->setData($data)->save(); // Alternatively use the entity type storage and specific methods, when // available. Create new entities with `$storage->create($settings)->save()`. $storage = \Drupal::entityTypeManager()->getStorage('block'); $storage->load('myblock')->set('settings', $data['settings'])->save();We tend to automate Drupal core's configuration management on most of our projects - but not always. Even where we don't, there is usually some config that we exclude from the automated management - usually to allow clients to make changes in the admin UI without needing to access the codebase. So this is a handy trick to have available when you just need to script some changes outside of config management.
Under the hood, the consolidation/output-formatters library is what provides output formatters. If you run drush help version you can get a list of other standard formatters, which includes:
-
yaml
-
The key-value format usually used for configuration exports.
-
csv
-
Comma-separated values; ideal for simple lists
-
php
-
The format that PHP's internal serialize() method produces.
-
var_dump
-
Probably my new favourite; as produces coloured syntax highlighting in the terminal output! It is powered by Symfony's VarDumper component. I have found this particularly useful recently when debugging the output from a remote API endpoint, to help me visually parse clumps of output.
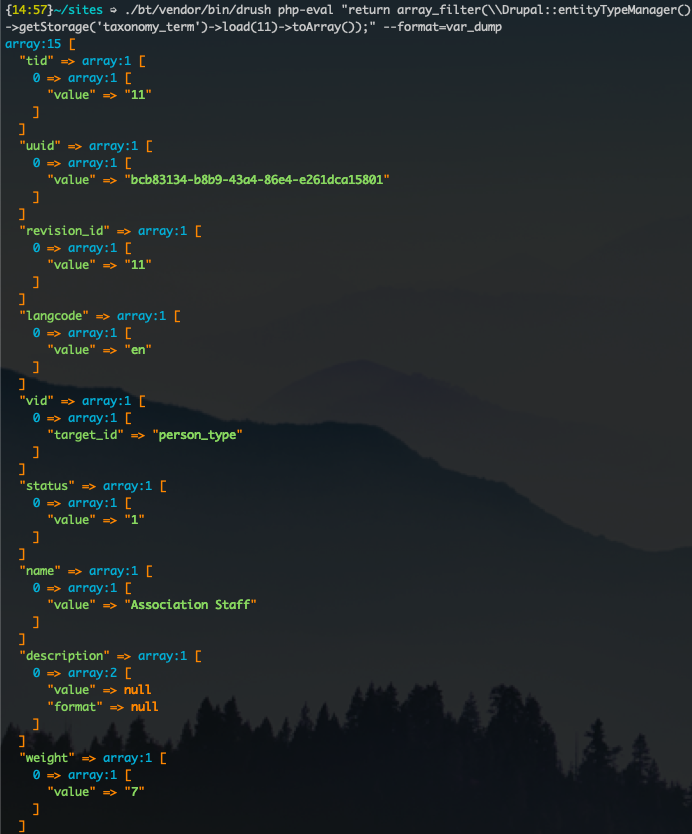
As a bonus, this can be useful for quickly loading up an entity to inspect its field values:
getStorage('taxonomy_term')->load(11)->toArray());" --format=var_dump`" data-entity-type="file" data-entity-uuid="9930f0b8-e138-4ae8-8432-1e42a2e7086b" src="https://www.computerminds.co.uk/sites/default/files/inline-images/drush-var-dumping.png" width="692" height="834" loading="lazy" /> My output from drush php-eval "return array_filter(\\Drupal::entityTypeManager()->getStorage('subscriber')->load(127)->toArray());" --format=var_dump
...which feels rather like a good case for a custom drush command, just taking an entity type and ID as arguments ;-)
What other handy uses of specifying an output format can you come up with? Let me know!
FSF Blogs: There are plenty of ways to socialize at LibrePlanet 2024: Cultivating Community
There are plenty of ways to socialize at LibrePlanet 2024: Cultivating Community
Real Python: Install and Execute Python Applications Using pipx
A straightforward way to distribute desktop and command-line applications written in Python is to publish them on the Python Package Index (PyPI), which hosts hundreds of thousands of third-party packages. Many of these packages include runnable scripts, but using them requires decent familiarity with the Python ecosystem. With pipx, you can safely install and execute such applications without affecting your global Python interpreter.
In this tutorial, you’ll learn how to:
- Turn the Python Package Index (PyPI) into an app marketplace
- Run installed applications without explicitly calling Python
- Avoid dependency conflicts between different applications
- Try throw-away applications in temporary locations
- Manage the installed applications and their environments
To fully benefit from this tutorial, you should feel comfortable around the terminal. In particular, knowing how to manage Python versions, create virtual environments, and install third-party modules in your projects will go a long way.
Note: If you’re a Windows user, then it’s highly recommended you follow our Python coding setup guide before plunging into this tutorial. The gist of it is that you should avoid installing Python from the Microsoft Store, as it could prevent pipx from working correctly.
To help you get to grips with pipx, you can download the supplemental materials, which include a handy command cheat sheet. Additionally, you can test your understanding by taking a short quiz.
Get Your Cheatsheet: Click here to download the free cheatsheet of pipx commands you can use to install and execute Python applications.
Take the Quiz: Test your knowledge with our interactive “Install and Execute Python Applications Using pipx” quiz. Upon completion you will receive a score so you can track your learning progress over time:
Get Started With pipxOn the surface, pipx resembles pip because it also lets you install Python packages from PyPI or another package index. However, unlike pip, it doesn’t install packages into your system-wide Python interpreter or even an activated virtual environment. Instead, it automatically creates and manages virtual environments for you to isolate the dependencies of every package that you install.
Additionally, pipx adds symbolic links to your PATH variable for every command-line script exposed by the installed packages. As a result, you can invoke those scripts directly from the command line without explicitly running them through the Python interpreter.
Think of pipx as Python’s equivalent of npx in the JavaScript ecosystem. Both tools let you install and execute third-party modules in the command line just as if they were standalone applications. However, not all modules are created equal.
Broadly speaking, you can classify the code distributed through PyPI into three categories:
- Importable: It’s either pure-Python source code or Python bindings of compiled shared objects that you want to import in your Python projects. Typically, they’re libraries like Requests or Polars, providing reusable pieces of code to help you solve a common problem. Alternatively, they might be frameworks like FastAPI or PyGame that you build your applications around.
- Runnable: These are usually command-line utility tools like black, isort, or flake8 that assist you during the development phase. They could also be full-fledged applications like bpython or the JupyterLab environment, which is primarily implemented in a foreign TypeScript programming language.
- Hybrid: They combine both worlds by providing importable code and runnable scripts at the same time. Flask and Django are good examples, as they offer utility scripts while remaining web frameworks for the most part.
Making a distribution package runnable or hybrid involves defining one or more entry points in the corresponding configuration file. Historically, these would be setup.py or setup.cfg, but modern build systems in Python should generally rely on the pyproject.toml file and define their entry points in the [project.scripts] TOML table.
Note: If you use Poetry to manage your project’s dependencies, then you can add the appropriate script declarations in the tool-specific [tool.poetry.scripts] table.
Each entry point represents an independent script that you can run by typing its name at the command prompt. For example, if you’ve ever used the django-admin command, then you’ve called out an entry point to the Django framework.
Note: Don’t confuse entry points, which link to individual functions or callables in your code, with runnable Python packages that rely on the __main__ module to provide a command-line interface.
For example, Rich is a library of building blocks for creating text-based user interfaces in Python. At the same time, you can run this package with python -m rich to display a demo application that illustrates various visual components at your fingertips. Despite this, pipx won’t recognize it as runnable because the library doesn’t define any entry points.
To sum up, the pipx tool will only let you install Python packages with at least one entry point. It’ll refuse to install runnable packages like Rich and bare-bones libraries that ship Python code meant just for importing.
Once you identify a Python package with entry points that you’d like to use, you should first create and activate a dedicated virtual environment as a best practice. By keeping the package isolated from the rest of your system, you’ll eliminate the risk of dependency conflicts across various projects that might require the same Python library in different versions. Furthermore, you won’t need the superuser permissions to install the package.
Deciding where and how to create a virtual environment and then remembering to activate it every time before running the corresponding script can become a burden. Fortunately, pipx automates these steps and provides even more features that you’ll explore in this tutorial. But first, you need to get pipx running itself.
Test Drive pipx Without InstallationIf you’re unsure whether pipx will address your needs and would prefer not to commit to it until you’ve properly tested the tool, then there’s good news! Thanks to a self-contained executable available for download, you can give pipx a spin without having to install it.
To get that executable, visit the project’s release page on the official GitHub repository in your web browser and grab the latest version of a file named pipx.pyz. Files with the .pyz extension represent runnable Python ZIP applications, which are essentially ZIP archives containing Python source code and some metadata, akin to JAR files in Java. They can optionally vendor third-party dependencies that you’d otherwise have to install by hand.
Note: Internally, the pipx project uses shiv to build its Python ZIP application. When you first run a Python ZIP application that was built with shiv, it’ll unpack itself into a hidden folder named .shiv/ located in your user’s home directory. As a result, subsequent runs of the same application will reuse the already extracted files, speeding up the startup time.
Afterward, you can run pipx.pyz by passing the path to your downloaded copy of the file to your Python interpreter—just as you would with a regular Python script:
Read the full article at https://realpython.com/python-pipx/ »[ Improve Your Python With 🐍 Python Tricks 💌 – Get a short & sweet Python Trick delivered to your inbox every couple of days. >> Click here to learn more and see examples ]
Django Weblog: Django bugfix release issued: 5.0.4
Today we've issued the 5.0.4 bugfix release.
The release package and checksums are available from our downloads page, as well as from the Python Package Index. The PGP key ID used for this release is Natalia Bidart: 2EE82A8D9470983E.
Django 3.2 has reached the end of extended supportNote that with this release, Django 3.2 has reached the end of extended support. All Django 3.2 users are encouraged to upgrade to Django 4.2 or later to continue receiving fixes for security issues.
See the downloads page for a table of supported versions and the future release schedule.
Robin Wilson: Simple self-hosted OpenStreetMap routing using Valhalla and Docker
I came up with an interesting plan for an artistic map recently (more on that when I’ve finished working on it), and to create it I needed to be able to calculate a large number of driving routes around Southampton, my home city.
Specifically, I needed to be able to get lines showing the driving route from A to B for around 5,000 combinations of A and B. I didn’t want to overload a free hosted routing server, or have to deal with rate limiting – so I decided to look into running some sort of routing service myself, and it was actually significantly easier than I thought it would be.
It so happened that I’d come across a talk recently on a free routing engine called Valhalla. I hadn’t actually watched the talk yet (it is on my ever-expanding list of talks to watch), but it had put the name into my head – so I started investigating Valhalla. It seemed to do what I wanted, so I started working out how to run it locally. Using Docker, it was nice and easy – and to make it even easier for you, here’s a set of instructions.
-
Download an OpenStreetMap extract for your area of interest. All of your routes will need to be within the area of this extract. I was focusing on Southampton, UK, so I downloaded the Hampshire extract from the England page on GeoFabrik. If you start from the home page you should be able to navigate to any region in the world.
-
Put the downloaded file (in this case, hampshire-latest.osm.pbf) in a folder called custom_files. You can download multiple files and put them all in this folder and they will all be processed.
-
Run the following Docker command:
docker run -p 8002:8002 -v $PWD/custom_files:/custom_files ghcr.io/gis-ops/docker-valhalla/valhalla:latestThis will run the valhalla Docker image, exposing port 8002 and mapping the custom_files subdirectory to /custom_files inside the container. Full docs for the Docker image are available here.
-
You’ll see various bits of output as Valhalla processes the OSM extract, and eventually the output will stop appearing and the API server will start.
-
Visit http://localhost:8002 and you should see an error – this is totally expected, it is just telling you that you haven’t used one of the valid API endpoints. This shows that the server is running properly.
-
Start using the API. See the documentation for instructions on what to pass the API.
Once you’ve got the server running, it’s quite easy to call the API from Python and get the resulting route geometries as Shapely LineString objects. These can easily be put into a GeoPandas GeoDataFrame. For example:
import urllib import requests from pypolyline.cutil import decode_polyline # Set up the API request parameters - in this case, from one point # to another, via car data = {"locations":[ {"lat":from_lat,"lon":from_lon},{"lat":to_lat,"lon":to_lon}], "costing":"auto"} # Convert to JSON and make the URL path = f"http://localhost:8002/route?json={urllib.parse.quote(json.dumps(data))}" # Get the URL resp = requests.get(path) # Extract the geometry of the route (ie. the line from start to end point) # This is in the polyline format that needs decoding polyline = bytes(resp.json()['trip']['legs'][0]['shape'], 'utf8') # Decode the polyline decoded_coords = decode_polyline(polyline, 6) # Convert to a shapely LineString geom = shapely.LineString(decoded_coords)To run this, you’ll need to install pypolyline and requests.
Note that you need to pass a second parameter of 6 into decode_polyline or you’ll get nonsense out (this parameter tells it that it is in polyline6 format, which seems to not be documented particularly well in the Valhalla documentation). Also, I’m sure there is a better way of passing JSON in a URL parameter using requests, but I couldn’t find it – whatever I did I got a JSON parsing error back from the API. The urllib.parse.quote(json.dumps(data)) code was the simplest thing I found that worked.
This code could easily be extended to work with multi-leg routes, to extract other data like the length or duration of the route, and more. The Docker image can also do more, like load public transport information, download OSM files itself and even more – see the docs for more on this.
Check back soon to see how I used this for some cool map-based art.
Guido Günther: Free Software Activities March 2024
A short status update of what happened on my side last month. I spent quiet a bit of time reviewing new, code (thanks!) as well as maintenance to keep things going but we also have some improvements:
Phosh- Release phosh 0.37.0
- Add support for progress indicator and counts to lockscreen launcher entries: Merge request, Demo using Phosh-EV's charge status as example (Merge request)
- Fix 5G with MM: Merge Request
- Doc updates: Merge Request
- Drop builtin session support Merge request
- Support gnome-session 45/46: Merge request
- Add plymouth theme: Merge Request
- OSD improvements: Merge Request
- Monitor: Only use wl_output_done and background fixes: Merge Request
- Support phones with rounded display corners: Merge Request
- CI maintenance: Merge Request
- More fractional scale fixes: Merge Request
- Dedup pointer constrain code: Merge Request
- xdg-shell: Check serial on move/resize: Merge Request
- Add an animation when toggling always on top: Merge Request
- Make ViewChild a GObject: Merge Request
- Validate more things during build: Merge Request
- Update to wlroots 0.17.2: Merge Request
- CI maintenance: Merge Request
- Detect and optionally disable when hardware keyboard is present: Merge Request
- Coloring fixes for HighContrast: Merge Request
- CI maintenance: Merge Request
- Make a shared library: Merge Request
- Let it work with recent json-glib : Merge Request
- Allow to preprocess pasted URLs: Merge request
- Bump GTK dependency and add fallback so we can land Robert's GtkOffload support: Merge request
- Allow to list recent videos: Merge request
- Check for Wayland support early: Merge Request
- Build against newer dependencies: Merge Request
- Forward to glib 2-58: Merge Request
- CI maintenance: Merge Request
- Release 46.0: Merge Request
- Don't export too many symbols: Merge Request
If you want to support my work see donations.
Tag1 Consulting: Drupal Core Test Suite Improved Runtime By 10% With Gander
The Drupal community has continuously sought ways to enhance the performance and efficiency of Drupal sites. The performance testing framework Gander has been part of Drupal core since version 10.2. The result of joint efforts between the Google Chrome team and Tag1 Consulting, this powerful tool is specifically designed to optimize Drupal performance. Optimized performance ensures that sites are not only fast but also efficient and sustainable. Today, we will take a closer look at how Gander played a crucial role in improving the Drupal core test suite runtime by 10%. ## Identifying A Core Performance Issue Gander's impact on Drupal development was recently highlighted by its identification of a performance issue within Drupal core. The issue (#3410312) reported a particular code section being called redundantly during automated test runs and on live websites, resulting in delays. ### The Bottleneck Identified Drupal is designed to use the flood system for user logins. It first checks if a flood protection table exists in the database. If it does not exist, Drupal postpones the creation of the table until it needs to write to it instead of creating the missing table immediately. What can happen is...
Read more janez Wed, 04/03/2024 - 02:00Pages
Recent Publications
- Managing Hidden Dependencies in OO Software: a Study Based on Open Source Projects
- Open Source Communities as Liminal Ecosystems
- Investigating developers' email discussions during decision-making in Python language evolution
- Developers, Quality Control and Download Volume in Open Source Software (OSS) Projects
FLOSS Project Planets
- Python Morsels: Multiline comments in Python
- The Drop Times: DrupalTO Meetup: Glimpses from the Event—Strategies for a Seamless Transition to Drupal 10
- Golems GABB: Boosting Productivity in Drupal with Composer 2
- Real Python: The Real Python Podcast – Episode #201: Decoupling Systems to Get Closer to the Data
- LN Webworks: Drupal Configuration Synchronization: A Simplified Guide
FLOSS Research
- Open Source AI Definition – Weekly update April 15
- Submit your proposal for All Things Open – Doing Business with Open Source
- Compelling responses to NTIA’s AI Open Model Weights RFC
- Open Source AI Definition – Weekly update April 8
- OSI participates in Columbia Convening on openness and AI; first readouts available